


Best Oil Filter Brand

Best Oil Filter Brand
The best oil filter brand for most drivers is FRAM Ultra Synthetic because it combines strong filtration efficiency, long service life, wide availability, and fair pricing.
The simple answer is this: if you want one safe pick, choose FRAM Ultra Synthetic. If you want OEM-style reliability, choose the factory filter from Mopar, Motorcraft, ACDelco, Toyota, Honda, or Mazda. If you tow, haul, or run long synthetic oil intervals, consider WIX XP, Purolator Boss, Mobil 1 Extended Performance, Royal Purple, or AMSOIL.
FRAM Ultra Synthetic is rated for up to 20,000 miles and claims 99%+ filtration efficiency with synthetic-blend media. WIX XP is also built for full-synthetic oil changes, severe service, towing, hauling, and extended intervals up to 20,000 miles / 32,186 km.
Best Overall: FRAM Ultra Synthetic
FRAM Ultra Synthetic is the best overall oil filter for most normal cars, trucks, and SUVs.
It is easy to find, usually priced well, and designed for synthetic oil intervals. The biggest advantage is filtration efficiency. FRAM advertises 99%+ filtration efficiency, which makes it one of the strongest mainstream choices for everyday protection.
This is the filter I would recommend for most drivers who want a good balance of price, protection, and availability.
Best OEM Choice: Factory Oil Filter
If you want the safest answer for a newer vehicle, use the OEM oil filter.
That means:
Mopar for Chrysler, Dodge, Jeep, Ram.
Motorcraft for Ford and Lincoln.
ACDelco for GM.
Toyota Genuine for Toyota and Lexus.
Honda Genuine for Honda and Acura.
Mazda Genuine for Mazda.
Subaru Genuine for Subaru.
OEM filters are designed around the engine’s bypass valve setting, flow needs, filter size, and service interval. They may not always be the “highest performance” filter on paper, but they are usually the least risky choice.
For dealership customers, OEM is often the best recommendation because it avoids fitment problems and warranty arguments.
Best for Trucks and Towing: WIX XP
WIX XP is a strong choice for trucks, towing, hauling, and severe-service driving.
WIX says the XP line is designed for full synthetic oil changes, heavy-duty use, towing, hauling, and demanding conditions. It also uses a silicone anti-drainback valve, which helps reduce dry starts after the engine sits.
This is a good choice for Ram 1500, Ram 2500, Jeep Grand Cherokee, Dodge Durango, Ford F-150, Silverado, Sierra, and other trucks or SUVs that work harder than normal commuter cars.
Best Premium Filter: Royal Purple or AMSOIL
Royal Purple and AMSOIL are premium choices for owners who want high-end filtration and are willing to pay more.
These brands are often popular with enthusiasts, long-interval synthetic oil users, and people who are very picky about oil filtration. They are not always necessary for normal 5,000-mile oil changes, but they make sense if you want premium construction and strong protection.
For most drivers, FRAM Ultra Synthetic or OEM is enough. For enthusiasts, Royal Purple and AMSOIL are worth considering.
Best Budget Filter: OEM or FRAM Tough Guard
If you are changing oil every 5,000 miles, you do not always need the most expensive filter.
A good OEM filter or FRAM Tough Guard is usually enough for regular maintenance intervals. The key is to avoid ultra-cheap no-name filters with questionable construction.
Do not save $4 on a filter if your engine costs thousands to repair.
Brands I Trust
The oil filter brands I would trust most are:
FRAM Ultra Synthetic.
WIX XP.
OEM filters.
Purolator Boss.
Mobil 1 Extended Performance.
Royal Purple.
AMSOIL.
Bosch Premium.
K&N Performance.
ACDelco Gold.
Motorcraft.
For most daily drivers, the top three are simple: FRAM Ultra Synthetic, OEM, or WIX XP.
FRAM vs WIX
FRAM Ultra Synthetic is usually the better pick if your priority is filtration efficiency and easy availability.
WIX XP is a strong pick if your priority is severe-service use, towing, hauling, and synthetic oil intervals.
Both are good. The better one depends on how you drive.
For a commuter car, I would choose FRAM Ultra Synthetic.
For a truck that tows or works hard, I would choose WIX XP or OEM.
Mobil 1 Oil Filters
Mobil 1 Extended Performance oil filters are still a good premium option.
They are widely available, built for extended synthetic oil intervals, and trusted by many drivers. They are not always the cheapest, and some oil-filter enthusiasts debate their value compared with FRAM Ultra or WIX XP, but they remain a safe mainstream premium choice.
If you already use Mobil 1 oil and want a matching filter, Mobil 1 Extended Performance is fine.
K&N Oil Filters
K&N oil filters are popular, especially with enthusiasts.
Their main appeal is easy removal because many have a welded nut on the end of the filter. That is useful in tight engine bays or for DIY oil changes.
However, I would not choose K&N only because of the name. It is a good filter, but for pure value and filtration, FRAM Ultra Synthetic, WIX XP, OEM, or Purolator Boss may be stronger choices.
Does the Oil Filter Brand Really Matter?
Yes, but only up to a point.
A good filter matters because it removes contaminants, holds debris, resists collapse, keeps oil flowing, and prevents dry starts when equipped with a quality anti-drainback valve.
But oil filter brand is not more important than using the correct oil, changing it on time, and using the correct filter part number.
A premium filter used too long is worse than a good filter changed on schedule.
What to Look for in a Good Oil Filter
A good oil filter should have:
Correct fitment.
Strong filtration efficiency.
Good dirt-holding capacity.
Proper bypass valve setting.
Silicone anti-drainback valve when applicable.
Strong internal construction.
Compatibility with synthetic oil.
A service interval that matches your oil-change plan.
Do not just buy the filter that physically screws on. Use the exact part number recommended for your vehicle.
Best Oil Filter for Synthetic Oil
For synthetic oil, use:
FRAM Ultra Synthetic.
WIX XP.
Mobil 1 Extended Performance.
Purolator Boss.
Royal Purple.
AMSOIL.
OEM extended-life filters where available.
Synthetic oil often supports longer intervals, so the filter needs enough capacity and construction quality to match.
Best Oil Filter for Older Vehicles
For older vehicles, I would usually use OEM, FRAM Ultra Synthetic, WIX, or Purolator.
If the engine has high mileage, leaks, sludge history, or poor maintenance history, avoid stretching the oil interval too long. Use a quality filter and change the oil more often.
A better filter helps, but it will not fix worn rings, low oil pressure, sludge, or internal engine wear.
Final Answer
The best oil filter brand for most people is FRAM Ultra Synthetic.
The best safe choice for newer vehicles is OEM.
The best truck and towing choice is WIX XP.
The best premium enthusiast choices are Royal Purple and AMSOIL.
For a normal daily driver, I would buy FRAM Ultra Synthetic or OEM without overthinking it. For a Ram, Jeep, Dodge, Ford, Chevy, Toyota, Honda, or Mazda that is still under warranty, OEM is the cleanest recommendation.
How Much Does a RAM 2500 Weigh

How Much Does a Ram 2500 Weigh?
A Ram 2500 usually weighs about 6,400 to 8,200 pounds, depending on cab style, drivetrain, bed length, trim, engine, and options.
The simple answer is this: a gas Ram 2500 is usually in the mid-6,000-pound range, while a Cummins diesel Ram 2500 can climb into the 7,000 to 8,000-pound range. A 2026 Ram 2500 Tradesman Crew Cab 4×4 with the 6.4L gas V8 is listed by Edmunds at 6,680 pounds curb weight, while a 2026 Ram 2500 Laramie Mega Cab 4×4 diesel is listed at 8,137 pounds. Edmunds diesel specs
What Is Curb Weight?
Curb weight is the truck’s weight with standard equipment and fluids, but without passengers or cargo.
That means curb weight does not include your tools, trailer tongue weight, passengers, cargo, bed cover, fifth-wheel hitch, fuel cans, aftermarket bumpers, lift kit, larger tires, or work equipment.
When people ask, “How much does a Ram 2500 weigh?” they usually mean curb weight. But if you are towing or hauling, GVWR and payload matter more.
Ram 2500 Gas Weight
A gas Ram 2500 is usually lighter than a diesel Ram 2500.
The 6.4L HEMI V8 model is often around 6,500 to 7,000 pounds, depending on configuration. As noted above, Edmunds lists a 2026 Ram 2500 Tradesman Crew Cab 4×4 short bed gas model at 6,680 pounds.
Gas models are lighter because the engine, cooling system, emissions equipment, and related hardware are not as heavy as the Cummins diesel setup.
That lower weight usually helps payload. This is why gas Ram 2500 models can sometimes carry more payload than diesel versions.
Ram 2500 Diesel Weight
A Ram 2500 diesel is heavier because of the Cummins engine and supporting hardware.
The 6.7L Cummins turbo diesel adds serious weight, but it also gives the truck more torque and stronger towing confidence. Edmunds lists a 2026 Ram 2500 Laramie Mega Cab 4×4 diesel at 8,137 pounds curb weight.
That is why diesel payload can be lower even though diesel towing can be higher. The truck’s GVWR is fixed, so the heavier diesel engine uses up more of the truck’s allowed weight before passengers or cargo are added.
Ram 2500 GVWR
GVWR means Gross Vehicle Weight Rating.
It is the maximum safe loaded weight of the truck, including the truck itself, passengers, cargo, accessories, and trailer tongue weight.
Ram’s official 2026 Ram 2500 specs page lists a common 10,000-pound GVWR for many configurations. Ram 2500 specs Ram also lists maximum available GVWR up to 11,040 pounds on its 2026 Ram 2500 capability page. Ram capability
That means the truck may weigh 6,600 to 8,100 pounds empty, but it can safely weigh much more when loaded, depending on the exact configuration.
Curb Weight vs GVWR
Curb weight is the truck empty.
GVWR is the truck loaded to its maximum allowed weight.
For example, if a Ram 2500 has a 10,000-pound GVWR and weighs 6,680 pounds empty, the remaining capacity is roughly 3,320 pounds for passengers, cargo, and added equipment. That matches the payload listing for the 2026 Ram 2500 Tradesman Crew Cab 4×4 gas configuration on Edmunds.
If a diesel Mega Cab weighs 8,137 pounds and has a GVWR around 10,000 pounds, payload drops significantly because the truck itself already uses more of the weight rating.
Why Ram 2500 Weight Changes So Much
Ram 2500 weight changes because the truck can be configured many different ways.
A Regular Cab gas 4×2 work truck is much lighter than a Mega Cab 4×4 diesel Laramie. A long bed can add weight. Four-wheel drive adds weight. Diesel adds weight. Higher trims add features, sound insulation, larger wheels, leather, power equipment, and more technology.
Weight is affected by:
Engine choice.
Gas vs diesel.
2WD vs 4WD.
Regular Cab vs Crew Cab vs Mega Cab.
Short bed vs long bed.
Trim level.
Wheel and tire package.
Tow package.
Fifth-wheel prep.
Bedliner.
Running boards.
Aftermarket accessories.
This is why the exact door sticker matters more than a general online number.
How Much Does a Ram 2500 Crew Cab Weigh?
A Ram 2500 Crew Cab usually weighs around 6,600 to 7,800 pounds, depending on engine and drivetrain.
A gas Crew Cab 4×4 can sit around the high-6,000-pound range. A diesel Crew Cab 4×4 can move well into the 7,000-pound range.
The Crew Cab is the most common setup because it balances passenger space, bed usability, and towing capability.
How Much Does a Ram 2500 Mega Cab Weigh?
A Ram 2500 Mega Cab is one of the heaviest configurations.
Mega Cab models are larger and usually paired with higher trims and 4WD, so they often weigh more than a standard Crew Cab. Diesel Mega Cab models can exceed 8,000 pounds empty, as shown by the 2026 Ram 2500 Laramie Mega Cab 4×4 diesel at 8,137 pounds.
The Mega Cab is great for interior space, but the extra weight reduces payload.
Is the Ram 2500 Heavier Than a Ram 1500?
Yes, the Ram 2500 is much heavier than a Ram 1500.
A Ram 1500 is a light-duty pickup. A Ram 2500 is a heavy-duty pickup with stronger frame components, heavier suspension, larger axles, bigger brakes, stronger towing hardware, and available diesel power.
That extra weight is why the Ram 2500 can handle heavier trailers and payloads, but it also affects ride, fuel use, tire cost, and maneuverability.
Why Truck Weight Matters
Truck weight matters for towing, payload, registration, braking, tire load rating, trailer setup, and legal limits.
If you tow, you need to understand curb weight, GVWR, GCWR, payload, axle ratings, and tongue weight. A heavy diesel truck may tow more, but it may have less payload left for a fifth-wheel hitch, passengers, cargo, and tools.
Ram’s 2026 capability page lists up to 20,000 pounds maximum available high-output diesel towing and up to 3,930 pounds maximum gas payload. Ram capability That shows the tradeoff clearly: diesel is usually the towing choice, gas is often the payload choice.
How to Find Your Exact Ram 2500 Weight
The most accurate number is on the driver-side door sticker and build sheet.
Look for:
GVWR.
GAWR front.
GAWR rear.
Payload rating.
Tire and loading information.
VIN-specific equipment.
Online specs are useful, but your exact truck may weigh more or less because of options. If you have added a toolbox, fifth-wheel hitch, bed cover, winch bumper, lift kit, bigger tires, or work gear, the real-world weight can be very different.
For the most accurate number, take the truck to a public scale or CAT scale.
Final Answer
A Ram 2500 usually weighs:
Gas Ram 2500: about 6,400 to 7,000 pounds
Diesel Ram 2500: about 7,200 to 8,200 pounds
Crew Cab 4×4 gas example: about 6,680 pounds
Mega Cab 4×4 diesel example: about 8,137 pounds
Most Ram 2500 models have a GVWR around 10,000 pounds, with some configurations rated higher. The exact weight depends on engine, cab, bed, drivetrain, trim, and options, so check the door sticker for the final number.
How Much Does A Jeep Wrangler Weigh
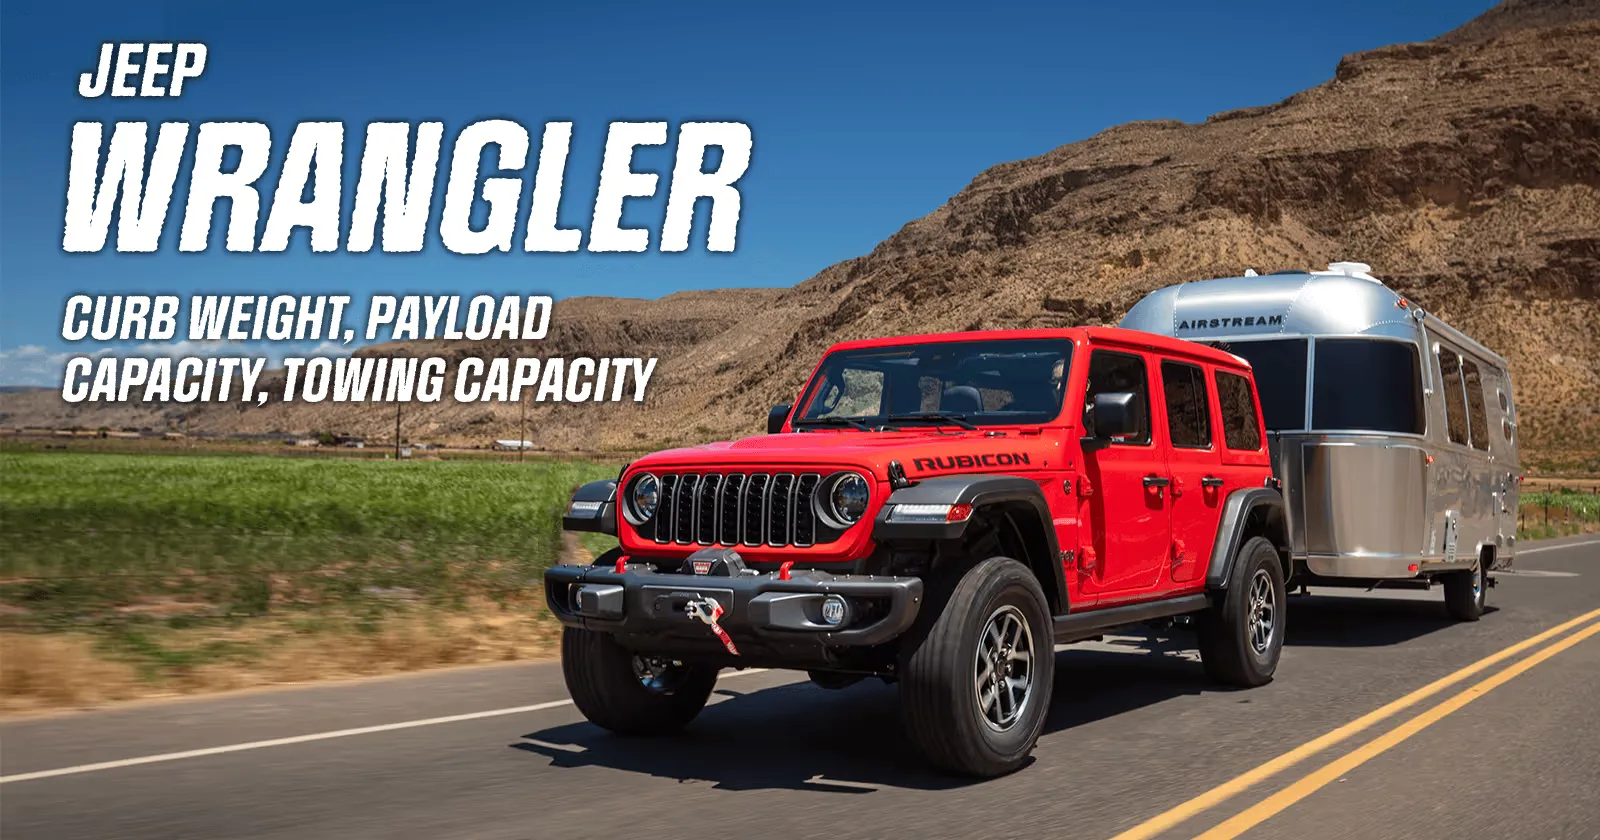
How Much Does a Jeep Wrangler Weigh?
A Jeep Wrangler usually weighs between 4,005 and 5,268 pounds, depending on the body style, trim, engine, roof, and equipment.
The simple answer is this: a 2-door Jeep Wrangler is usually just over 4,000 pounds, while a 4-door Wrangler is usually in the mid-4,000-pound range. The heavier Wrangler 4xe plug-in hybrid and Rubicon 392 V8 models can weigh more than 5,000 pounds.
Jeep’s official Wrangler FAQ lists the 2026 Wrangler base curb-weight range at 4,005 to 4,422 pounds for 2-door models and 4,251 to 4,976 pounds for 4-door non-PHEV models. Jeep also lists the Wrangler’s Gross Vehicle Weight Rating, or GVWR, between 5,100 and 6,250 pounds.
What Is Curb Weight?
Curb weight means the vehicle’s weight before passengers and cargo.
It usually includes standard equipment and operating fluids, but it does not include your passengers, tools, roof rack, camping gear, winch, bigger tires, recovery equipment, or trailer tongue weight.
That matters because most shoppers asking “how much does a Jeep Wrangler weigh?” are really asking about curb weight. If you are towing, loading cargo, or modifying the Jeep, you also need to pay attention to payload and GVWR.
Jeep Wrangler 2-Door Weight
A 2-door Jeep Wrangler usually weighs about 4,005 to 4,422 pounds, depending on trim and equipment.
The 2-door Wrangler is lighter because it has a shorter wheelbase, smaller cabin, fewer doors, and less body structure than the 4-door Wrangler Unlimited. That lower weight helps it feel more agile on tight trails and easier to maneuver off-road.
Edmunds lists the 2026 Wrangler Sport S 2-door at 4,012 pounds curb weight. A 2-door Rubicon or Rubicon X can weigh more because of heavier off-road hardware, larger tires, and added trail equipment.
Jeep Wrangler 4-Door Weight
A 4-door Jeep Wrangler usually weighs about 4,251 to 4,976 pounds for non-PHEV models.
The 4-door Wrangler, also called the Wrangler Unlimited, is heavier because it has a longer wheelbase, extra doors, more passenger space, more cargo room, and added structure.
Edmunds lists a 2026 Wrangler Sport S 4-door at 4,285 pounds curb weight. That is a good real-world reference point for a common 4-door gas Wrangler.
Jeep Wrangler Rubicon Weight
A Jeep Wrangler Rubicon weighs more than a basic Wrangler because it adds serious off-road equipment.
Rubicon models can include heavier-duty axles, locking differentials, larger all-terrain tires, rock rails, skid plates, and trail-focused hardware. That equipment is great off-road, but it adds weight.
Edmunds lists the 2026 Wrangler Rubicon 4-door at 4,575 pounds curb weight. A 2-door Rubicon is lighter, with Edmunds listing one 2026 Rubicon 2-door configuration at 4,246 pounds.
Jeep Wrangler 4xe Weight
The Wrangler 4xe is heavier than a regular gas Wrangler.
That is because the 4xe adds a plug-in hybrid battery pack, electric motor components, charging hardware, and hybrid control systems. The extra weight is the tradeoff for electric driving capability and strong instant torque.
Edmunds lists the 2025 Wrangler 4xe Sport S at 5,049 pounds curb weight, while the Wrangler 4xe Rubicon is listed at 5,226 pounds.
Jeep Wrangler Rubicon 392 Weight
The Rubicon 392 is one of the heaviest Wrangler versions.
It uses a 6.4L HEMI V8 and includes performance and off-road hardware that adds weight. Car and Driver lists the 2025 Wrangler Rubicon 392 Final Edition at 5,268 pounds curb weight.
That makes it much heavier than a basic 2-door Wrangler, but the extra power changes the driving experience completely.
Why Wrangler Weight Changes So Much
Wrangler weight changes because every version is built differently.
A soft-top 2-door Sport weighs much less than a loaded 4-door Rubicon 4xe or Rubicon 392. Hardtops, steel bumpers, larger wheels, bigger tires, winches, rock rails, skid plates, upgraded audio, roof racks, and off-road packages can all add weight.
Even two Wranglers from the same year can weigh differently if one has a soft top and manual transmission while the other has an automatic, hardtop, larger tires, and premium packages.
Curb Weight vs GVWR
Curb weight and GVWR are not the same.
Curb weight is the weight of the Jeep before people and cargo.
GVWR, or Gross Vehicle Weight Rating, is the maximum safe loaded weight of the vehicle. That includes the Jeep, passengers, cargo, accessories, fluids, and trailer tongue weight.
Jeep lists the 2026 Wrangler GVWR between 5,100 and 6,250 pounds, depending on configuration. Jeep Wrangler FAQ
This matters because adding accessories reduces how much payload you have left.
Why Jeep Wrangler Weight Matters
Wrangler weight affects fuel economy, braking, payload, towing, acceleration, tire wear, and off-road behavior.
A lighter 2-door Wrangler can feel better on tight trails. A heavier 4-door Wrangler can feel more stable on the highway. A 4xe or 392 gives you more power and capability, but the extra weight can affect braking, tire wear, and payload.
If you plan to add a lift kit, steel bumpers, winch, larger spare tire, roof rack, and camping gear, the weight can climb quickly.
How Much Weight Do Modifications Add?
Wrangler modifications can add hundreds of pounds.
A winch can add around 70 to 100 pounds depending on setup. Steel bumpers can add much more than factory plastic bumpers. Larger tires and wheels add rotating weight. Roof racks, recovery boards, spare fuel, tools, jacks, and camping gear can push the Jeep closer to its GVWR.
That is why serious overland and off-road builds should be weighed after modification. A Wrangler can become overloaded faster than many owners expect.
Is a Jeep Wrangler Heavy?
Yes, a Wrangler is fairly heavy for its size.
It is not huge like a full-size SUV, but it carries rugged 4×4 hardware, a removable roof structure, off-road suspension components, strong axles, skid protection, and available hybrid or V8 powertrains.
That is why a Wrangler can weigh more than some people expect when they compare it to a normal compact or midsize SUV.
Final Answer
A Jeep Wrangler usually weighs:
2-door Wrangler: about 4,005 to 4,422 pounds
4-door gas Wrangler: about 4,251 to 4,976 pounds
Wrangler 4xe: about 5,049 to 5,226 pounds
Wrangler Rubicon 392: about 5,268 pounds
The exact weight depends on trim, engine, roof, tires, packages, and accessories. For the most accurate number, check the driver-side door sticker, build sheet, or official specifications for that exact Wrangler.
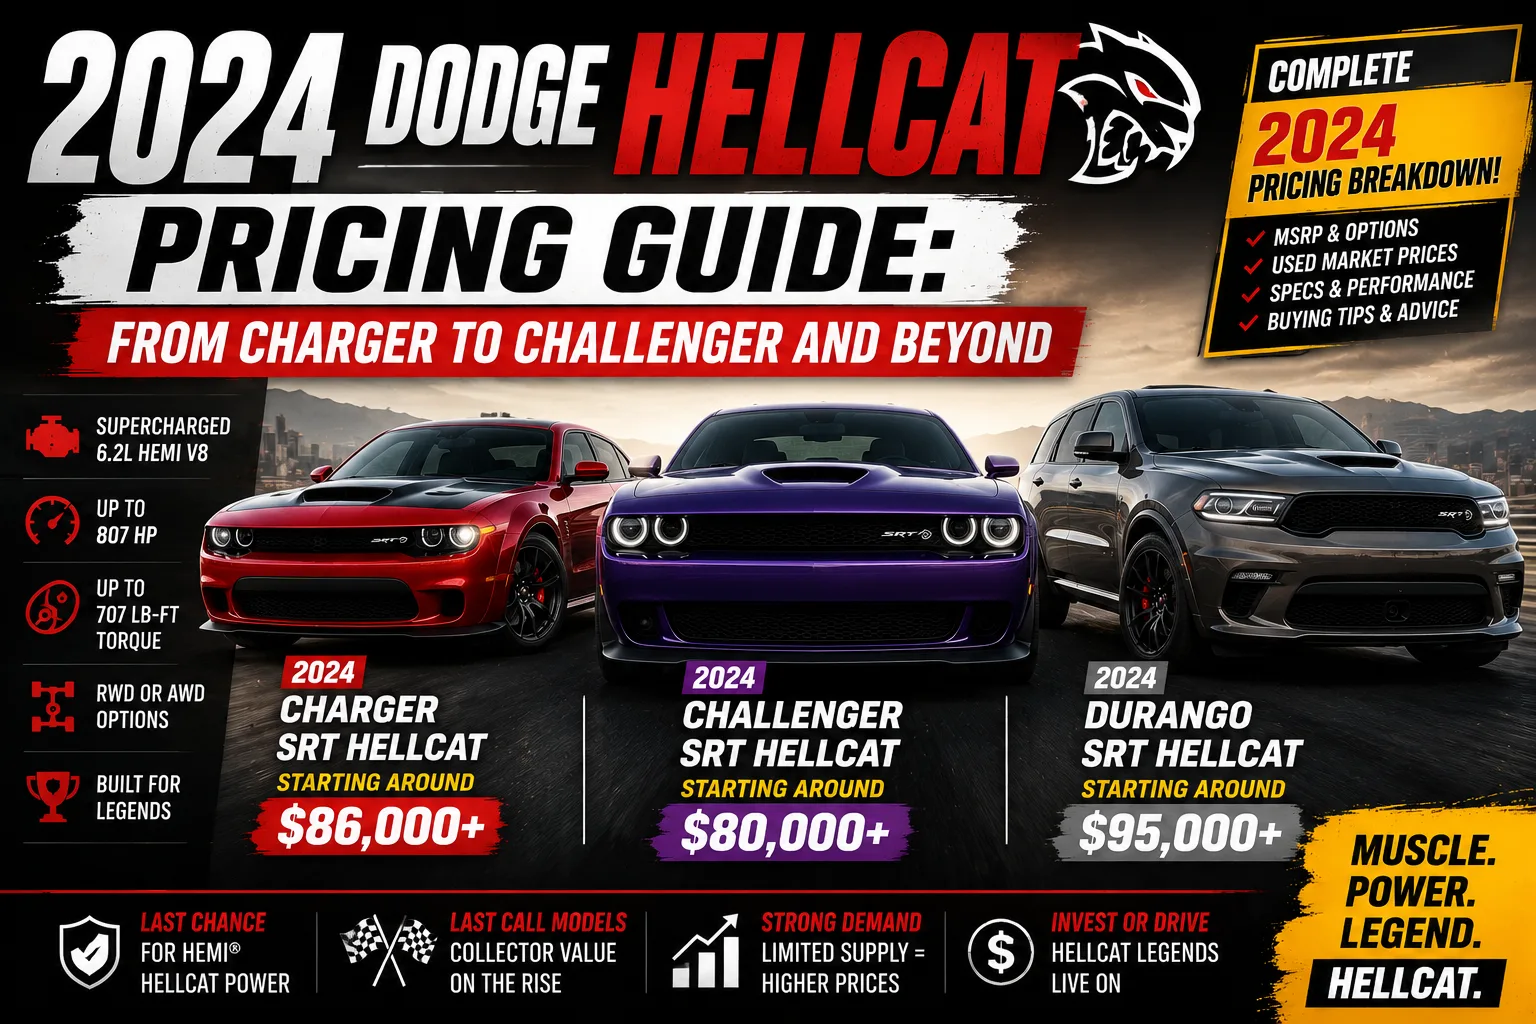
2024 Dodge Hellcat Pricing Guide: From Charger to Challenger and Beyond
The biggest thing to know is this: there was no new 2024 Dodge Charger Hellcat or 2024 Dodge Challenger Hellcat. Dodge ended the gas-powered Charger and Challenger after the 2023 model year, so any “2024 Hellcat Charger” or “2024 Hellcat Challenger” listing is usually a leftover 2023, a used model, or a dealer listing using the wrong year.
The only true new 2024 Dodge Hellcat model shoppers could realistically point to was the 2024 Dodge Durango SRT Hellcat, the three-row SUV with the supercharged 6.2L HEMI V8. Edmunds lists the 2024 Durango SRT Hellcat Plus at $103,590 MSRP, while CarPro reviewed a 2024 Durango SRT Hellcat with a $95,995 base price and $109,190 as-tested price.
So the 2024 Hellcat pricing guide comes down to three buckets: new Durango Hellcat pricing, used or leftover Charger Hellcat pricing, and used or leftover Challenger Hellcat pricing.
Was There a 2024 Dodge Charger Hellcat?
No, there was no new 2024 Dodge Charger Hellcat.
The last gas-powered Charger Hellcat belonged to the 2023 model year. Dodge’s own Charger SRT page now frames the model as “Remembering the Beast,” which tells you exactly where the old supercharged Charger stands in Dodge history.
That means if you are shopping in 2024 or later, Charger Hellcat pricing depends heavily on mileage, trim, condition, color, options, accident history, collector demand, and whether it is a standard Hellcat, Redeye, Widebody, or Jailbreak.
2023 Dodge Charger Hellcat Pricing Reference
The 2023 Charger Hellcat is the closest reference point for shoppers asking about a 2024 Charger Hellcat.
Car and Driver listed the 2023 Dodge Charger SRT Hellcat lineup from $86,365 to $95,960, depending on trim and options.
That range covered factory MSRP, not today’s used-market pricing. Real market prices can be higher or lower depending on supply, condition, and collector demand. Low-mile, final-year, rare-color, Jailbreak, or Redeye examples may command stronger money than higher-mile cars.
Was There a 2024 Dodge Challenger Hellcat?
No, there was no new 2024 Dodge Challenger Hellcat.
Like the Charger, the gas Challenger ended after the 2023 model year. Dodge’s official Challenger SRT page now presents the Challenger SRT as a past icon, highlighting its supercharged 6.2L HEMI V8 and Hellcat legacy rather than a current 2024 production model.
So any 2024 Challenger Hellcat “price” is really a used, leftover, auction, or collector-market price.
2023 Dodge Challenger Hellcat Pricing Reference
For the Challenger, the best baseline is also the 2023 model year.
Car and Driver listed the 2023 Dodge Challenger SRT Hellcat lineup from $71,895 to $92,895, depending on trim and options.
That range included multiple Hellcat-family versions. A standard Hellcat was cheaper than a Redeye Widebody Jailbreak. Special editions and final-year cars may carry market premiums, especially if mileage is low and documentation is clean.
2024 Dodge Durango SRT Hellcat Pricing
The 2024 Dodge Durango SRT Hellcat was the main new Hellcat-powered Dodge available in 2024.
This SUV used the supercharged 6.2L HEMI V8 and gave buyers Hellcat power with three rows, all-wheel drive, and real family-hauler utility. Dodge continues to position the Durango SRT Hellcat as the supercharged V8 performance SUV in the lineup.
For pricing, expect the 2024 Durango SRT Hellcat to sit roughly in the mid-$90,000 to low-$100,000 MSRP range before options, with heavily optioned examples climbing higher. Edmunds lists the 2024 SRT Hellcat Plus at $103,590 MSRP, while CarPro’s reviewed example had a $109,190 as-tested price.
Why Durango Hellcat Pricing Is So High
The Durango Hellcat costs more because it is not just a regular Durango with a louder exhaust.
It has a supercharged V8, standard all-wheel drive, upgraded cooling, performance brakes, performance suspension tuning, aggressive styling, and three-row practicality. It also exists in a market where new supercharged V8 vehicles are disappearing.
That scarcity matters. Buyers are not only paying for horsepower. They are paying for one of the last family-sized Hellcat-powered SUVs still standing.
What About the Ram TRX?
The Ram 1500 TRX is not a Dodge, but it belongs in any real Hellcat pricing discussion.
The TRX used a supercharged 6.2L HEMI V8 and became the Hellcat-powered off-road truck people still chase. It was discontinued after the Final Edition run, making used-market pricing especially sensitive to mileage and condition.
Car and Driver listed the 2024 Ram 1500 TRX from $98,335 to $119,620, depending on trim and options. That means the TRX often overlapped with Durango Hellcat pricing, but served a totally different buyer.
The Durango Hellcat is the family missile. The TRX is the desert-running supertruck.
What About the Jeep Trackhawk?
The Jeep Grand Cherokee Trackhawk is another Hellcat-powered legend, but it was not a 2024 model.
It used the supercharged 6.2L HEMI V8 and became famous as the “Hellcat Jeep.” Since it is discontinued, pricing is fully used-market based. Clean examples can remain expensive because the Trackhawk has no direct new replacement.
For buyers cross-shopping Hellcat vehicles, the Trackhawk still matters because it gives you Hellcat power, all-wheel drive, SUV practicality, and collector appeal.
Why 2024 Hellcat Pricing Got Complicated
Hellcat pricing became complicated because Dodge ended the old Charger and Challenger while keeping the Durango Hellcat alive.
That created a confusing market. Some shoppers searched for a 2024 Charger Hellcat or 2024 Challenger Hellcat even though those cars were not built as 2024 models. Others found leftover 2023 inventory sold during 2024 and assumed it was a 2024 car.
The model year matters. A final-year 2023 Charger or Challenger Hellcat may still be extremely desirable, but it is not a 2024 model.
New vs Used Hellcat Pricing
New Hellcat pricing in 2024 was mainly about the Durango SRT Hellcat.
Used Hellcat pricing was about everything else: Charger, Challenger, Trackhawk, TRX, and older Durango Hellcat models.
Used pricing changes based on:
Mileage.
Trim.
Widebody package.
Redeye package.
Jailbreak package.
Final-year status.
Color.
Accident history.
Service history.
Modifications.
Number of owners.
Original window sticker.
Dealer markup or collector premium.
A clean, stock Hellcat with low mileage usually brings stronger money than a modified one with unknown tuning.
Charger Hellcat vs Challenger Hellcat Pricing
The Challenger Hellcat often had a lower original starting MSRP than the Charger Hellcat, but the used market can vary.
The Challenger is the classic two-door muscle car. The Charger is the four-door muscle sedan. Some buyers prefer the Challenger for collectibility and old-school style. Others prefer the Charger because it gives Hellcat power with rear doors and real daily usability.
In the used market, the right trim matters more than the body style alone. A Challenger Redeye Widebody Jailbreak may cost more than a standard Charger Hellcat. A low-mile Charger Redeye may cost more than a higher-mile Challenger.
Is the Hellcat Still Worth Buying?
Yes, a Hellcat can still be worth buying if you understand the costs.
The supercharged 6.2L HEMI is one of the most iconic modern American performance engines. It delivers brutal power, unforgettable sound, and the kind of character that is disappearing from new vehicles.
But ownership is not cheap. Hellcats use more fuel, burn through tires faster, cost more to insure, and can be expensive to repair if abused or modified poorly.
Before buying used, inspect service records, tire condition, brake condition, accident history, tune status, pulley changes, cooling system, and drivetrain behavior.
Best Hellcat Value in 2024
The best value depends on the buyer.
The Challenger Hellcat is best if you want the classic muscle-car shape.
The Charger Hellcat is best if you want four-door practicality.
The Durango SRT Hellcat is best if you want three rows and all-wheel drive.
The Ram TRX is best if you want the supercharged V8 in a truck.
The Jeep Trackhawk is best if you want the discontinued Hellcat SUV icon.
For shoppers around Simi Valley, check used Dodge inventory for Charger, Challenger, Durango, and other performance models. If you want current Dodge options, browse new Dodge inventory.
FAQs About 2024 Dodge Hellcat Pricing
Is there a 2024 Dodge Charger Hellcat?
No. The gas-powered Dodge Charger Hellcat ended after the 2023 model year.
Is there a 2024 Dodge Challenger Hellcat?
No. The gas-powered Dodge Challenger Hellcat also ended after the 2023 model year.
What was the main 2024 Dodge Hellcat model?
The main new 2024 Dodge Hellcat model was the Dodge Durango SRT Hellcat.
How much did a 2024 Dodge Durango Hellcat cost?
A 2024 Durango SRT Hellcat generally landed in the mid-$90,000 to low-$100,000 MSRP range before options, with some optioned examples around or above $109,000.
How much was a 2023 Charger Hellcat?
Car and Driver listed the 2023 Charger SRT Hellcat range from $86,365 to $95,960, depending on trim and options.
How much was a 2023 Challenger Hellcat?
Car and Driver listed the 2023 Challenger SRT Hellcat range from $71,895 to $92,895, depending on trim and options.
Is a used Hellcat expensive to own?
Yes. Fuel, tires, brakes, insurance, repairs, and maintenance can be expensive, especially on modified or abused examples.
Final Thoughts: 2024 Was the Year Hellcat Became Scarcity-Driven
The 2024 Dodge Hellcat pricing story is really about transition.
The Charger Hellcat and Challenger Hellcat were gone as new models after 2023. The Durango SRT Hellcat carried the supercharged Dodge torch into 2024. The Ram TRX and Jeep Trackhawk remained part of the wider Hellcat conversation, but mostly through used and collector markets.
So the actual answer is clear: there was no 2024 Charger Hellcat or Challenger Hellcat, but the 2024 Durango SRT Hellcat kept Hellcat power alive, usually at roughly $96,000 to $109,000 depending on trim and options.
How to Jump-Start a Car Safely

How to Jump-Start a Car Safely
A dead battery is one of the most common car problems, but jump-starting a car has to be done in the right order. The simple answer is this: connect positive to positive first, connect the final negative clamp to a clean metal ground away from the dead battery, start the booster vehicle, start the dead car, then remove the cables in reverse order.
AAA warns not to jump-start a battery if the case is cracked, leaking, frozen, or physically damaged. That is the first safety rule. A jump-start is for a weak or dead battery, not a damaged one.
What You Need Before You Start
You need a working vehicle or a portable jump starter, a good set of jumper cables, gloves if available, and eye protection if you have it.
Before connecting anything, turn off both vehicles. Put both vehicles in Park or Neutral, set the parking brakes, and turn off lights, radio, climate control, heated seats, chargers, and accessories.
The vehicles should be close enough for the cables to reach, but they should not touch each other. AAA recommends positioning the cars so the cables can reach while keeping both ignitions off before making connections.
Step 1: Find the Battery Terminals
Open the hood and locate the battery terminals.
The positive terminal is usually marked with a + sign and may have a red cover. The negative terminal is usually marked with a – sign and may be black.
Some vehicles have remote jump-start posts instead of easy battery access. This is common on vehicles where the battery is in the trunk, under a seat, or hidden under covers. If your vehicle has remote jump points, use those instead of digging for the battery.
Always check the owner’s manual if you are unsure.
Step 2: Connect the Red Cable to the Dead Battery
Take the red positive clamp and connect it to the positive terminal of the dead battery.
Make sure the clamp has a solid grip on clean metal. If the terminal is covered in heavy corrosion, the connection may be weak. Do not let the red clamp touch any metal body parts after it is connected.
This is the first connection.
Step 3: Connect the Other Red Clamp to the Good Battery
Connect the other red positive clamp to the positive terminal of the good battery or the positive jump post on the booster vehicle.
At this point, both red clamps should be connected to positive terminals.
Do not mix up positive and negative. Reversing polarity can damage electronics, fuses, modules, alternators, and battery components.
Step 4: Connect the Black Cable to the Good Battery
Connect one black negative clamp to the negative terminal of the good battery.
This is the third connection.
Make sure the clamp is secure and not touching moving engine parts, belts, fans, or hot exhaust components.
Step 5: Connect the Final Black Clamp to a Metal Ground
Connect the final black negative clamp to a clean, unpainted metal surface on the vehicle with the dead battery.
Use a solid metal bracket, engine ground, or designated ground point away from the battery. Do not connect the final clamp directly to the dead battery’s negative terminal unless the owner’s manual tells you to.
AAA Oregon recommends connecting the last black clamp to a bare, unpainted metal surface on the engine block of the vehicle with the dead battery. This helps reduce spark risk near the battery.
Correct Jumper Cable Order
Use this order:
Red to dead battery positive.
Red to good battery positive.
Black to good battery negative.
Black to clean metal ground on the dead car.
That order matters. It reduces spark risk and helps protect the electrical system.
Step 6: Start the Booster Vehicle
Start the vehicle with the good battery.
Let it run for a few minutes. This gives the dead battery a small charge before you try to start the disabled vehicle.
Do not rev aggressively. A gentle idle is usually enough. If the battery is very weak, give it more time before trying.
Step 7: Start the Dead Car
Try to start the car with the dead battery.
Do not crank for too long. If it does not start after about 5 to 10 seconds, stop and wait a few minutes before trying again. Repeated long cranking can overheat the starter.
If the car still does not start, check the cable connections. If the lights are still dead or the starter only clicks, the battery may be too weak, the clamps may not be making contact, or there may be another problem such as a bad starter, alternator, fuse, or connection.
Step 8: Remove the Cables in Reverse Order
Once the dead car starts, remove the cables in reverse order.
Remove the black clamp from the metal ground on the revived car.
Remove the black clamp from the good battery.
Remove the red clamp from the good battery.
Remove the red clamp from the revived car.
Keep the cable clamps from touching each other while any clamp is still connected to a battery.
Step 9: Let the Car Run
After the car starts, let it run for at least 15 to 30 minutes or drive it safely.
A jump-start only gets the engine running. It does not fully recharge the battery immediately. If you shut the car off too soon, it may not restart.
If the battery dies again shortly after the jump, the battery may be bad, the alternator may not be charging, or there may be a parasitic electrical drain.
Using a Portable Jump Starter
A portable jump starter is often easier than using another vehicle.
Most jump packs follow a similar process: connect the red clamp to the positive battery terminal, connect the black clamp to a safe ground or negative point as directed, turn the jump pack on, start the vehicle, then disconnect the clamps.
Interstate Batteries explains that a portable jump starter’s red clamp goes to the positive terminal first, then the negative clamp connects to the negative terminal or approved connection point depending on the product instructions.
Always follow the jump starter manual. Some units have safety lights, boost buttons, reverse-polarity warnings, or special steps.
When You Should Not Jump-Start a Car
Do not jump-start a car if the battery is cracked, leaking, swollen, frozen, smoking, or smells like rotten eggs.
Do not jump-start if the cables are melted, damaged, or sparking heavily.
Do not jump-start while standing in water.
Do not jump-start if the vehicle has obvious crash damage near the battery.
Do not jump-start an electric or hybrid vehicle without reading the owner’s manual first.
NHTSA warns that electric and hybrid vehicles can have high-voltage components that may create shock hazards if damaged. Most EVs still have a 12-volt battery system, but the jump procedure can be vehicle-specific.
Common Jump-Start Mistakes
The biggest mistake is connecting the cables in the wrong order.
Other common mistakes include connecting negative directly to the dead battery when a ground point is recommended, letting clamps touch, using thin cheap cables, trying to jump a damaged battery, cranking too long, or shutting the car off immediately after it starts.
Another mistake is assuming the battery is the only problem. A failed alternator, loose battery cable, bad starter, corroded terminal, blown fuse, or parasitic drain can all make a car act like the battery is dead.
Why Did the Battery Die?
A battery may die because lights were left on, the car sat too long, the weather was very cold, the battery is old, or the alternator is not charging properly.
If the battery is more than three to five years old, have it tested. If the battery keeps dying after a jump, do not keep jump-starting it over and over. Test the battery and charging system.
A jump-start is a temporary solution. It is not a repair.
FAQs About Jump-Starting a Car
What is the correct order to connect jumper cables?
Connect red to the dead battery positive, red to the good battery positive, black to the good battery negative, and the final black clamp to clean metal ground on the dead vehicle.
Do you connect red or black first?
Connect red first. The red clamp goes to the positive terminal of the dead battery first.
Why not connect the final black clamp to the dead battery?
Connecting the final clamp to a metal ground away from the dead battery helps reduce spark risk near battery gases.
How long should I let the car run after a jump-start?
Let it run or drive for about 15 to 30 minutes. If it dies again, the battery or charging system needs testing.
Can jump-starting damage a car?
Yes, if the cables are connected backward, the battery is damaged, or the procedure is done incorrectly. Modern vehicles have sensitive electronics, so follow the correct order.
Can I jump-start a hybrid or EV?
Sometimes, but you must check the owner’s manual. Hybrid and EV systems can have special jump points and high-voltage safety concerns.
Final Thoughts: Follow the Order and Do Not Rush
Jump-starting a car is simple when done correctly.
Connect positive first, make the final negative connection to a safe ground, start the booster vehicle, start the dead car, then remove the cables in reverse order. Avoid damaged batteries, keep sparks away from the battery, and let the revived car run long enough to recharge.
If the car keeps dying after a jump, the real problem is not solved. Get the battery and charging system tested before you get stranded again.
The best place to buy a used car in Los Angeles depends on your risk tolerance. A licensed dealership is usually safer, easier, and more structured. Craigslist can be cheaper, but it puts more responsibility on you to verify the title, vehicle condition, seller identity, smog paperwork, payment, and DMV transfer.
The simple answer is this: buy from a dealership if you want more protection, financing options, trade-in support, and a cleaner paperwork process. Use Craigslist only if you know how to inspect a car, verify ownership, avoid scams, and handle California DMV paperwork correctly.
The California DMV says a private-party vehicle purchase must be transferred to the buyer within 10 days, while the seller has 5 days to report the sale. The FTC Used Car Rule also requires dealers to display a Buyers Guide on used vehicles they offer for sale, which gives dealership shoppers a clearer written disclosure than most private-party listings.
Buying a Used Car in Los Angeles
Los Angeles is one of the biggest used-car markets in the country.
That gives buyers a lot of choice, but it also creates more noise. You will see clean dealer inventory, high-mileage commuter cars, rebuilt-title cars, auction flips, rideshare-used vehicles, private-party listings, and Craigslist deals that look too cheap to be real.
The key is not just finding the lowest price. The key is finding the best car with the least hidden risk.
In Los Angeles, that means checking title status, smog readiness, accident history, service records, registration fees, mileage, tires, brakes, and whether the seller is actually the legal owner.
Dealerships: The Safer Route for Most Buyers
A licensed dealership is usually the better choice for most used-car buyers.
A dealership handles the sales paperwork, title transfer, registration steps, taxes, financing, trade-in, and required disclosures. You can also compare multiple vehicles in one place instead of driving across Los Angeles to meet different private sellers.
The California Department of Justice explains that California’s Car Buyer’s Bill of Rights gives buyers certain protections when purchasing a new or used vehicle from a licensed California dealer. That matters because dealership transactions are regulated differently than casual private-party sales.
A dealer is not automatically perfect. You still need to inspect the car and read the contract. But the process is usually more transparent and easier to document.
Craigslist: Cheaper, But Riskier
Craigslist can be useful if you want a private-party deal, but it carries more risk.
A private seller may price the car lower because there is no dealership overhead, reconditioning cost, financing office, or retail markup. That can help you find a cheaper car.
But Craigslist also has more uncertainty. You may deal with fake listings, title problems, curbstoners, rebuilt vehicles, rolled-back odometers, hidden mechanical problems, unpaid registration fees, smog issues, or sellers who disappear after the sale.
A recent Kiplinger private-party buying guide recommends verifying the title, checking for liens or title brands, running a vehicle history report, and getting a pre-purchase inspection before buying from a private seller.
That is the right mindset for Craigslist. Do not buy based on price alone.
Dealership Pros
A dealership usually gives you more structure.
You can finance the vehicle. You can trade in your current car. You can review a vehicle history report. You can ask about available warranties or service contracts. You can test drive multiple vehicles. You can deal with one licensed business instead of a stranger in a parking lot.
A dealership may also inspect and recondition vehicles before retail sale. That does not make every used car perfect, but it usually gives buyers a cleaner starting point than a random private listing.
For Los Angeles-area shoppers who want a safer path, browsing used inventory lets you compare vehicles by price, mileage, body style, drivetrain, and condition without chasing individual Craigslist posts.
Dealership Cons
Dealerships can cost more.
The price may include reconditioning, overhead, documentation, inspection, advertising, and retail margin. You may also be offered add-ons such as warranties, protection packages, service contracts, or accessories.
That does not mean the deal is bad. It means you need to compare the full out-the-door price, not just the monthly payment.
Ask for the selling price, taxes, registration, documentation fee, any dealer-added products, and total amount financed. If financing, also compare the APR and loan term.
A dealership is safer, but you still need to read everything.
Craigslist Pros
Craigslist can be good for buyers who know cars.
The main advantage is price. Private sellers may accept less than a dealership because they want a quick sale or do not want to trade the car in.
You may also find older, cheaper vehicles that many dealerships do not retail. If you are looking for a budget commuter, project car, older truck, or cash purchase, Craigslist may have options.
Craigslist can work well if the seller has a clean title in their name, maintenance records, current registration, a valid smog certificate, and no pressure tactics.
Craigslist Cons
Craigslist has more buyer responsibility.
You are responsible for checking the title, lien status, smog certificate, registration, VIN, mechanical condition, payment safety, and transfer paperwork. If you miss something, it can become your problem after the sale.
The California DMV says ownership changes must be reported to DMV within 10 days, and the title must be updated. If paperwork is wrong, delayed, or incomplete, the buyer can run into registration problems.
Craigslist also attracts curbstoners. These are people who sell cars without a dealer license while pretending to be private sellers. Be careful if the seller has multiple cars for sale, refuses to show ID, does not have the title in their name, or wants to meet somewhere suspicious.
California Smog Check Matters
In California, smog paperwork can make or break a used-car deal.
For most private-party sales, the seller is generally responsible for providing a valid smog certification if one is required. Do not accept “it should pass” as proof. Do not buy a car that needs smog unless you fully understand the risk.
A failed smog test can become expensive fast. It may involve catalytic converters, oxygen sensors, EVAP issues, readiness monitors, exhaust leaks, engine codes, or emissions-system tampering.
At a dealership, smog and emissions compliance should be handled before sale. With Craigslist, you must verify it yourself.
Private Party Paperwork Checklist
Before buying from Craigslist, make sure the paperwork is clean.
You need the California Certificate of Title signed correctly. The VIN on the title should match the vehicle. The seller’s ID should match the name on the title. The odometer disclosure must be handled when required. Registration status should be checked. Any lienholder issue must be cleared.
The California DMV private-party registration page outlines the process for registering a vehicle bought from another person and confirms the buyer’s 10-day transfer deadline.
If the seller says the title is lost, in someone else’s name, “coming later,” or held by a friend, walk away unless you know exactly how to handle that situation.
How to Avoid Craigslist Car Scams
Meet in a safe public place during daylight.
Ask for the VIN before meeting. Run a vehicle history report. Confirm the title is clean and in the seller’s name. Do not send deposits before seeing the vehicle. Do not use wire transfers, gift cards, crypto, or unusual payment methods. Do not trust a seller who says they are out of state, deployed, traveling, or using a shipping company for a local car.
Reverse-search the photos if the deal looks too good. Scam listings often use stolen images.
Test drive the car. Inspect it cold. Check for warning lights. Bring a mechanic or get a pre-purchase inspection.
If the seller rushes you, avoids paperwork, or refuses a mechanic inspection, leave.
Dealership vs Craigslist: Which Is Better?
A dealership is better for most buyers.
It gives you a more organized buying process, more disclosure, financing access, trade-in convenience, and a licensed business to deal with. It may cost more upfront, but it can reduce risk.
Craigslist is better for experienced buyers who can inspect vehicles, handle DMV paperwork, negotiate cash deals, and walk away from sketchy listings.
In simple terms:
Choose a dealership if you want safety, convenience, financing, trade-in options, and cleaner paperwork.
Choose Craigslist if you want the lowest possible price and are comfortable doing all due diligence yourself.
What About Facebook Marketplace?
Facebook Marketplace has replaced Craigslist for many private-party sellers in Los Angeles.
The same rules apply. Verify title, smog, seller identity, VIN, condition, maintenance records, and payment method. Marketplace may show a seller profile, but that does not eliminate risk.
Treat Facebook Marketplace like Craigslist with better photos and more messages.
Best Used Cars to Buy in Los Angeles
The best used car in Los Angeles depends on your commute, budget, parking, insurance, and fuel costs.
For long commutes, look at fuel-efficient sedans and hybrids. For families, consider midsize SUVs and minivans. For work and weekend use, a truck or SUV may make sense. For mountain trips, desert driving, or outdoor use, a Jeep or Ram can be a better fit.
The real key is condition. A clean, well-maintained vehicle with records is usually better than a cheaper car with mystery history.
Final Thoughts: Choose Safety Over a “Too Good” Deal
Los Angeles has thousands of used cars for sale, but not every deal is worth chasing.
A dealership is usually the safer and easier route, especially if you want financing, trade-in support, registration help, and a more structured transaction. Craigslist can save money, but it also carries more risk and requires more work from the buyer.
The best used-car buying strategy is simple: compare the price, verify the title, inspect the vehicle, check the history, confirm smog compliance, and never let urgency override judgment. A cheap car with hidden problems is not a deal. It is just an expensive repair waiting to happen.
Is a Dodge Demon or Hellcat Faster?
Is a Dodge Demon or Hellcat Faster?
The Dodge Demon is faster than a Dodge Hellcat in a straight line, especially in a drag race.
The simple answer is this: the Demon was built to be the quickest factory drag-racing Challenger, while the Hellcat was built to be a brutally fast but more street-friendly muscle car. The original 2018 Dodge Challenger SRT Demon made up to 840 horsepower, while the 2023 Dodge Challenger SRT Demon 170 pushed the formula to 1,025 horsepower on E85 fuel.
Dodge Garage lists the Demon 170 at 1,025 horsepower, 945 lb-ft of torque, 0 to 60 mph in 1.66 seconds, and a certified 8.91-second quarter-mile at 151.17 mph. That makes it far quicker than a normal Hellcat and even quicker than the Hellcat Redeye in factory drag-strip form.
Demon vs Hellcat: The Quick Answer
The Demon is faster in the quarter-mile.
The Hellcat may be better as a daily driver.
The Demon 170 is the fastest factory Challenger ever built.
The Hellcat is still insanely fast, but it is not as drag-focused as the Demon.
A Hellcat is a muscle car. A Demon is a street-legal drag car.
How Fast Is the Dodge Demon?
The original 2018 Dodge Challenger SRT Demon was already outrageous.
MotorWeek lists the 2018 Demon at 840 horsepower, 770 lb-ft of torque, 0 to 60 mph in 2.3 seconds, and a 9.65-second quarter-mile.
That was extreme when it launched. The Demon came with drag-focused hardware, including special tires, transbrake technology, drag suspension tuning, and equipment designed to help it launch hard.
Then Dodge went even further with the Demon 170.
The Demon 170 is the final boss version. With E85 fuel, it makes 1,025 horsepower and runs an 8.91-second quarter-mile according to Dodge Garage. That puts it in a completely different performance category from a regular Hellcat.
How Fast Is the Dodge Hellcat?
A regular Dodge Hellcat is still very fast.
The Challenger and Charger Hellcat models used a supercharged 6.2L HEMI V8 and became icons because they delivered absurd horsepower in a relatively usable street car. Depending on year and version, Hellcat models made around 707 horsepower, while Redeye versions pushed power higher.
The Hellcat Redeye is the closest normal Hellcat-family car to the Demon. MotorWeek lists the 2019 Challenger SRT Hellcat Redeye at 797 horsepower, 707 lb-ft of torque, 0 to 60 mph in 3.7 seconds, and an 11.4-second quarter-mile at 126 mph.
That is extremely quick, but it is still slower than both the original Demon and the Demon 170 at the drag strip.
Why the Demon Is Faster
The Demon is faster because it was engineered specifically for drag racing.
It is not just a Hellcat with more horsepower. Dodge changed the formula to help the Demon launch harder, hook better, and survive repeated drag-strip abuse.
The Demon has drag-focused tires, special suspension tuning, more aggressive launch technology, extra cooling features, and higher-output engine tuning. The original Demon was already designed to dominate the quarter-mile, and the Demon 170 took that idea even further.
A Hellcat is more of a street muscle car. A Demon is built to chase the lowest elapsed time.
Demon 170 vs Hellcat Redeye
The Demon 170 destroys the Hellcat Redeye in pure straight-line acceleration.
The Demon 170 makes 1,025 horsepower on E85. The Hellcat Redeye makes 797 horsepower in many configurations. The Demon 170 is also designed around drag-strip launches, while the Redeye is more usable as a high-power street car.
In a quarter-mile race, the Demon 170 is the clear winner.
In daily driving, the Redeye may be easier to live with because it is not as specialized.
Original Demon vs Hellcat
The original 2018 Demon is also faster than a standard Hellcat.
The Demon made up to 840 horsepower with the right setup, compared with the standard Hellcat’s roughly 707 horsepower. It also had more drag-specific equipment.
The standard Hellcat is more comfortable as a normal street car. The Demon is more collectible and more extreme.
Is the Hellcat Better for Daily Driving?
Yes, the Hellcat is usually better for daily driving.
The Hellcat is still loud, powerful, and aggressive, but it is less specialized than the Demon. It is easier to use every day, especially if you want regular tires, normal street manners, and fewer drag-racing compromises.
The Demon is cooler and faster, but it is not the practical choice. It is more of a collectible drag weapon.
Is the Demon Street Legal?
Yes, the Demon and Demon 170 were built as street-legal production cars, but they are extremely drag-focused.
That does not mean they are casual commuter cars. The Demon was built around launch performance, traction, and quarter-mile dominance. It can be driven on the street, but its real purpose is the drag strip.
Which One Should You Buy?
Buy the Demon if you want the faster, rarer, more collectible drag car.
Buy the Hellcat if you want a more usable high-horsepower muscle car.
Buy the Hellcat Redeye if you want something closer to Demon power but more street-friendly.
Buy the Demon 170 if you want the most extreme factory Challenger ever built and understand that it is already a collector-grade machine.
For local shoppers, check available used Dodge inventory for Challenger, Charger, Hellcat, Scat Pack, and other performance models. You can also browse new Dodge inventory to compare current Dodge performance options.
FAQs About Demon vs Hellcat
Is a Dodge Demon faster than a Hellcat?
Yes. The Dodge Demon is faster than a Hell
Are Jeep Wranglers Better Than Other Vehicles in Winter Snow?
Jeep Wranglers can be excellent in winter snow, but they are not automatically better than every other vehicle. The real answer is this: a Wrangler is better than many cars and crossovers in deep snow, unplowed roads, steep driveways, trails, and rough winter conditions, but a good AWD crossover with winter tires can be better for everyday icy-road commuting.
The Wrangler’s biggest winter advantage is its real 4×4 hardware. Jeep describes the Command-Trac 4×4 system as delivering torque to all four wheels with a 2.72:1 low range, while Jeep Canada explains that Selec-Trac can automatically switch between 2WD and 4WD based on driving conditions. That makes the Wrangler very capable when snow gets deep or roads are poorly cleared.
But here is the part many people miss: 4×4 helps you move, but tires help you stop. Consumer Reports found that stopping distance in snow can be extremely long on all-season tires and that an AWD vehicle with winter tires will be far more capable. So a Wrangler on weak all-season tires may not stop or turn as well as a lighter crossover on proper winter tires.
Why the Wrangler Is Good in Snow
The Jeep Wrangler is good in snow because it has ground clearance, available 4×4, strong traction hardware, and a rugged body-on-frame layout.
That matters when snow gets deep. A low sedan may scrape, drag, or get stuck. A Wrangler can clear deeper snow more easily, especially with the right tires. It also gives drivers better confidence on rough winter roads, cottage roads, mountain roads, trails, and unplowed areas.
A Wrangler is especially strong in:
Deep snow.
Unplowed roads.
Steep driveways.
Rutted winter trails.
Snowy rural roads.
Slushy parking lots.
Mountain access roads.
Winter camping routes.
This is where the Wrangler feels more capable than many normal cars and crossovers.
Where the Wrangler Is Not Automatically Better
The Wrangler is not automatically better on ice.
Ice is different from snow. On ice, traction is limited no matter what badge is on the grille. A Wrangler’s 4×4 system can help it get moving, but it cannot magically shorten braking distance if the tires do not grip.
A Wrangler is also taller, heavier, and less aerodynamic than many commuter cars. It can feel more truck-like in emergency maneuvers. The short-wheelbase two-door Wrangler can also feel twitchier than a longer crossover if the road is slick.
That does not make the Wrangler bad in winter. It simply means the driver still needs proper tires, slower speeds, and realistic expectations.
4×4 vs AWD in Winter
Wrangler 4×4 and crossover AWD are not the same thing.
A traditional Wrangler 4×4 system is built for traction and low-speed capability. It is excellent when you need extra grip in snow, mud, loose surfaces, or rough terrain. Some Wrangler trims use part-time 4WD, which should be used in slippery conditions and not on dry pavement.
Many crossovers use AWD systems designed for daily driving. They automatically send power to the wheels that need it and are easier for most drivers to use on mixed winter roads.
In simple terms: Wrangler 4×4 is better for deep snow and rough conditions. AWD crossovers are often easier for normal winter commuting.
Tires Matter More Than the Jeep Badge
The biggest winter upgrade for any vehicle is tires.
A Wrangler with proper winter tires will be much better in snow and ice than a Wrangler on worn all-seasons. A small AWD SUV with good winter tires can outperform a Wrangler with the wrong tires in braking and turning.
Consumer Reports says winter tires provide optimum grip for stopping, going, and turning on snow or icy roads. Tire Rack has also tested winter tires against all-season tires and shown why winter-specific rubber matters when temperatures drop.
If you live somewhere with real snow, winter tires are not just a nice upgrade. They are one of the most important safety choices you can make.
Wrangler Two-Door vs Four-Door in Snow
The four-door Wrangler Unlimited is usually easier to drive in winter than the two-door Wrangler.
The reason is wheelbase. A longer wheelbase can feel more stable on slick roads, especially at highway speeds. The two-door Wrangler is lighter and shorter, which can be fun off-road, but it may feel more sensitive on icy pavement.
If you want a Wrangler mostly for daily winter commuting, the four-door Wrangler is usually the better choice. If you want a trail-focused winter toy, the two-door still has advantages in tight terrain.
Is Rubicon Better in Snow?
The Wrangler Rubicon is excellent off-road, but it is not always the best winter road trim.
The Rubicon has serious trail equipment, including off-road tires, locking differentials, stronger axle hardware, and a more aggressive 4×4 system. That is great for trails and deep snow.
But on normal icy roads, lockers are not something you use casually. Aggressive off-road tires may also be worse on ice than dedicated winter tires.
For everyday snow driving, a Sahara, Sport S, or Willys with the right winter tires can be more practical than a Rubicon on mud-terrain tires.
Is Wrangler 4xe Good in Snow?
Yes, the Wrangler 4xe can be good in snow.
The plug-in hybrid system gives strong torque, and the Wrangler platform still has real 4×4 capability. But like any Wrangler, the tires matter. The 4xe is also heavier because of the hybrid battery system, so braking and tire grip still need attention.
If you drive a 4xe in winter, charge it regularly, use the right driving mode, keep winter tires in mind, and remember that electric torque can come on quickly. Smooth throttle inputs are important on slippery roads.
Wrangler vs Subaru in Snow
A Subaru may be better for everyday winter commuting. A Wrangler may be better for deeper snow and rougher winter terrain.
Subaru AWD systems are easy to use, automatic, and well-suited to normal snowy roads. Vehicles like the Outback and Forester are lower, more car-like, and often more comfortable for highway winter driving.
The Wrangler is better when snow gets deep, the road is unplowed, or you need more ground clearance and true 4×4 capability.
For city and highway snow, Subaru with winter tires is hard to beat. For trails, rural roads, and deeper snow, Wrangler has the advantage.
Wrangler vs Pickup Truck in Snow
A Wrangler can be better than many pickup trucks in snow because it has a shorter body, better maneuverability, and more balanced traction.
Pickup trucks can be tricky in winter when unloaded because the rear end is light. A 4×4 truck with winter tires and some weight over the rear axle can be very capable, but a Wrangler often feels easier to manage in tight snowy areas.
That said, trucks have their own advantage for towing, hauling, plowing, and carrying gear. If you need work capability, a Ram 1500 or heavy-duty truck may make more sense.
Wrangler vs Regular SUV in Snow
A Wrangler is usually better than a regular SUV in deep snow and off-road winter conditions.
But a modern AWD SUV may be better for smooth, quiet, daily commuting. Vehicles like the Toyota RAV4 Hybrid, Honda CR-V, Subaru Forester, Mazda CX-5, Jeep Grand Cherokee, or Dodge Durango can be easier to live with on highways and city roads.
The Wrangler wins when the road gets worse. The crossover wins when the road is plowed and comfort matters more.
How to Drive a Wrangler in Snow
Driving a Wrangler in snow is about smooth control.
Do not accelerate aggressively. Do not brake late. Do not make sharp steering inputs. Leave more distance than usual. Use 4H when roads are slippery and conditions call for it. Use 4L only for low-speed deep snow, steep terrain, or recovery situations.
If you have a part-time 4WD Wrangler, do not drive in 4H on dry pavement. That can cause drivetrain binding. Use 4WD when the surface is slippery enough to allow tire slip.
Always read your owner’s manual for your exact Wrangler system.
Best Winter Setup for a Jeep Wrangler
The best winter Wrangler setup is simple:
Good winter tires or severe snow-rated all-terrain tires.
Proper tire pressure.
Working 4×4 system.
Good battery.
Fresh wiper blades.
Full washer fluid.
Healthy brakes.
Good coolant protection.
Emergency kit.
Tow strap and recovery gear if you drive remote roads.
A Wrangler can be excellent in snow when it is prepared properly. It can also feel disappointing if it has the wrong tires, bad alignment, weak brakes, or worn suspension parts.
Should You Buy a Wrangler for Winter?
Yes, buy a Wrangler for winter if you deal with deep snow, rough roads, rural routes, steep driveways, trails, or outdoor winter activities.
Do not buy a Wrangler only because you think it will automatically be safest on icy city roads. For that use, a modern AWD SUV with winter tires may be smoother, quieter, and easier to control.
For Southern California shoppers who want snow capability for mountain trips, off-road weekends, or winter travel, compare new Jeep inventory and check trim, tires, drivetrain, and 4×4 system. If you are shopping used, review used Jeep inventory and inspect tire condition, suspension, brakes, and 4×4 operation carefully.
FAQs About Jeep Wranglers in Snow
Are Jeep Wranglers good in snow?
Yes, Jeep Wranglers are good in snow, especially deep snow and unplowed roads. They have strong 4×4 systems, good ground clearance, and rugged construction.
Are Wranglers better than AWD cars in snow?
Wranglers can be better in deep snow and rough winter conditions. AWD cars and crossovers may be better for normal plowed roads, ice, and daily commuting, especially with winter tires.
Do Jeep Wranglers need snow tires?
They do not always need them, but snow tires make a major difference. Winter tires improve stopping, turning, and grip in snow and ice.
Is the Rubicon best for snow?
The Rubicon is excellent for off-road snow, but it is not automatically the best for icy roads. Tire choice matters more than trim.
Should I use 4H in snow?
Use 4H when roads are slippery and you need extra traction. Do not use part-time 4H on dry pavement.
Is a Wrangler safe on ice?
A Wrangler can handle icy roads with the right tires and careful driving, but 4×4 does not eliminate ice risk. Braking and steering still depend heavily on tire grip.
Final Thoughts: Wrangler Is Great in Snow, But Tires Decide Everything
Jeep Wranglers are better than many vehicles in deep snow, unplowed roads, and rough winter conditions. Their 4×4 systems, ground clearance, and rugged construction make them genuinely capable when winter gets ugly.
But they are not magic. On ice and packed snow, tires matter more than the Jeep badge. A Wrangler with winter tires is a strong winter vehicle. A Wrangler on worn all-seasons can still slide, skid, and take too long to stop.
The best answer is simple: a Wrangler is better for deep snow and tough winter terrain, but a good AWD vehicle with proper winter tires may be better for everyday winter commuting.
Why Do People Put Ducks On Jeeps [ 2026 Update ]
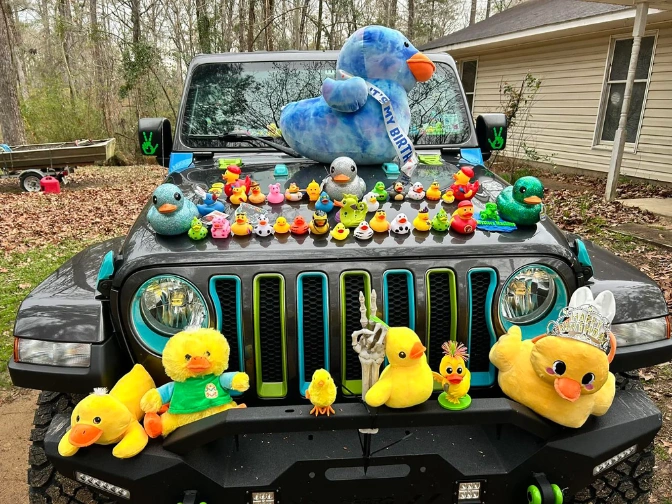
Why Do People Put Ducks on Jeeps? 2026 Update
People put rubber ducks on Jeeps because of a friendly tradition called Jeep Ducking or Duck Duck Jeep. It is a small act of kindness where one Jeep owner leaves a rubber duck on another Jeep to say, “Nice Jeep.”
The simple answer is this: a duck on your Jeep means someone liked your Jeep and wanted to make you smile. It is not a warning, insult, prank, or secret code. It is part of Jeep culture.
Jeep’s official ducking page describes ducking as placing a rubber duck on someone else’s Jeep, usually with a kind note like “Love that Jeep” or “You’ve been Ducked.” The goal is simple: spread kindness between people who share the same passion for Jeep vehicles.
What Is Jeep Ducking?
Jeep Ducking is when someone leaves a rubber duck on a Jeep.
The duck is usually placed somewhere easy to see, such as the windshield, door handle, hood, mirror, bumper, or near the wipers. Many ducks come with a small note that says “You’ve been ducked,” “Nice Jeep,” or “Duck Duck Jeep.”
At first, the trend was mostly connected to Jeep Wranglers. By 2026, it has spread across the wider Jeep community, including the Jeep Gladiator, Grand Cherokee, Cherokee, Compass, Renegade, Wagoneer, and Grand Wagoneer.
Still, Wranglers and Gladiators are the most commonly ducked because they have the strongest enthusiast culture.
Where Did Jeep Ducking Start?
The modern Jeep Ducking trend is widely credited to Allison Parliament.
Road & Track reported that Parliament, from Orillia, Ontario, started the now-famous trend in 2020 by placing a rubber duck on another Jeep as a small act of kindness.
The story became popular during the COVID era, when people were looking for simple ways to spread positivity. One rubber duck turned into a global Jeep community tradition.
That is why Jeep Ducking is not just about the duck. It is about the message behind it.
Why Ducks?
Rubber ducks are cheap, bright, fun, and easy to carry.
They also fit the Jeep personality. Jeep owners already have a culture built around waves, trail groups, custom builds, roof-off driving, off-road events, and small community rituals. A rubber duck is playful enough to match that energy.
A duck does not need to be expensive or serious. That is the point. It is a lighthearted way to say, “Your Jeep stood out.”
What Does It Mean If Someone Puts a Duck on Your Jeep?
If someone puts a duck on your Jeep, it usually means they liked your Jeep.
Maybe they liked the color. Maybe they liked the lift, tires, wheels, bumper, lights, decals, roof setup, or overall build. Maybe they just wanted to keep the tradition going.
In most cases, getting ducked means:
Your Jeep caught someone’s attention.
Another Jeep owner appreciated your vehicle.
Someone wanted to spread a positive moment.
You are now part of a Jeep community tradition.
You can keep the duck, display it, or pass it along to another Jeep.
Is Jeep Ducking Still a Thing in 2026?
Yes, Jeep Ducking is still active in 2026.
The trend has moved beyond a viral moment and become part of modern Jeep culture. Jeep owners still bring ducks to meets, trail events, dealerships, parking lots, road trips, and off-road gatherings.
A newer 2026 dealership writeup from Nye Chrysler Dodge Jeep Ram describes Jeep Ducking as a community-driven tradition where Jeep owners leave rubber ducks on other Jeeps as a gesture of kindness and mutual respect.
In other words, it has lasted because it is simple, harmless, and easy to participate in.
Allison Parliament’s Legacy
The 2026 update matters because Jeep Ducking now carries even more meaning.
Allison Parliament passed away in 2024. Road & Track covered her passing and credited her with creating the Jeep Ducking trend that became famous across the Jeep community.
For many Jeep owners, continuing to duck Jeeps is now also a way to honor her original idea: use a small gesture to make someone’s day better.
That is why the trend has not disappeared. It has become part of her legacy.
Is Jeep Ducking Only for Wranglers?
No, Jeep Ducking is not only for Wranglers.
The Wrangler is still the most common model to receive ducks because it is the most recognizable enthusiast Jeep. But many people now duck other Jeep models too.
You may see ducks on:
Jeep Wrangler
Jeep Gladiator
Jeep Grand Cherokee
Jeep Cherokee
Jeep Compass
Jeep Renegade
Jeep Wagoneer
Jeep Grand Wagoneer
Some Jeep owners are selective and only duck Wranglers or Gladiators. Others duck any Jeep they like. There is no official rulebook.
How Do You Duck a Jeep?
Ducking a Jeep is simple.
Buy a small rubber duck, add a friendly note if you want, and place it somewhere visible on another Jeep. The note can say something like “You’ve been ducked,” “Nice Jeep,” or “Love your Jeep.”
The best places to leave a duck are:
Windshield corner
Door handle
Side mirror
Hood edge
Front bumper
Near the wipers
Do not open the vehicle, climb on it, stick anything to the paint, or place the duck where it blocks visibility. Jeep Ducking should be respectful.
What Should a Jeep Ducking Note Say?
A Jeep Ducking note should be short and friendly.
Good examples include:
“You’ve been ducked.”
“Nice Jeep.”
“Love your build.”
“Duck Duck Jeep.”
“Your Jeep made me smile.”
“Pass it on.”
Some owners buy pre-made tags. Others print their own. Some write directly on the duck. The note is optional, but it helps new Jeep owners understand why there is suddenly a rubber duck on their vehicle.
Do You Have to Duck Someone Back?
No. There is no obligation.
If someone ducks your Jeep, you can keep the duck, display it on the dashboard, give it to a passenger, or pass it along to another Jeep. Some people collect every duck they receive. Others prefer to keep the chain moving.
There is no wrong answer as long as the gesture stays positive.
Why Jeep Owners Love Ducking
Jeep owners love ducking because Jeep ownership has always been social.
There is the Jeep Wave. There are trail clubs, Jeep meets, off-road parks, build groups, local cruises, and parking-lot conversations between owners who have never met before.
Jeep Ducking fits that culture perfectly. It gives owners another way to connect without needing a full conversation.
A duck on a Jeep says, “I noticed your Jeep, and I get it.”
Is Jeep Ducking Official?
Jeep Ducking started with owners, not as a corporate campaign.
That is part of why it feels authentic. It came from the community first. But Jeep has since acknowledged the tradition, and the official Jeep ducking tradition page explains it as an act of kindness between Jeep fans.
So while Jeep Ducking is not a factory feature or official requirement, it is now recognized as part of Jeep culture.
Is It Safe to Put Ducks on Jeeps?
Yes, as long as you use common sense.
Do not place the duck somewhere that could block the driver’s view. Do not put it where it could fall into traffic. Do not attach it with tape, glue, magnets, or anything that could damage paint.
A rubber duck on the windshield corner or door handle is usually fine. Touch the vehicle as little as possible and leave it where the owner will notice it safely.
Should You Duck Non-Jeep Vehicles?
Traditionally, Jeep Ducking is for Jeeps.
Some similar trends have appeared in other car communities, but Duck Duck Jeep belongs to Jeep culture. If you want to keep the original spirit, duck Jeeps only.
That said, the point of the trend is kindness. The best rule is to be respectful, harmless, and positive.
What If You Do Not Like Ducks on Your Jeep?
You do not have to participate.
Some Jeep owners love collecting ducks. Others do not care for the trend. Both are fine. If you get ducked and do not want the duck, you can remove it, give it away, or pass it along.
Jeep Ducking should never feel forced. It is supposed to be fun.
Why Jeep Ducking Became So Big
Jeep Ducking became popular because it is easy to understand.
It does not require money, status, or a heavily modified Jeep. A stock Wrangler can get ducked. A lifted Gladiator can get ducked. A colorful Compass can get ducked. A clean Grand Cherokee can get ducked.
The tradition works because it makes people feel seen.
For shoppers who want to join the Jeep community, browsing used Jeep inventory is a practical way to compare Wranglers, Gladiators, Grand Cherokees, and other Jeep models. If you want a newer Jeep with warranty coverage, check current new Jeep inventory.
FAQs About Jeep Ducking
Why do people put ducks on Jeeps?
People put ducks on Jeeps to compliment the vehicle, spread positivity, and connect with other Jeep owners.
What does it mean when someone puts a duck on your Jeep?
It usually means someone liked your Jeep. It is a friendly gesture from another Jeep fan.
Who started Jeep Ducking?
The modern Jeep Ducking movement is widely credited to Allison Parliament, who started it in 2020 by placing a rubber duck on another Jeep as an act of kindness.
Is Jeep Ducking still popular in 2026?
Yes. Jeep Ducking is still active in 2026 and remains part of Jeep-owner culture.
Is Jeep Ducking only for Wranglers?
No. Wranglers are the most common, but many Jeep owners also duck Gladiators, Grand Cherokees, Cherokees, Compasses, Renegades, Wagoneers, and other Jeep models.
Do I have to pass the duck along?
No. You can keep it, display it, or pass it along. There is no strict rule.
Is Jeep Ducking official?
It started as an owner-driven tradition, but Jeep has acknowledged it as part of Jeep community culture.
Final Thoughts: Jeep Ducking Is About Kindness, Not Just Ducks
People put ducks on Jeeps because it is a simple way to spread kindness inside the Jeep community.
What started with Allison Parliament in 2020 has grown into a worldwide tradition. By 2026, Jeep Ducking is still going because it gives owners a fun way to recognize each other, celebrate unique builds, and keep Jeep culture friendly.
A rubber duck on your Jeep means someone noticed your ride and wanted to make your day better. That is the whole point.


Jeep Wrangler 4xe Fuel Mystery: Is Premium Gas a Must?
No, the Jeep Wrangler 4xe does not require premium gas.
The simple answer is this: the Wrangler 4xe can run on regular 87-octane gasoline, but 91-octane or higher is recommended for the best performance and fuel economy. Pickup Truck Talk lists the Wrangler 4xe fuel requirement as minimum unleaded regular 87 octane, with 91 octane or higher recommended for optimum fuel economy and performance.
That means premium fuel is recommended, not mandatory.
Why the Wrangler 4xe Fuel Question Is Confusing
The confusion comes from the wording.
When an automaker says recommended, many drivers read it as required. But those are not the same thing.
If fuel is required, you should not use anything lower. If fuel is recommended, the vehicle can run on the lower octane, but higher octane may help it perform better.
For the Jeep Wrangler 4xe, regular 87 octane is the minimum. Premium 91 octane or higher is the better choice if you want the strongest performance from the turbocharged plug-in hybrid powertrain.
What Engine Does the Jeep Wrangler 4xe Use?
The Wrangler 4xe uses a 2.0L turbocharged four-cylinder engine paired with electric motors and a plug-in hybrid battery system.
That setup produces strong power for a Wrangler. Warner Robins Chrysler Dodge Jeep Ram lists the 2025 Wrangler 4xe at 375 horsepower and 470 lb-ft of torque, with 87 octane as the minimum fuel requirement and 91 octane or higher recommended for optimum fuel economy and performance.
The important part is the turbocharger. Turbocharged engines can benefit from higher-octane fuel because premium gas resists knock better under boost, heat, and load.
Will Regular Gas Hurt the Wrangler 4xe?
No, regular 87-octane gas should not hurt the Wrangler 4xe if it meets Jeep’s minimum fuel requirement.
The engine control system can adjust timing and performance to help protect the engine when lower-octane fuel is used. So if you fill up with 87, you are not automatically damaging the engine.
The tradeoff is performance. In some conditions, especially hard acceleration, hot weather, towing, mountain driving, or when the battery is depleted, the gas engine may perform better on 91 octane.
Why Jeep Recommends 91 Octane
Jeep recommends 91 octane because the 4xe’s gas engine is turbocharged.
A turbo engine compresses more air into the engine. That creates more heat and pressure inside the cylinders. Higher-octane fuel helps resist engine knock, which allows the engine to run closer to its ideal performance settings.
That is why 87 is acceptable, but 91 is better.
In plain English: regular gas works, premium gas helps the 4xe perform at its best.
Regular vs Premium Gas: What Will You Notice?
Most drivers will not notice a dramatic difference during gentle city driving.
If you mostly charge the battery, drive short trips, and use electric power often, the fuel grade may not feel like a big deal. The Wrangler 4xe’s biggest efficiency advantage comes from plugging it in regularly, not from choosing premium gas.
But if you drive harder, tow, climb hills, drive in heat, or use the gas engine often, premium fuel may give you better throttle response and smoother performance.
What If You Mostly Drive on Electric Power?
If you mostly drive on electric power, you may use very little gasoline.
That changes the fuel conversation. Instead of only asking whether to buy regular or premium, you should also think about fuel freshness. Gasoline can degrade if it sits too long, especially in heat or humidity.
For many 4xe owners who rarely fill up, using premium may not cost much more over time because they buy gas less often. But it is still not required.
Does Premium Gas Improve Fuel Economy?
Premium gas may improve fuel economy slightly under certain driving conditions, but it usually will not transform the Wrangler 4xe.
The bigger MPG difference comes from charging habits. If you charge daily and your trips fit within the electric range, the Wrangler 4xe can use far less gasoline. If you never charge it, you are mostly driving a heavy hybrid Wrangler, and fuel economy will not be as impressive.
Mac Haik Chrysler Dodge Jeep Ram lists the 2025 Wrangler 4xe at 49 MPGe combined, 21 miles of all-electric driving range, and 370 miles of total driving range. Those numbers are most useful when the vehicle is charged regularly.
Can You Mix 87 and 91 Octane?
Yes, mixing regular and premium is fine.
If you have half a tank of 87 and add 91, the fuel in the tank will blend somewhere between the two octane ratings. The engine computer will adjust as needed.
You do not need to drain the tank, reset anything, or panic if you switch fuel grades.
Is 93 Octane Better Than 91?
Not necessarily.
If Jeep recommends 91 or higher, then 93 octane is acceptable. But that does not mean you will see a huge improvement over 91. In many cases, 91 is enough to give the engine the benefit Jeep intended.
If 93 is the only premium grade available in your area, it is fine to use. If 91 is available, that is usually enough.
Wrangler 4xe vs Regular Wrangler Fuel Needs
Not every Wrangler uses the same fuel guidance.
The Wrangler 4xe uses the 2.0L turbo plug-in hybrid powertrain. Other Wrangler models may use different engines, such as the 3.6L Pentastar V6, the 2.0L turbo gas engine, or older specialty engines depending on year and trim.
The 3.6L V6 is generally regular-fuel friendly. The 2.0L turbo can run on regular but may perform better on premium. Some performance-oriented Wrangler models may require premium.
That is why you should always confirm by checking the fuel door, owner’s manual, window sticker, or VIN-specific build sheet.
Should You Use Premium in the Wrangler 4xe?
Use premium if you want the best performance.
Premium makes the most sense if you:
Drive in hot weather.
Tow or carry heavy gear.
Drive in mountains.
Use the gas engine often.
Run larger tires.
Have added off-road weight.
Want the strongest throttle response.
Rarely fill up because you mostly drive electric.
Use regular if you mainly commute, drive gently, charge often, and want to keep fuel costs lower.
Both choices can be reasonable. The key is knowing that 87 is the minimum and 91 is the performance recommendation.
Is the Wrangler 4xe Still Worth Buying If You Do Not Want Premium?
Yes. The Wrangler 4xe is still worth considering even if you do not want to buy premium fuel every time.
Premium is not mandatory. The 4xe can run on regular gas. The bigger ownership question is whether you will actually plug it in. A plug-in hybrid makes the most sense when you charge regularly and use electric range for daily driving.
For Southern California shoppers, compare current new Jeep inventory and check the exact engine, trim, and fuel recommendation before buying. If you are looking at a used model, review used Jeep inventory and verify charging equipment, warranty status, recall completion, and service history.
FAQs About Jeep Wrangler 4xe Gas Type
Does the Jeep Wrangler 4xe require premium gas?
No. The Jeep Wrangler 4xe does not require premium gas. It can run on regular 87-octane gasoline, while 91 octane or higher is recommended for optimum performance and fuel economy.
What octane does the Wrangler 4xe use?
The Wrangler 4xe uses 87 octane minimum, with 91 octane or higher recommended for the best performance.
Can I put regular gas in a Jeep Wrangler 4xe?
Yes. You can use regular 87-octane gas in a Wrangler 4xe.
Will regular gas damage the Wrangler 4xe?
No. Regular gas should not damage the engine if it meets the minimum 87-octane requirement.
Is premium gas better for the Wrangler 4xe?
Yes, premium is better if you want the best performance from the turbocharged engine, especially under load, heat, towing, or mountain driving.
Is the Wrangler 4xe fuel efficient?
It can be very efficient when charged regularly. If you do not plug it in, it will not deliver the same electric-driving benefit.
Final Thoughts: Premium Is Recommended, Not Required
The Jeep Wrangler 4xe fuel mystery comes down to one word: recommended.
Premium gas is not required. The Wrangler 4xe can run on regular 87-octane fuel. But 91 octane or higher is recommended if you want the best performance and fuel economy from the turbocharged plug-in hybrid system.
For daily driving and regular commuting, 87 is acceptable. For towing, heat, hills, heavy throttle, larger tires, or maximum performance, premium is the smarter choice.
Connect with us


