


Jeep Grand Cherokee Running Boards: Are They Worth It, Which Type Is Best, and What Owners Should Know
If you are shopping for Jeep Grand Cherokee running boards, you are probably trying to answer more than one question at the same time. You may want to know whether running boards make the Grand Cherokee easier to get into, whether they hurt ground clearance, whether side steps and running boards are the same thing, and whether factory-style accessories are better than generic aftermarket options.
The short answer is that running boards can be one of the smartest comfort and style upgrades for a Jeep Grand Cherokee, especially if you regularly carry kids, older passengers, or anyone who would benefit from a more stable step-in height. They can also help protect the lower body from minor road grime and give the SUV a more finished, upscale, or rugged look depending on the design you choose. Jeep and Mopar officially sell vehicle accessories, and Simi Valley Chrysler Dodge Jeep Ram positions itself as a source for Jeep inventory, service, and genuine Mopar parts and accessories. (Jeep Gear)
If you are exploring Grand Cherokee ownership, accessories, or service support, start with Simi Valley Chrysler Dodge Jeep Ram, browse the Jeep inventory, or check the service department.
What Are Jeep Grand Cherokee Running Boards?
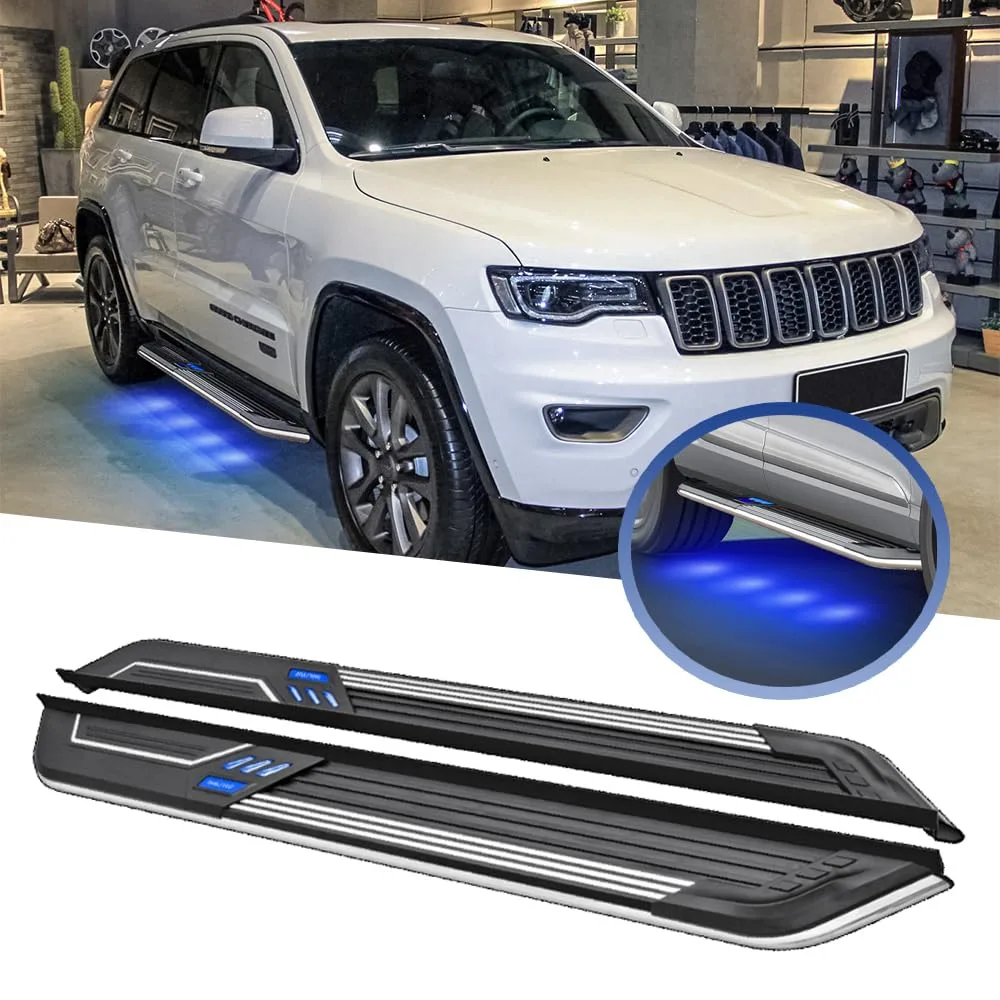
Running boards are step surfaces mounted along the lower side of the vehicle, typically below the doors. On a Jeep Grand Cherokee, they serve two main purposes.
The first is practical. They make entry and exit easier by giving you an intermediate step between the ground and the cabin floor. That matters more than people think, especially on SUVs that sit higher than sedans.
The second is visual. Running boards change the way the Grand Cherokee looks. Some designs make it appear more premium and upscale. Others give it a stronger off-road stance. On a vehicle like the Grand Cherokee, which already balances comfort and capability, that styling difference can be a big part of the appeal.
Many buyers also use the terms running boards, side steps, and nerf bars interchangeably, but they are not always identical. Running boards usually offer a broader, flatter stepping surface. Side steps may be more compact. Nerf bars often have a rounder, more tubular appearance. For most Grand Cherokee owners, the question is not just what they are called. The real question is which setup fits how the SUV is actually used.
If you are comparing trim levels or deciding whether to accessorize a new or used model, the Grand Cherokee inventory at Simi Valley CDJR is the best place to begin.
Why Grand Cherokee Owners Add Running Boards
There is a reason this upgrade stays popular year after year. Grand Cherokee running boards are one of the few accessories that can improve both daily usability and appearance at the same time.
Easier entry and exit
This is the biggest reason most people buy them. If your passengers include children, parents, grandparents, or anyone who does not want to climb up into the cabin, a running board makes the Grand Cherokee easier to live with every single day.
Better convenience for loading
Running boards can also help when reaching roof-mounted cargo, cleaning the roofline, or loading a roof rack. Even if they are not designed as a rooftop access platform, they give you a better side position than standing directly on the ground.
Visual upgrade
A Grand Cherokee already has a strong design, but running boards can make it look more complete. On some builds, they add a premium, factory-finished appearance. On others, they make the SUV look tougher and more trail-ready.
Light body-side protection
Running boards are not the same as hardcore rock sliders, but they can still provide a little shielding from splashed debris, road grime, and incidental contact in daily driving situations.
Practical family upgrade
A lot of owners do not realize how valuable running boards are until after installation. For family use, especially repeated school runs, grocery stops, sports practice, and weekend travel, they often become one of the most appreciated accessories on the entire vehicle.
If you are keeping your Jeep long term and want accessories that improve real-world ownership, the parts and service support at Simi Valley Chrysler Dodge Jeep Ram is worth using instead of guessing your way through generic add-ons.
Are Running Boards Worth It on a Jeep Grand Cherokee?
For many owners, yes.
That does not mean every Grand Cherokee needs them. A lower trim with mostly solo driving and no family passengers may be fine without them. But if you are asking the question seriously, there is a good chance you already have the use case that makes them worthwhile.
Running boards tend to be worth it if:
- You want easier cabin access
- You drive with kids or older passengers
- You want a more finished SUV look
- You use the vehicle for travel and loading
- You prefer OEM-style fit and appearance
- You want a practical upgrade, not just cosmetic flash
They may be less necessary if:
- You prefer maximum side clearance
- You do frequent off-road driving where breakover and side clearance matter
- You want the cleanest possible side profile
- You almost never carry passengers who need a step up
So yes, for a lot of buyers, Jeep Grand Cherokee running boards are worth it. The key is choosing the right type rather than buying the first set that looks acceptable online.
Running Boards vs Side Steps on a Jeep Grand Cherokee
This is where a lot of buyers get tripped up.
A running board usually has a longer, wider stepping surface that spans much of the door area. It is often better for families, daily commuting, and anyone who values comfort and ease of use.
A side step may be more compact and may emphasize appearance or a sportier look. It can still work well, but it may not offer the same broad stepping area.
For Grand Cherokee owners, the best choice depends on what matters most:
- If comfort and everyday convenience come first, running boards usually make more sense.
- If you want a cleaner look with a smaller step pad, side steps may be enough.
- If you care about trail abuse, neither is the same thing as a true rock slider.
This is why genuine or vehicle-specific parts matter. Fitment, mounting integrity, and door-area coverage are not details you want to get wrong on a daily-driven SUV. Jeep officially promotes Mopar accessories and genuine-approved parts through its accessory channels, and Simi Valley CDJR highlights genuine Mopar parts and accessories as part of its Jeep support. (Jeep Gear)
Do Running Boards Affect Ground Clearance?
Yes, at least to some degree.
This is one of the biggest tradeoffs. Anything mounted along the lower side of the SUV can slightly reduce the clean clearance envelope compared with having nothing there at all. For most road-focused Grand Cherokee owners, this is not a major issue. But if you regularly drive rough trails, rocky paths, deep ruts, or uneven terrain, it becomes more relevant.
That does not mean you should automatically avoid running boards if you like mild adventure use. It just means you should be honest about how you actually use the SUV.
A Grand Cherokee that spends most of its life on pavement, family trips, commuting, and occasional dirt roads will usually benefit more from the convenience of running boards than it will suffer from the slight loss in side clearance.
A Grand Cherokee that regularly sees technical off-road use may be better served by a more purpose-built protection solution.
Do Running Boards Make the Grand Cherokee Safer?
They can improve entry and exit confidence, especially in bad weather or for shorter passengers, but they are not a substitute for careful movement or proper footwear. Their biggest safety contribution is reducing awkward step-up motion when getting in or out of the vehicle.
That matters more in real life than some people admit. Slipping while climbing into an SUV is not a theoretical issue. A stable side step can make a meaningful difference, especially when the ground is wet or the passenger is carrying bags, helping a child, or stepping out in a narrow parking space.
The best running board is not just the one that looks good in a photo. It is the one that gives a stable step surface and integrates cleanly with the vehicle.
Best Reasons to Choose OEM-Style or Genuine-Accessory Fitment
There are a lot of running board options out there, but factory-style fitment usually wins on the things that matter most long term:
Better fit
Vehicle-specific running boards are designed to match the body, door area, and mounting points more accurately.
Cleaner appearance
A good Grand Cherokee running board should look like it belongs there, not like it was added as an afterthought.
Better compatibility
Fitment problems are common when people buy universal accessories for a vehicle that really needs model-specific hardware.
Easier service support
Working with a dealership or genuine-parts source usually makes installation, troubleshooting, and replacement easier.
Jeep and Mopar continue to promote official accessory channels, and Simi Valley CDJR presents genuine Mopar parts and factory-trained service support as part of its Jeep ownership ecosystem. (Jeep Gear)
If you would rather do this once and do it right, connect with Simi Valley CDJR service or start from the main dealership homepage.
Jeep Grand Cherokee Running Boards for Families
This deserves its own section because family usability is where running boards make the strongest case.
On paper, a running board looks like a small upgrade. In daily family use, it can feel like a major one.
Think about what repeated SUV use actually looks like:
- kids climbing in and out
- backpacks and sports gear
- grandparents riding along
- grocery runs
- road trips
- rainy parking lots
- curbside pickups
- car seats and child assistance
In all of those situations, a usable step surface makes the Grand Cherokee easier to live with. That is why running boards often become a “why didn’t we do this earlier?” upgrade.
Jeep Grand Cherokee Running Boards for Appearance
Not every accessory has to solve a technical problem. Sometimes the point is that the SUV just looks better.
On the Grand Cherokee, running boards can help visually connect the front and rear lower body lines. They can also make the SUV feel more substantial and more premium. On some trims, they pair especially well with larger wheels, darker trim, or black exterior accents.
This is one reason people shopping for a newer Grand Cherokee often want to compare accessorized examples rather than plain stock photos. If you are browsing locally, the Jeep inventory at Simi Valley CDJR is the easiest place to start.
Should You Install Running Boards on a New or Used Grand Cherokee?
Either can make sense.
For a new Grand Cherokee, running boards are a great way to personalize the SUV right away and improve daily usability from day one.
For a used Grand Cherokee, they can be one of the most cost-effective upgrades because they change the ownership experience every time you open the door.
In both cases, the smarter move is to think in terms of long-term fit and quality, not just lowest upfront price. Cheap accessories often look fine online and disappointing in person.
If you are still deciding whether to keep your current vehicle or move into a Grand Cherokee that fits your needs better, explore the used inventory, new inventory, or check your current value on the trade-in page.
Installation: DIY or Professional?
Some owners like to install accessories themselves. That can work if the product is truly vehicle-specific, the hardware is complete, and you are comfortable working under the vehicle.
But there is a strong case for professional installation, especially on a premium SUV like the Grand Cherokee.
Why?
- Proper alignment matters
- Torque and mounting integrity matter
- You want even placement from side to side
- You do not want rattles, looseness, or crooked fitment
- If there is an issue later, support is easier when the accessory path is documented
That is where the service department at Simi Valley Chrysler Dodge Jeep Ram becomes more useful than gambling on trial-and-error installation.
What to Look for Before You Buy Jeep Grand Cherokee Running Boards
Before you choose a set, ask these questions:
Is it actually designed for your exact Grand Cherokee generation and configuration?
This matters more than people think.
Is the stepping surface wide enough to be useful?
Some products look good but offer less practical footing than expected.
Does it match the look you want?
Premium, rugged, sporty, factory-style, and blacked-out are not the same visual goal.
Are you prioritizing family convenience or off-road clearance?
Be honest about the SUV’s real job.
Are you choosing long-term fitment quality over bargain pricing?
That usually pays off.
Do you want dealership-backed service and parts support?
If yes, work through a real Jeep support channel.
Final Thoughts
Jeep Grand Cherokee running boards are one of the best examples of an accessory that can improve both form and function. They make the SUV easier to enter, more convenient for passengers, more practical for family use, and often more attractive overall. For many owners, they are not a flashy extra. They are a daily-life upgrade.
The only mistake is treating all running boards as equal. They are not. Fit, finish, width, style, clearance impact, and installation quality all matter. A well-chosen set can make your Grand Cherokee feel more complete. A poorly chosen set can feel cheap, awkward, or unnecessary.
If you want to explore Grand Cherokee ownership, factory-style service support, or genuine Mopar parts and accessories, visit Simi Valley Chrysler Dodge Jeep Ram, browse the Jeep inventory, explore the used inventory, or schedule with the service department.
If you are wondering how long a car inspection takes, the real answer is: it depends on the type of inspection, the condition of the vehicle, and where you go. In a best-case scenario, a very basic inspection can feel quick. In the real world, though, most drivers are not just asking about a five-minute visual walkaround. They want to know how long it takes to inspect a car properly, how long a dealership inspection takes, whether a state inspection moves faster, and what can slow the whole process down.
That is why this question gets searched so often. People are trying to plan their day. They want to know whether they can wait at the service department, whether they need to drop the car off, whether they are looking at a 15-minute inspection, or whether the vehicle will be tied up for hours because something small turned into something bigger.
At Simi Valley Chrysler Dodge Jeep Ram, the better way to think about inspection time is not as one fixed number. Instead, think of it as a range based on what kind of inspection your vehicle actually needs. A quick pre-trip or basic safety check is not the same as a full used-car inspection, a multi-point dealership inspection, or a state-required emissions and safety inspection.
If you want to schedule service, start here: Simi Valley CDJR Service Department. If your inspection turns into a bigger repair or you decide it makes more sense to upgrade instead, you can also browse the new inventory or used inventory.
The Short Answer: How Long Does a Car Inspection Take?
For most drivers, a car inspection usually takes anywhere from about 15 minutes to over an hour, depending on what is being checked.
A simple inspection may be relatively fast. A more complete inspection, especially at a dealership or service center, can take longer because technicians are not just glancing at the car. They are checking important systems, identifying wear, and documenting anything that needs attention.
Here is a practical way to think about it:
- A very basic inspection can sometimes be done in around 15 to 30 minutes
- A standard dealership multi-point inspection often takes around 30 minutes to an hour
- A state inspection or emissions-related inspection may take longer depending on wait times, paperwork, and test requirements
- A full used vehicle or pre-purchase inspection can take an hour or more, especially if the technician finds issues that require deeper review
That is why search terms like how long do inspections take, how long does inspection take, how long does an inspection take, and how long does it take to inspect a car are all really asking the same thing: how much of your day this is going to consume.

Why Inspection Time Varies So Much
A lot of articles answer this question too simply. They throw out one number and move on. That is not how inspections work in real life.
A vehicle inspection time can vary because of several factors:
1. The type of inspection
This is the biggest factor. A quick car inspection near me search might bring up fast checks, but a genuine dealership inspection is usually more thorough.
2. The condition of the car
If the vehicle is clean, accessible, and in reasonably good shape, the process tends to move faster. If it has warning lights, worn tires, leaks, brake issues, or modifications, the technician may need more time.
3. Shop traffic and scheduling
Sometimes the inspection itself is not what takes the longest. The waiting line does. A service center may be ready to inspect your car quickly once it reaches the bay, but intake volume can change how long the total appointment feels.
4. Whether extra diagnosis is needed
An inspection can uncover a problem that leads to additional time. A routine check may become a brake measurement, suspension review, battery test, or scan for trouble codes.
5. Whether the vehicle needs state-specific checks
If someone is searching how long does a state inspection take or how long does a state car inspection take, they are asking about a process that often includes specific legal requirements, not just a general mechanical review.
If you want a dealership-backed inspection rather than a rushed generic check, the best place to start is the Simi Valley CDJR service department.
What Happens During a Car Inspection?
One reason people underestimate car inspection time is because they do not realize how much can be involved. A proper inspection may include checks of:
- Tires and tread depth
- Brake condition
- Battery performance
- Fluid levels and visible leaks
- Suspension components
- Steering response
- Belts and hoses
- Lights and signals
- Wiper blades
- Warning lights
- Undercarriage condition
- Cabin and engine air filters
- Charging and starting system condition
A more complete inspection may also include a road test, diagnostic scan, or measurements of brake pad life and tire wear. That is why how long does an auto inspection take does not have the same answer for every vehicle.
A technician doing a real inspection is not just looking for whether the vehicle starts. They are checking whether it is safe, whether it is wearing out in predictable ways, and whether it is about to need work that the owner should know about.
How Long Does a Car Inspection Take at a Dealership?
This is where the answer becomes especially useful for drivers. If you are asking how long does a car inspection take at a dealership, the answer is usually more reassuring than people expect. In many cases, a dealership inspection can be fairly efficient because the service department has trained technicians, proper tools, and a set inspection workflow.
At the same time, a dealership inspection may also be more detailed than the kind of quick glance you get somewhere advertising a fast car inspection near me. That is a good thing. A rushed check may get you out faster, but it may not tell you much.
At a dealership like Simi Valley Chrysler Dodge Jeep Ram, inspection time depends on whether you are coming in for:
- A general service inspection
- A brake inspection
- A pre-trip inspection
- A seasonal vehicle check
- A used vehicle evaluation
- A concern-specific inspection tied to a warning light, noise, or drivability issue
If your goal is to find out whether your vehicle is actually healthy, a slightly longer inspection is often worth it.
You can also contact the service team directly if you want to plan around wait time versus drop-off.
How Long Does a State Inspection Take?
This is one of the most common variations of the keyword. People search:
- how long does a state inspection take
- how long does a state car inspection take
- how long does a car inspection take in pa
- how long does a car inspection take in ny
- how long does a car inspection take in nc
The reason these searches are so common is simple: state inspections are different from general dealership or repair-shop inspections. They may include legal compliance items such as emissions testing, documentation, safety verification, and system-specific requirements.
In general, a state inspection can sometimes feel longer because the total time includes:
- Check-in
- Waiting line
- Required test procedure
- Paperwork
- Any re-checks if something fails
In many cases, the actual inspection portion may be reasonable, but total time is affected by demand and local procedure. That is why someone searching what time does inspection station open is really trying to beat the rush.
Even when the inspection itself is straightforward, the overall visit can still stretch out depending on how busy the location is and whether the vehicle passes cleanly the first time.
Can a Car Inspection Take Only 15 Minutes?
Sometimes, yes. That is why phrases like 15 minute inspection, 10 minutes inspection, and inspection express – 10 minute inspection appear in search data. People want speed.
But there is an important distinction here: a 15-minute inspection can happen, but it is usually either:
- A very basic check
- A lightly loaded shop handling a simple vehicle
- A narrow service-specific inspection
- A marketing phrase rather than a fully comprehensive mechanical evaluation
If the vehicle is newer, has no visible issues, and is only getting a limited inspection, the process may indeed feel quick. But if the car needs a true diagnostic-quality review, 15 minutes is not much time.
That is why drivers need to decide what they actually want. Do you want the fastest possible answer, or do you want the most useful one?
If your vehicle has symptoms, noises, warning lights, uneven tire wear, weak brakes, or charging concerns, you should not be shopping for the shortest inspection. You should be shopping for the most accurate one, which is where the Simi Valley CDJR service department becomes more valuable than a generic express lane.
How Long Should a Car Inspection Take?
This is a smarter question than it seems. When people ask how long should a car inspection take, they are usually trying to figure out whether they are being rushed or whether the shop is dragging things out unnecessarily.
A good answer is this:
A car inspection should take long enough to be thorough, but not so long that the vehicle sits untouched without a reason.
That means:
- A fast, simple inspection should not be artificially stretched
- A full inspection should not be rushed just to hit a marketing time promise
- The shop should be able to explain what is being inspected and why the timing makes sense
If a service team says the inspection is taking longer, that is not automatically bad. It may mean the technician found something worth checking more carefully. On the other hand, if the vehicle sits for a long time before anyone touches it, that is more about scheduling than inspection time itself.
What Slows Down a Car Inspection?
If you want to estimate your own vehicle inspection time, these are the biggest delay factors.
Warning lights
A check engine light, ABS light, battery light, or airbag light often turns a routine inspection into a deeper diagnostic process.
Tire or brake wear
If the technician sees unusual wear or a safety issue, they may need to measure components more carefully.
Leaks
Oil leaks, coolant leaks, and seepage around major components can require additional inspection time.
Modifications
Lift kits, aftermarket wheels, performance parts, or non-standard wiring can complicate a basic inspection.
Battery or charging issues
A weak battery or poor alternator output can require formal testing instead of a quick visual check.
Customer complaints
If you came in saying the car makes a noise, shakes at highway speed, smells like coolant, or dies overnight, the inspection becomes more than a simple multi-point review.
Heavy service traffic
Sometimes the technician is fast, but the service lane is busy.
That is why how long does it take to get your car inspected and how long does it take to get a car inspection can vary so much from one visit to the next.
How Long Does It Take to Inspect a Used Car?
A used-car inspection should generally take longer than a casual check because more is at stake. When a used vehicle is being evaluated, the technician is not just checking whether it seems okay for today. They are looking for wear patterns, deferred maintenance, hidden damage, and signs that major service may be coming soon.
A proper used-car inspection may include:
- Undercarriage review
- Brake and tire condition
- Suspension wear
- Fluid condition
- Signs of collision repair
- Engine bay issues
- Battery and charging review
- Road test impressions
- Scan for codes or pending issues
This kind of inspection is one of the most valuable services a buyer can pay for because it helps prevent the classic used-car mistake: buying a vehicle that looks clean but is expensive underneath.
If an inspection reveals that the used vehicle you were considering is not worth the trouble, you can skip the risk and browse dealer-backed options in the used inventory at Simi Valley CDJR.
Is a Quick Car Inspection Near Me Good Enough?
Sometimes it is. Sometimes it is not.
A quick car inspection near me may be enough if:
- You just want a very basic status check
- The vehicle is relatively new
- You have no warning lights or symptoms
- You only want a simple safety overview
It may not be enough if:
- The vehicle is older
- You are buying used
- You have warning lights
- The car has sat unused
- You suspect brake, battery, suspension, or leak issues
- You want confidence, not just speed
The same logic applies to search terms like fast car inspection near me and express state inspection. Fast is only good when the inspection is still meaningful.
Does the Inspection Itself Take Longer Than the Appointment?
Not always. This is one of the biggest misunderstandings people have.
The actual inspection may be relatively efficient. The full appointment may feel longer because it includes:
- Arrival and write-up
- Queue time
- Technician assignment
- Inspection process
- Review of findings
- Estimate preparation if needed
- Customer communication
So when people search how long does it take for car inspection or how long does it take for a car inspection, they are often mixing up two different timelines:
- The actual time spent inspecting the car
- The total time spent at the shop
That distinction matters for planning your day.
How to Make Your Car Inspection Faster
If you want your inspection to move as efficiently as possible, there are a few simple things you can do.
Schedule ahead
Appointments usually move more predictably than walk-ins.
Arrive on time
Showing up late often pushes the entire process back.
Be specific about the concern
If you are hearing a noise, seeing a light, or noticing a problem, describe it clearly.
Remove clutter
A vehicle packed with cargo or personal items can slow access to key inspection areas.
Bring service history if relevant
If the shop knows what was recently replaced, they can avoid unnecessary re-checks.
Choose the right type of inspection
Do not ask for a quick check if what you really need is a deeper diagnosis.
If you are ready to book service, go directly to Simi Valley CDJR service.
When a Car Inspection Turns Into Repairs
A lot of drivers ask how long is a car inspection because they expect a simple in-and-out visit. But inspections often uncover things like:
- Brake pads that are nearly worn out
- Tires that need replacement
- Weak batteries
- Fluid leaks
- Suspension wear
- Belts or hoses near failure
- Filters that are overdue
- Diagnostic trouble codes
When that happens, the question changes from inspection time to repair time.
That is not a bad thing. In fact, it is often the whole point of the inspection. It is better to discover an issue during a scheduled visit than during a roadside breakdown.
If the repair estimate makes you rethink keeping the car, you can also explore alternatives through Simi Valley CDJR’s new inventory, used inventory, or even get a value on your current vehicle through the trade-in page.
How Long Does a Car Inspection Take at a Dealership vs Other Places?
A dealership inspection is often more structured and more brand-aware than a generic quick-check location. That can make it more useful, especially if you drive a Chrysler, Dodge, Jeep, or Ram vehicle.
At a dealership, the technician may already know the common wear patterns, service intervals, and inspection priorities for your vehicle. That can improve both accuracy and efficiency.
A generic location might advertise speed, but speed is not always the same thing as value. If you are dealing with an actual concern and want a thorough review, dealership service often makes more sense.
That is especially true if your inspection is tied to future maintenance, warranty questions, OEM parts, or brand-specific service recommendations. Start with Simi Valley Chrysler Dodge Jeep Ram.
How Long Do Car Inspections Take When the Car Fails?
If the vehicle fails a required check or shows a major issue, the original inspection may still finish in a reasonable window. What changes is the next step.
At that point, the service advisor may need time to:
- Explain the failure
- Prepare an estimate
- Recommend next steps
- Schedule repairs
- Arrange re-inspection if needed
That means the inspection may not have taken too long, but the visit itself becomes longer because now you are dealing with what the inspection found.
So, How Long Does Car Inspection Take?
If you want the best practical answer, it is this:
Most car inspections take somewhere between about 15 minutes and an hour, but the total appointment can be longer depending on vehicle condition, shop traffic, and whether the technician finds issues that need additional review.
That answer works because it reflects reality. It accounts for:
- how long does car inspection take
- how long do car inspections take
- how long does it take to inspect a car
- how long does an inspection take on a car
- how long does a car inspection take at a dealership
- how long does a state inspection take
The exact number changes, but the pattern stays the same: simple inspections are faster, thorough inspections take longer, and problem cars take longest.
Final Thoughts
If you are searching how long does a car inspection take, the most important thing to understand is that speed should not be the only goal. A rushed inspection might save a few minutes, but a proper inspection can save you from far bigger problems later. The right amount of time depends on the kind of inspection, the condition of the vehicle, and what you want to learn from the visit.
For some drivers, a quick 15-minute inspection may be enough. For others, especially those with warning lights, noise complaints, used-car concerns, or overdue maintenance, a more complete inspection is the smarter move. That is why the better question is not just how long inspections take, but whether the inspection is actually thorough enough to matter.
If you want a dealership-backed inspection, service support, or help deciding whether to repair or replace your vehicle, visit Simi Valley Chrysler Dodge Jeep Ram, schedule with the service department, browse the new inventory, check the used inventory, or value your vehicle on the trade-in page.
3.6 Pentastar Years to Avoid – Expert Review
If you want the blunt answer first, the 3.6 Pentastar years that deserve the most caution are 2011, 2012, and 2013. Those are the years most closely tied to the Pentastar’s best-known early defect: left-cylinder-head/cylinder-leakage-related misfires, serious enough that FCA issued an extended-warranty bulletin covering many 2011–2013 applications, including the 2012–2013 Jeep Wrangler and multiple Chrysler, Dodge, and Jeep models. In that bulletin, FCA specifically tied the issue to misfire codes such as P0300, P0302, P0304, and P0306 and instructed dealers to check for excessive cylinder leakage and replace the cylinder head if necessary.
That does not mean every 2011–2013 Pentastar is a guaranteed problem. It does mean that if you are shopping used, those are the years where you should be the most skeptical, the most documentation-focused, and the least willing to buy a vague “runs great” example with no proof of repairs. Later Pentastar years are generally safer bets, but later engines are not flawless either. FCA service information shows later pain points including oil filter housing / oil filter adapter leak diagnosis on early 2014 ERB engines, a narrow 2016 camshaft issue on certain Grand Cherokee and Durango builds, and even a 2022 customer-satisfaction campaign for a small number of 3.6 vehicles requiring left-side cylinder-head replacement due to engine misfire.
So the smartest version of this article is not “avoid all Pentastars” and not “they are all fine.” It is this: avoid or heavily scrutinize the early 2011–2013 engines first, be careful with some 2014–2016 examples if records are weak, and judge every later engine by VIN history, service history, and symptoms rather than model year alone.
If you are comparing used Jeep inventory or want a newer model with service support behind it, start with the Simi Valley Chrysler Dodge Jeep Ram homepage, browse the used inventory, or check the service department.
Why the 3.6 Pentastar Has This Reputation
The Pentastar is not a one-year engine or a one-vehicle engine. It has been used across a huge number of Chrysler, Dodge, Jeep, and Ram products. That makes internet advice messy, because people often talk about “the Pentastar” as if a 2011 Wrangler, a 2014 Ram 1500, a 2016 Grand Cherokee, and a 2022 Wrangler all share exactly the same risk profile. They do not.
What gave the engine its reputation early on was not some vague forum rumor. FCA’s own bulletin for the X56 warranty extension explicitly covered a long list of 2011–2013 vehicles with the 3.6L ERB engine and described a repair path for misfire-related cylinder-head problems. The included applications span multiple brands and body styles, which is why the early Pentastar reputation became so widespread.
The important takeaway is that the Pentastar’s bad name mostly comes from specific clusters of issues, not from a blanket official finding that every year was defective. That distinction matters when you are buying used, because the right question is not “Is the Pentastar bad?” The right question is “Which Pentastar years and sub-groups had the most documented headaches, and has this specific vehicle already had the relevant repair?”
The Main 3.6 Pentastar Years to Avoid
2011 to 2013: the real caution zone
If you only remember one range from this article, make it this one. 2011, 2012, and 2013 are the Pentastar years I would treat with the most caution. FCA’s extended-warranty bulletin is the strongest official reason why. It covered 2011–2013 model-year applications and told dealers to diagnose excessive cylinder leakage and replace the cylinder head when needed on affected vehicles showing misfire symptoms. The bulletin specifically included vehicles such as the 2012–2013 Jeep Wrangler, 2011–2013 Grand Cherokee, 2011–2013 Charger, 2011–2013 Challenger, 2011–2013 300, 2011–2013 Durango, and others equipped with the 3.6L ERB.
This is why so many buyers and technicians still tell people to be wary of the earliest Pentastar years. The concern was not hypothetical. It was serious enough to generate official diagnostic and repair guidance tied to specific misfire fault codes.
If you are looking at one of these early engines, here is the first thing that matters: Has the cylinder-head issue already been repaired? If the seller cannot answer that, or gives you a fuzzy “I think so,” you should assume you need proof before paying real money.
2014: not automatic avoid, but not carefree either
I would not put all 2014 Pentastars in the same danger tier as 2011–2013, but I would still treat 2014 as a careful buy, especially early-build vehicles with poor maintenance records. FCA issued a 2015 technical bulletin for certain 2014 ERB vehicles built on or before January 20, 2014, including the 2014 Jeep Wrangler, 2014 Grand Cherokee, 2014 Durango, 2014 Ram 1500, and other models, because oil could pool in the valley under the intake and the oil filter housing may need to be replaced.
FCA also issued a 2013 bulletin explaining that the oil filter adapter changed for 2014 model-year vehicles, that the two designs were not interchangeable, and that installing the wrong filter could result in permanent engine damage.
That does not mean 2014 is a disaster year. It means 2014 is a year where sloppiness matters more than usual. A well-kept 2014 with the right parts, no leak history, and solid service records can still be fine. A neglected early-build 2014 with mystery oil seepage is the kind of vehicle that turns “cheap purchase” into “expensive ownership.”
2015 to 2016: usually better than the earliest years, but not immune
By this point, the Pentastar’s reputation had improved versus the earliest launch years, but I still would not call these “buy blindly” years. The big official example is a 2016 service bulletin for certain Grand Cherokee and Durango vehicles built within narrow date ranges that required left and right intake camshaft replacement because of a missing feature on the nose of the camshaft. That issue was not a full-family condemnation of all 2016 Pentastars, but it is a reminder that “later than 2013” does not mean “problem-free.”
For 2015–2016, the more practical concern in the used market is not just factory bulletins. It is whether the vehicle has been maintained carefully enough to avoid the common age-and-heat-related issues these engines can develop around the oil filter housing / cooler area, seals, and top-end noise complaints. Official service material shows how seriously FCA treated the oil-loss/oil-pooling concern in early 2014 ERB applications, and later bulletins show the manufacturer still dealing with oil-filter-area leak diagnosis on newer 3.6 applications as recently as 2025.
So if you are shopping a 2015 or 2016 Pentastar, I would not say “avoid,” but I would say inspect thoroughly and buy records, not promises.
Later Pentastar Years: Better, But Still Not Perfect
One of the biggest mistakes buyers make is swinging from one extreme to another. They hear that early Pentastars had cylinder-head trouble, then assume everything after that is bulletproof. The official record does not support that.
In February 2023, FCA issued Customer Satisfaction Notification ZD2 for a small number of 2022 vehicles equipped with the 3.6 engine, including the Jeep Wrangler, Jeep Gladiator, Ram 1500, Pacifica/Voyager, and Grand Cherokee, because the MIL could illuminate due to a cylinder misfire and the remedy was to replace the left-side cylinder head. FCA said the campaign affected only about 56 vehicles, which is a very different scale from the early-2010s reputation problem, but it proves a useful point: even later Pentastar years are not immune to batch-specific defects. (NHTSA)
Likewise, a 2025 Stellantis technical bulletin covering 2022–2025 3.6L ERC applications, including the Jeep Wrangler, Gladiator, Durango, Grand Cherokee, Ram 1500, and others, states that oil filter assemblies were being replaced at high rates and instructs dealers to properly diagnose oil leaks around the oil-filter area, cap O-ring, valve cover, and OFA-to-block mating surfaces before replacing parts. (NHTSA)
That is not the same as saying “avoid 2022–2025.” It is saying something more useful: later Pentastars are usually safer buys than 2011–2013, but they still need inspection.
The Best Way to Think About “Years to Avoid”
A smarter buyer frames the Pentastar like this:
- Highest-risk years: 2011–2013. These are the ones most directly tied to the official cylinder-head / cylinder-leakage misfire issue.
- Careful-buy years: 2014 and some 2015–2016 examples, especially if records are weak, because oil-loss/oil-pooling and some production-specific issues show up in official service material.
- Generally safer years: later Pentastars, especially when well maintained, but still check VIN-specific campaigns and leak history because later cylinders-head and oil-filter-area issues did not disappear entirely. (NHTSA)
That is much more accurate than a simplistic “all Pentastars are junk” or “only 2011 is bad” take.
Symptoms That Matter More Than Year Alone
Even if you already know which years are riskier, the vehicle in front of you still matters more than the internet’s favorite year chart. On any used Pentastar, I would pay close attention to:
Misfire history
If the vehicle has a history of P0300, P0302, P0304, or P0306-type misfire problems, that deserves real investigation, especially on early ERB engines because those are the exact kinds of codes mentioned in the FCA cylinder-head warranty-extension bulletin.
Oil smell or visible oil in the valley
On affected early-2014 ERB applications, FCA told technicians to check for oil pooling in the engine valley because the area could hold almost a quart of oil without obvious external weeping. That is not a theoretical concern; it is straight from the manufacturer’s own diagnostic aid.
Evidence of incorrect oil-filter service
FCA explicitly warned that for the 2014 model-year change, the wrong oil-filter application could result in permanent engine damage. On a used Pentastar, that means a sloppy maintenance history matters more than usual.
Top-end noise or valvetrain concern
The 2016 camshaft bulletin was narrow, but it reinforces a broader point: unusual top-end noise on a Pentastar should never be brushed off as “they all do that.”
VIN-specific campaign history
Because later issues can be very narrow and VIN-specific, always run the VIN through manufacturer and NHTSA recall/campaign resources before buying. The 2022 ZD2 campaign is a perfect example of why that matters. (NHTSA)
If you want a dealer-backed inspection instead of gambling on a private-party guess, the service department at Simi Valley Chrysler Dodge Jeep Ram is the right kind of place to start.
Which 3.6 Pentastar Years Are Usually Better?
The official material I reviewed supports a cautious but fair conclusion: the earliest 2011–2013 engines are the ones to fear most, while later years are generally better provided the vehicle has been maintained and inspected properly.
That does not mean you should automatically buy any 2017, 2018, 2019, 2020, or 2021 Pentastar. It means those years usually do not carry the same broad stigma as the launch-era engines. With later models, condition and service history become more important than online year rankings.
Should You Avoid the 3.6 Pentastar Entirely?
No. That is too broad. The Pentastar powered a huge number of Chrysler, Dodge, Jeep, and Ram vehicles for a reason. The better conclusion is:
- Avoid blind buys from 2011–2013
- Be extra careful with early 2014 and some 2015–2016 vehicles if maintenance history is weak
- Treat later engines as inspect-before-you-buy, not avoid-by-default
That is the balanced answer supported by the official bulletins.
Final Verdict
If you want the cleanest shortlist of 3.6 Pentastar years to avoid, it is this:
Avoid or heavily scrutinize 2011, 2012, and 2013 first. Those are the years most directly linked to the Pentastar’s best-known official cylinder-head / cylinder-leakage misfire problem.
After that, I would put 2014 in the “proceed carefully” category rather than the full avoid category, because official FCA service material shows early-2014 ERB engines had meaningful oil-loss / oil-pooling diagnostic concerns and a filter-adapter change that could lead to serious damage if serviced incorrectly.
2015–2016 are usually better than the earliest years, but they are still years where a weak service history, leak evidence, or top-end noise should make you walk away. The 2016 camshaft bulletin is a reminder that production-specific problems can still exist even after the early head issue period.
And for later Pentastars, the lesson is simple: better does not mean perfect. VIN-specific campaigns like the 2022 ZD2 left-cylinder-head replacement and recent 2022–2025 oil-filter-area leak bulletins prove that later engines still need real inspection. (NHTSA)
Best Automotive Spray Gun Expert Review
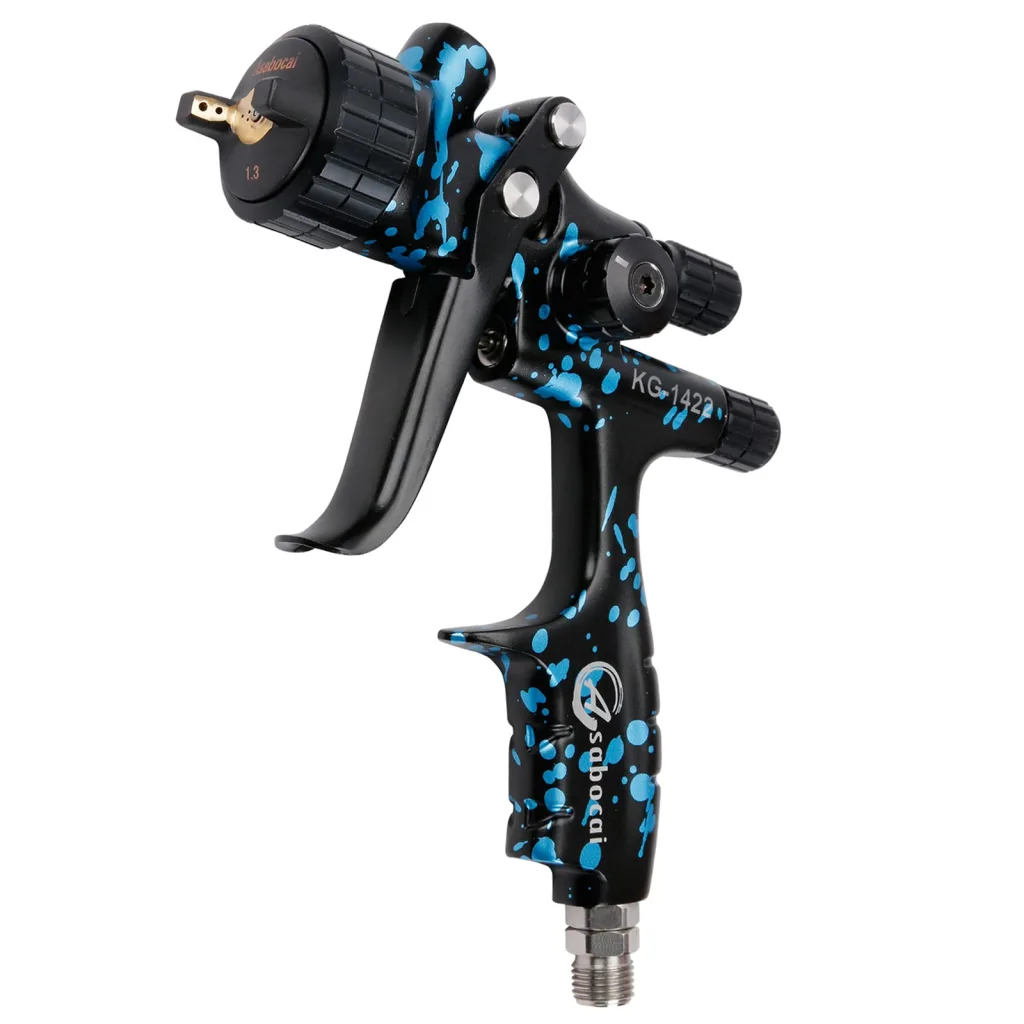
Finding the best automotive spray gun is not just about buying the most expensive name in the booth. It is about matching the right gun to the kind of work you actually do: full resprays, clear coat, basecoat, primer, spot repairs, restoration work, or production-level throughput. A spray gun that feels perfect for a seasoned collision shop painter can be completely wrong for a DIY user with a smaller compressor, limited booth space, and a tighter budget.
That is why the market for best automotive paint spray gun, best automotive HVLP spray gun, and best automotive spray paint gun searches is so fragmented. Some buyers want elite atomization and transfer efficiency. Others care more about cup systems, ease of cleanup, cost of consumables, or whether the gun can lay down clear without demanding hero-level trigger control.
Based on the product lineup you provided, and keeping this strictly to Amazon.com products only, the current field includes serious names like Graco, SATA, 3M, ANEST IWATA, Binks, and DeVilbiss. That matters, because these are not random rebadged tools. These are brands with real credibility in finishing, refinish, and industrial coating work.
In this guide, I will break down what actually matters when choosing the best HVLP spray gun automotive buyers should consider, then review the standout Amazon.com options from your list, explain which type of user each suits best, and help you avoid buying the wrong gun for your paint system, compressor setup, and skill level.
Quick Verdict: Best Automotive Spray Guns on Amazon.com
From the products listed, these are the strongest picks depending on use case:
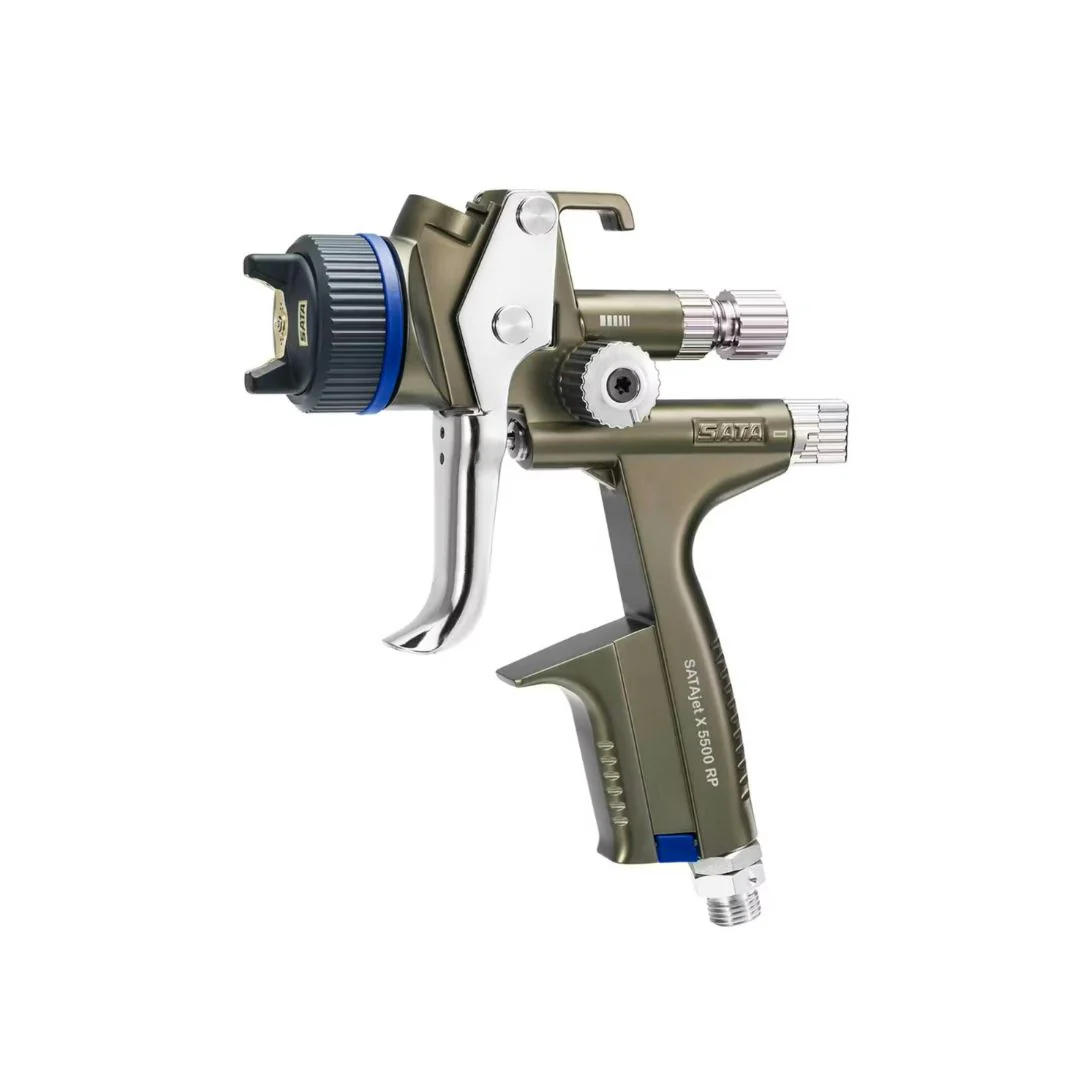
Best overall for premium automotive finishing:
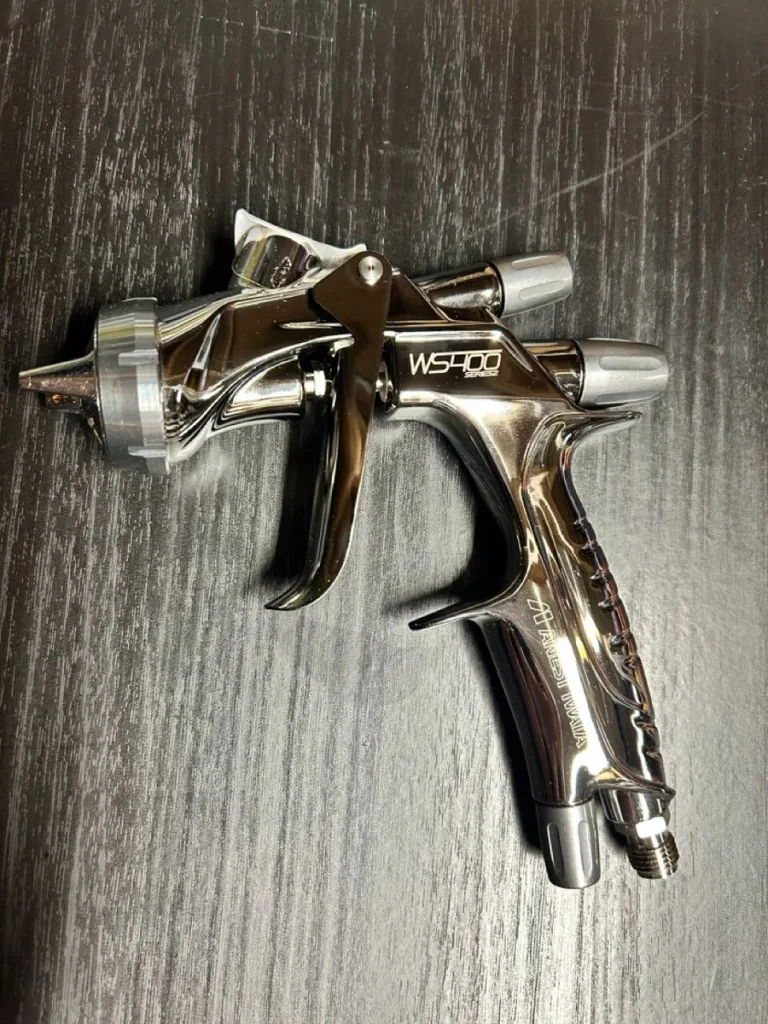
SATA X5500 HVLP Spray Gun 1.3
A true top-tier refinish gun for painters who care about atomization quality, consistency, and finish refinement.
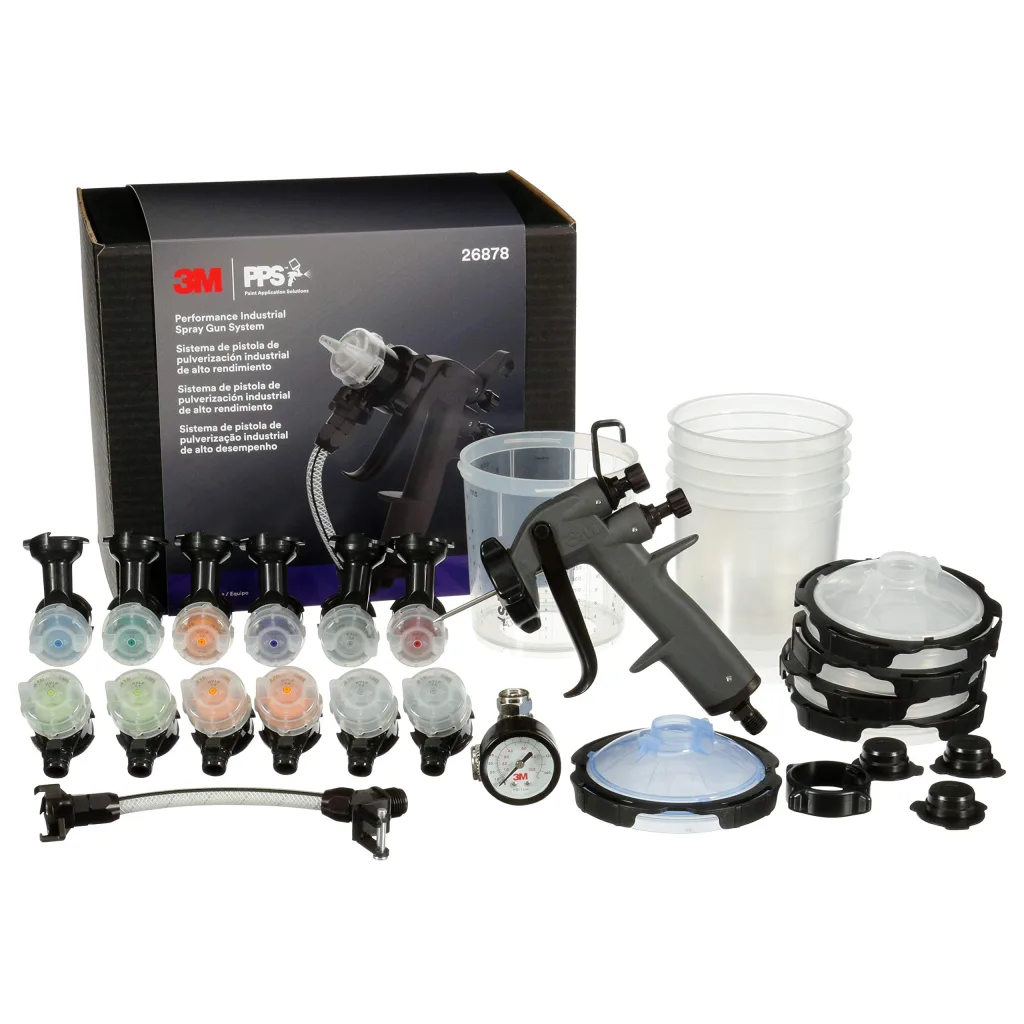
Best for modern disposable cup workflow and versatility:
3M Performance Industrial Spray Gun Starter Kit 26878
Lightweight, modular, efficient, and attractive for painters who value speed, ergonomics, and easy cleanup.
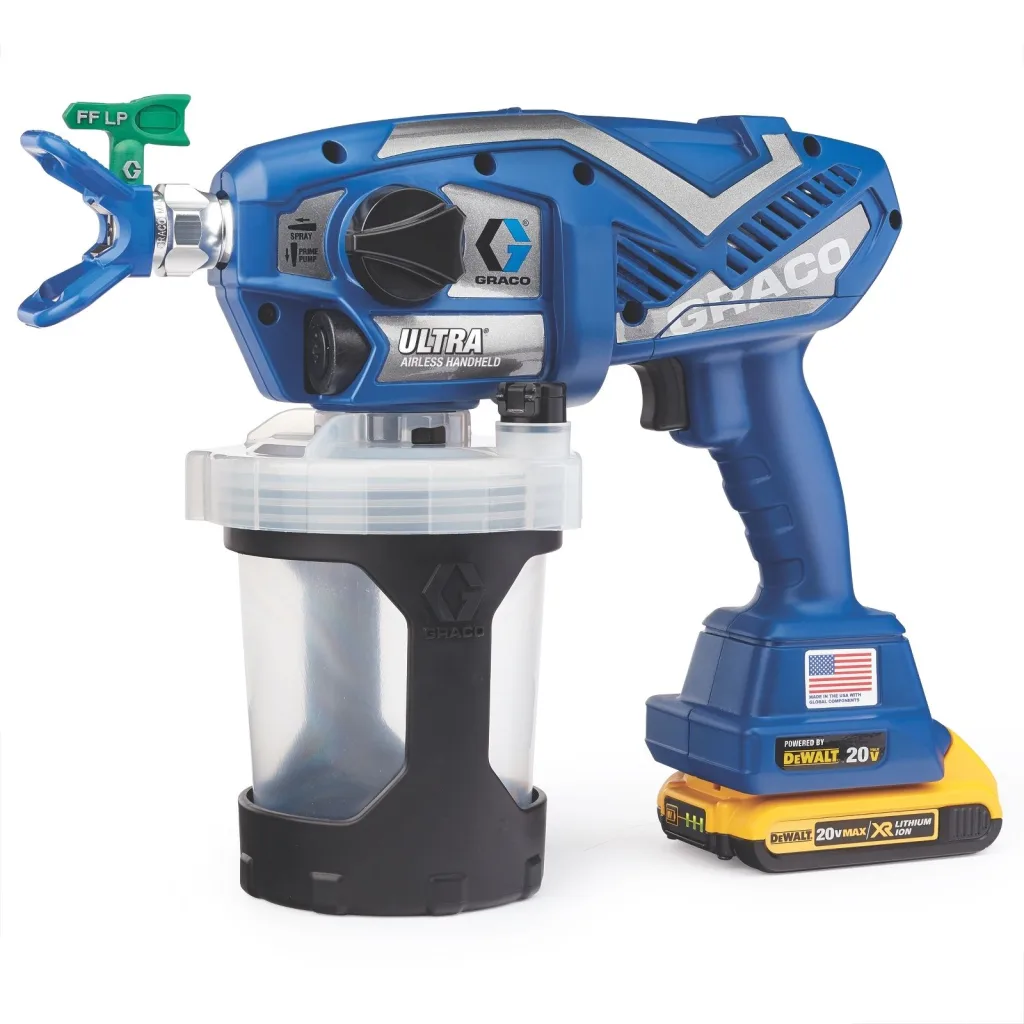
Best cordless option for specialized work:
Graco Ultra Cordless Airless Handheld Paint Sprayer 17M363
Not the conventional choice for fine automotive refinishing, but extremely useful for certain coatings and mobile workflows.
Best for clear coat precision:
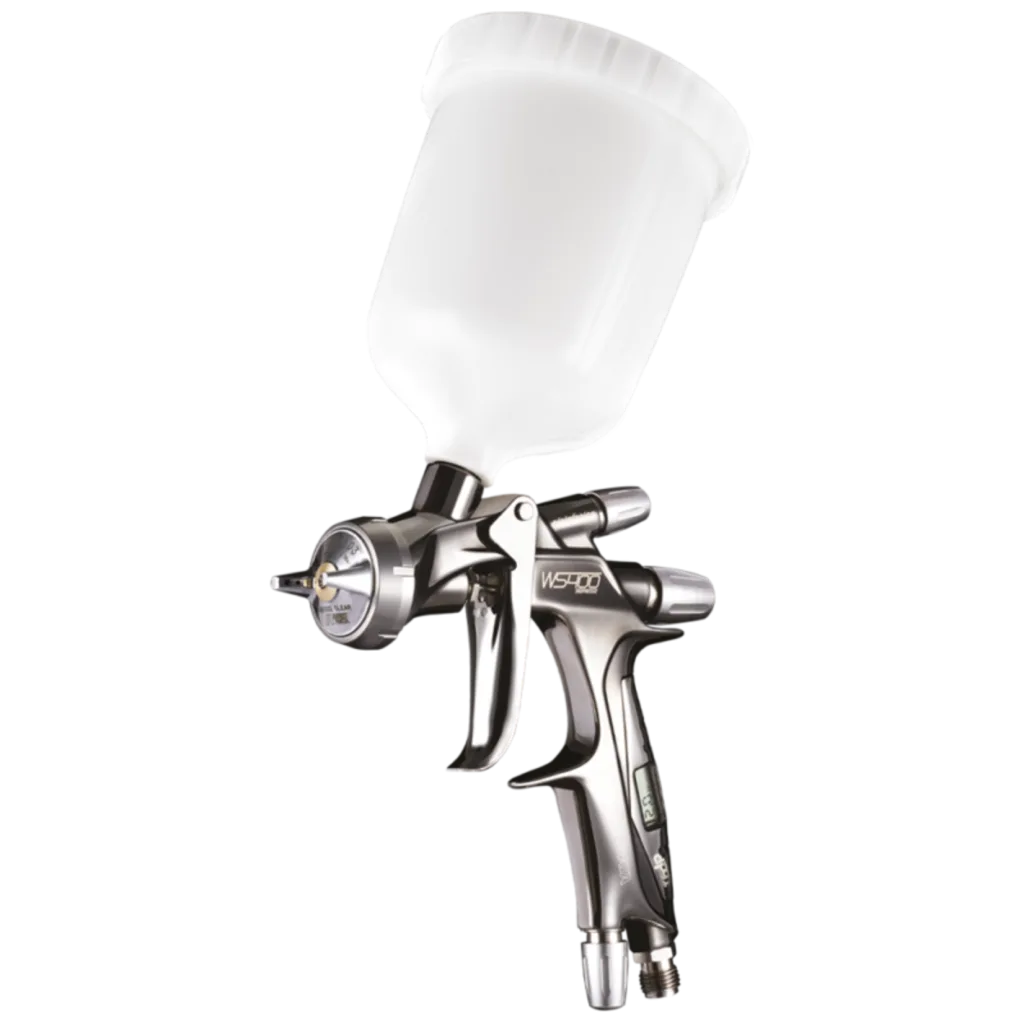
Iwata 2713D WS400 Series S2 Clear 1.3 HD
A serious clear gun with a reputation for refined atomization and premium finish quality.
Best pressure pot setup for medium-volume autobody work:
TCP Global 2 Quart Pressure Pot Spray Paint Tank
A practical option when continuous feed and longer work cycles matter more than boutique spray-gun prestige.
Best heavy-duty outfit for shop-style production:
Binks Paint Pressure Pot Spray Gun Outfit Kit
A traditional professional setup geared toward volume, endurance, and more industrial-style output.
Why the Right Automotive Spray Gun Matters
A great spray gun changes everything. It affects:
- Atomization quality
- Transfer efficiency
- Overspray control
- Orange peel risk
- Material waste
- Fatigue over long sessions
- Finish consistency from panel to panel
A poor gun can turn even good paint into a frustrating mess. You can have quality basecoat, proper reducer, and correct booth prep, yet still struggle with striping, blotchiness, dry spray, and uneven clear if the gun does not suit the material or the painter.
This is why buyers searching what is the best automotive spray gun or what is the best spray gun for automotive finishes need more than a list of star ratings. The real question is: best for what job?
A high-end SATA or Iwata can be extraordinary in trained hands, but that does not automatically make it the smartest buy for a hobbyist spraying a fender and bumper in a home garage.
What to Look for in the Best Automotive Paint Spray Gun
1. HVLP vs Airless vs Pressure Pot
Most people searching for the best automotive HVLP spray gun should start with HVLP because it remains the most popular category for automotive refinishing. HVLP guns generally offer:
- Better transfer efficiency
- Lower overspray
- Better control
- Suitability for basecoat and clear coat work
Airless systems, such as the Graco Ultra Cordless Airless Handheld, are different. They can be fast and convenient, but they are not usually the first choice for traditional show-quality automotive finishing.
Pressure pot systems like the TCP Global and Binks setups are useful when spraying larger volumes of material or when uninterrupted feed matters. They fit certain shop environments very well.
2. Nozzle Size
For automotive finishes, nozzle size matters a lot:
- 1.2 to 1.3 mm is commonly favored for clear coats and many basecoats
- 1.4 mm is a versatile all-around size
- 1.7 mm and above is more suitable for primer and thicker materials
Several of the premium guns in your list center around the sweet spot of 1.3 mm, which is a strong indicator that they are targeted at serious refinish work.
3. Finish Quality vs Speed
Some guns prioritize the absolute best atomization pattern and finish texture. Others prioritize speed, ease, and throughput. A production shop may value one thing. A restoration specialist may value another.
4. Weight and Ergonomics
Painter fatigue is real. Guns that are lighter, better balanced, and easier to clean can dramatically improve your real-world output. This is one reason the 3M Performance Spray Gun system stands out.
5. Compressor Compatibility
Many buyers overlook this. The best automotive spray paint gun in theory may be a terrible purchase if your compressor cannot keep up. Premium HVLP guns often need stable, sufficient air supply to perform correctly.
6. Material Compatibility
Not every gun behaves the same with primer, sealer, basecoat, single-stage, or clear. Some are excellent clear guns. Others are better generalists.
Detailed Reviews of the Best Automotive Spray Guns
1. SATA X5500 HVLP Spray Gun 1.3 with RPS Cups
Best Overall Premium Automotive Spray Gun
If your goal is to buy the best automotive spray gun for professional refinishing, the SATA X5500 HVLP 1.3 is one of the first names that deserves attention. SATA has long been associated with high-end collision and refinish work, and the X5500 sits firmly in that premium category.
Why it stands out
The X5500 is built for painters who care deeply about atomization characteristics, pattern stability, and finish quality. The 1.3 setup is especially well suited to basecoat and clear applications, and the HVLP configuration supports transfer efficiency with strong control.
Best for
- Professional collision shops
- Refinish specialists
- High-end clear coat work
- Users who already know how to tune a gun properly
Strengths
- Premium atomization
- Excellent finish quality potential
- Professional-grade construction
- Strong reputation in autobody environments
Weaknesses
- Expensive
- Likely overkill for casual users
- Requires proper air setup and technique to justify the price
Bottom line
For a pro-level buyer searching best automotive HVLP spray gun, this is one of the strongest answers on the list.
2. 3M Performance Industrial Spray Gun Starter Kit 26878

Best for Versatility, Weight, and Workflow Efficiency
The 3M Performance Industrial Spray Gun Starter Kit is one of the most interesting products here because it combines modern workflow advantages with strong real-world usability. It includes the PPS Series 2.0 Paint Spray Cup System, replaceable nozzles, whip hose, and air control.
Why it stands out
Traditional metal spray guns can be excellent, but they are also heavier and often slower to clean. The 3M system is designed around reducing fatigue, simplifying cleanup, and creating a more modular workflow. That matters in real shops.
Best for
- Busy painters who want speed and convenience
- Shops already comfortable with PPS cup systems
- Users who value lightweight tools
- People switching between materials and setups
Strengths
- Very light design
- Excellent workflow efficiency
- Easy cleanup
- Replaceable atomizing head concept reduces rebuild hassle
- Strong cup system integration
Weaknesses
- Consumables and proprietary ecosystem may not appeal to everyone
- Some traditionalists still prefer classic full-metal gun feel
Bottom line
If you want a modern, practical answer to what is the best spray gun for automotive finishes, the 3M deserves serious consideration. It may not have the mystique of SATA or Iwata, but in everyday shop use, it makes a compelling case.
3. Iwata 2713D WS400 Series S2 Clear 1.3 HD
Best Clear Coat Spray Gun on This List
ANEST IWATA has a loyal following for a reason. The Iwata WS400 Series S2 Clear 1.3 HD is targeted squarely at painters chasing premium clear coat results.
Why it stands out
Clear coat reveals everything. Poor atomization, inconsistent fan pattern, or unstable application quickly show up as texture issues, edge mapping, or extra cut-and-buff work. The WS400 series is respected because it is designed for refined atomization and clean, controlled application.
Best for
- Clear coat specialists
- Restoration painters
- High-end finish work
- Experienced users
Strengths
- Excellent clear coat potential
- Strong reputation for finish refinement
- Premium build quality
- 1.3 setup fits common automotive refinish needs
Weaknesses
- Premium pricing
- More specialized than an entry-level buyer may need
Bottom line
If the most important thing in your workflow is how your final clear lays down, this is arguably one of the most desirable Amazon.com options in the entire field.
4. Graco Ultra Cordless Airless Handheld Paint Sprayer 17M363
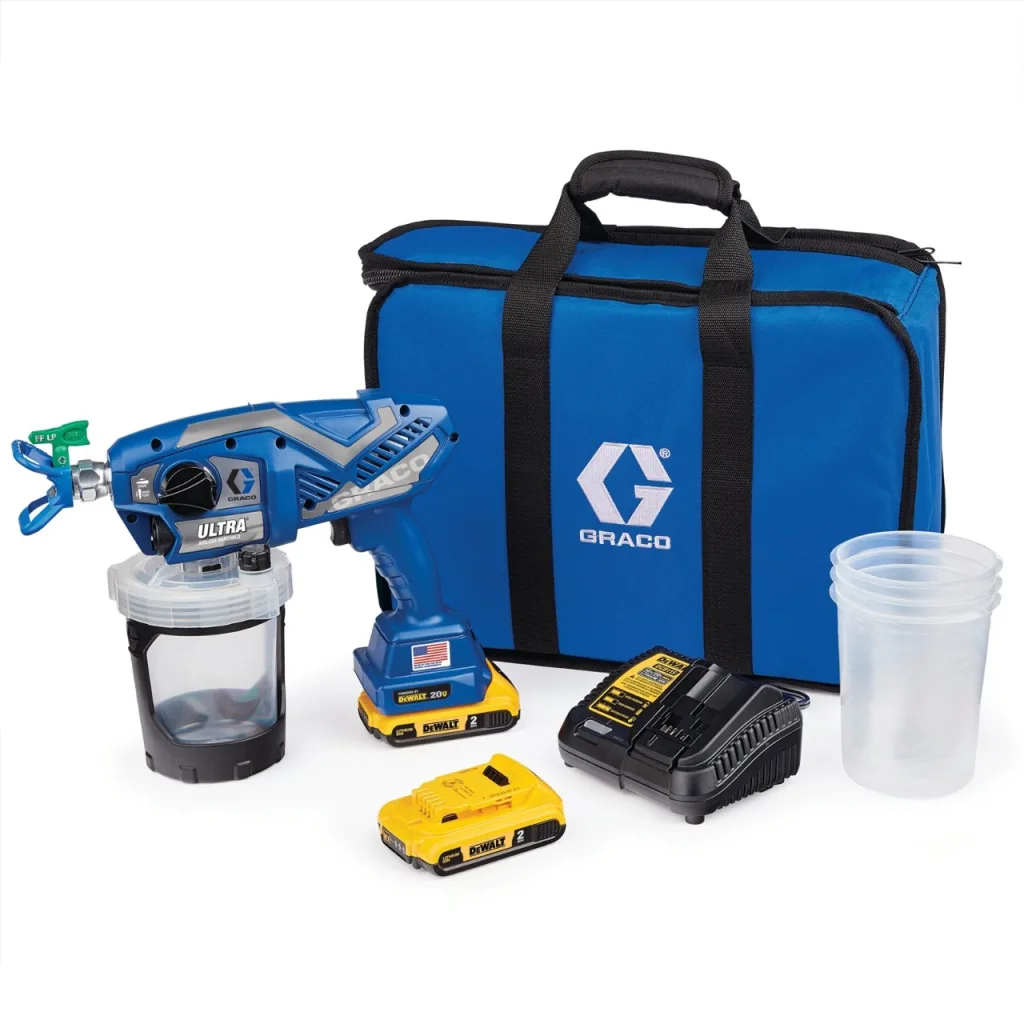
Best Specialized Cordless Option
The Graco Ultra Cordless Airless Handheld Paint Sprayer is not the most traditional answer for best automotive paint spray gun, but it is still a notable product because cordless, airless convenience can be extremely useful in certain circumstances.
Why it stands out
Mobility. Speed. No air hose. No large compressor dependency. That changes the job-site equation. For the right coatings and the right tasks, a cordless Graco can be incredibly practical.
Best for
- Spot work
- Mobile applications
- Nontraditional refinishing tasks
- Users who prioritize portability over classic booth-style spraying
Strengths
- Cordless convenience
- Fast setup
- Portable
- Useful for certain coatings and quick applications
Weaknesses
- Not the first choice for elite automotive basecoat-clearcoat finishing
- Different learning curve
- Less ideal for painters seeking classic HVLP control
Bottom line
This is a niche but valuable option. It is not the king of fine automotive finishing, but for the right buyer it may be the smartest tool in the bunch.
5. Binks Paint Pressure Pot Spray Gun Outfit Kit
Best for Heavy-Duty Shop-Style Volume Work
Binks has a long-standing reputation in finishing equipment, and this 2.8-gallon galvanized pressure pot outfit with 1.4 mm Trophy Series HVLP spray gun and 25 feet of hose is built for a different kind of workflow than compact gravity guns.
Why it stands out
A pressure pot setup helps maintain material supply over longer cycles and can be highly effective in production or semi-industrial environments.
Best for
- Medium- to high-volume work
- Shops spraying larger surfaces
- Users who prefer pressure-fed consistency
- Commercial or industrial-style finishing tasks
Strengths
- Large material capacity
- Reduced refill interruptions
- Shop-ready format
- Strong brand credibility
Weaknesses
- Less convenient for small touch-up jobs
- Larger footprint
- More setup complexity than a simple gravity HVLP gun
Bottom line
For buyers who need output more than portability, Binks remains a respected answer.
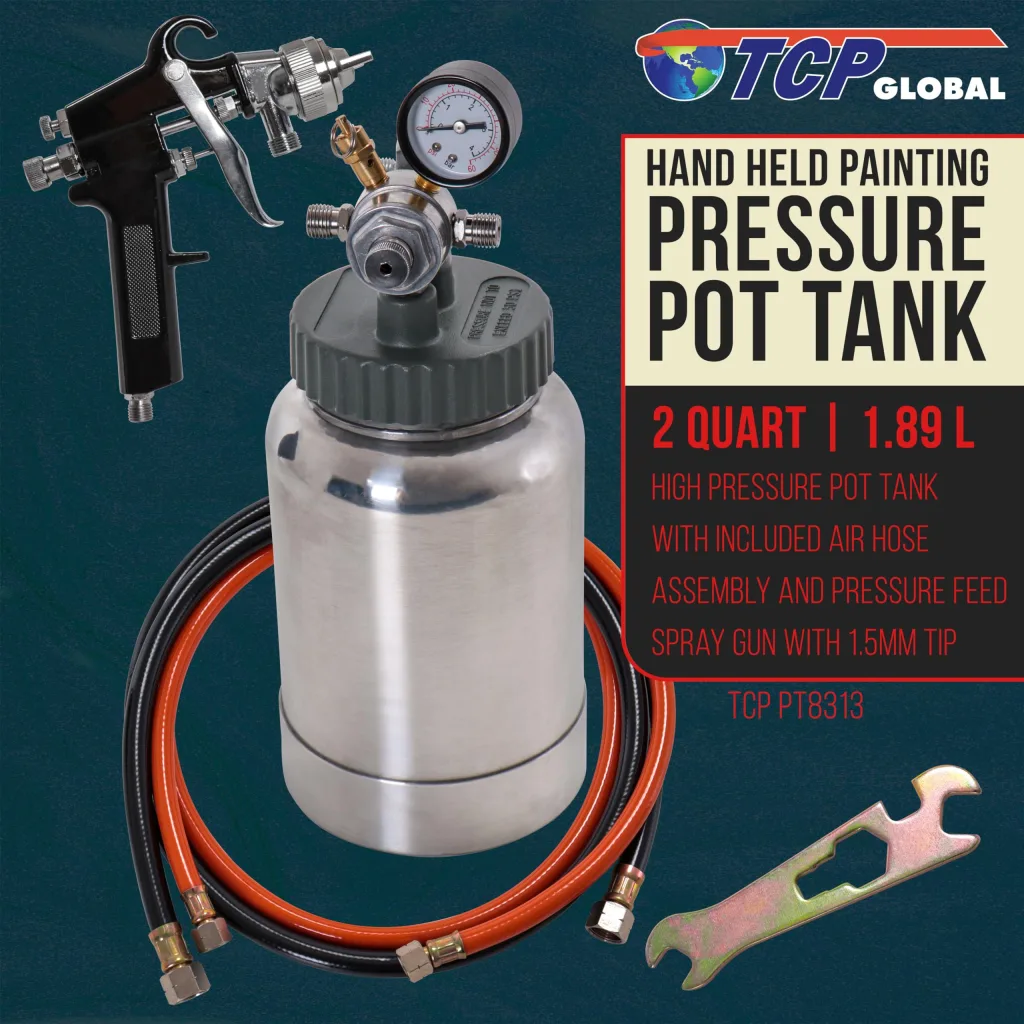
6. TCP Global 2 Quart Pressure Pot Spray Paint Tank
Best Budget-Conscious Pressure Pot Entry
The TCP Global 2 Quart Pressure Pot Spray Paint Tank is another pressure-fed solution, aimed at medium-volume painting and autobody work.
Why it stands out
Not everyone needs to jump straight into a premium Binks outfit. TCP Global offers a more accessible pressure pot route for buyers who want the workflow benefits without going fully premium.
Best for
- Budget-aware shop users
- Medium-volume spraying
- Those experimenting with pressure pot systems
- Repetitive autobody jobs
Strengths
- Pressure feed convenience
- Decent capacity
- Suitable for medium-volume work
- More approachable than some elite shop systems
Weaknesses
- Not as prestigious or refined as premium-tier alternatives
- May not match top-end guns in finish sophistication
Bottom line
A practical choice for buyers who want to step beyond basic gravity-feed hobby gear.
7. 3M Performance Fine Finish Spray Gun System 26978
Best 3M Upgrade for Fine Finish Work
This version pushes further toward fine-finish refinement with 15 replaceable gravity fine finish HVLP atomizing heads and PPS 2.0 compatibility.
Why it stands out
It takes the core strengths of the 3M system and leans harder into finish-oriented work.
Best for
- Users already committed to the 3M ecosystem
- Finish-focused painters
- Shops wanting fast turnaround and lower cleanup time
Bottom line
If you like the idea of the standard 3M Performance system but want a more finish-focused setup, this is a very strong option.
8. DeVilbiss DV1-B Basecoat Digital HVLP
Best for Basecoat-Focused Professionals
DeVilbiss is another serious name in refinish. The DV1-B Basecoat Digital is aimed at professional users who prioritize basecoat performance.
Why it stands out
Basecoat performance is not just about laying down color. It is about orientation, metallic control, consistency, and blend behavior. A basecoat-optimized gun can make difficult colors much more manageable.
Bottom line
For pro painters focused on color work, this is one of the more interesting specialist tools on the list.
Which Spray Gun Is Best for Different Types of Buyers?
Best for professionals
- SATA X5500 HVLP 1.3
- Iwata WS400 Series S2 Clear
- DeVilbiss DV1-B
- 3M Performance Fine Finish System
Best for workflow efficiency
- 3M Performance Industrial Spray Gun Starter Kit
Best for pressure-fed shop work
- Binks Pressure Pot Outfit Kit
- TCP Global 2 Quart Pressure Pot System
Best for mobility and specialty jobs
- Graco Ultra Cordless Airless Handheld
Best Automotive Spray Gun by Use Case
Best for clear coat
Iwata WS400 Series S2 Clear
Best for basecoat
DeVilbiss DV1-B or SATA X5500 HVLP
Best overall for premium refinish
SATA X5500 HVLP
Best value in a professional workflow system
3M Performance Industrial Spray Gun Starter Kit
Best for larger-volume jobs
Binks Pressure Pot Outfit Kit
Best entry into pressure pot spraying
TCP Global 2 Quart Pressure Pot
What Is the Best Automotive Spray Gun for Beginners?
This is where many buyers make expensive mistakes. Beginners often assume the most expensive tool will automatically produce the best results. It will not.
For a beginner, the ideal spray gun should offer:
- Predictable setup
- Easy cleanup
- Good ergonomic balance
- Tolerance for learning mistakes
- Manageable air demand
From your list, the 3M Performance Industrial Spray Gun Starter Kit is arguably the most beginner-friendly premium option because of its light weight, modular design, and easier maintenance workflow. It is still serious equipment, but it is less intimidating in day-to-day use than some old-school heavy metal setups.
What Is the Best Spray Gun for Automotive Finishes?
For pure finish quality, the shortlist is clear:
- SATA X5500 HVLP 1.3
- Iwata WS400 Series S2 Clear
- DeVilbiss DV1-B
- 3M Performance Fine Finish Spray Gun System
These are the types of products serious painters compare when finish quality is the priority rather than initial cost.
Common Mistakes When Buying an Automotive Spray Gun
Buying based only on hype
A gun can be world-class and still wrong for your shop.
Ignoring compressor requirements
Your gun is only as good as the air supply behind it.
Choosing one gun for every material
Ideally, primer, basecoat, and clear are not all forced through one compromise setup.
Underestimating cleanup time
A gun that saves ten minutes every session matters more than buyers think.
Confusing portability with finish quality
Cordless and airless can be brilliant in certain contexts, but they do not automatically replace premium refinish HVLP guns.
Final Verdict
If you want the most credible answer to best automotive spray gun from the Amazon.com-only products you listed, the winner for most serious automotive painters is the SATA X5500 HVLP 1.3. It is premium, proven, and aimed directly at professional-level refinish work.
If you want the smartest blend of modern workflow, reduced fatigue, and real-world versatility, the 3M Performance Industrial Spray Gun Starter Kit is probably the most practical buy for the widest range of users.
If clear coat quality is your obsession, the Iwata WS400 Series S2 Clear is one of the most attractive options on the board.
If you need shop-style pressure-fed volume, look hard at Binks and TCP Global.
And if portability matters more than conventional booth technique, the Graco Ultra Cordless Airless Handheld deserves a place in the conversation.
The truth is that the best automotive paint spray gun is not universal. The right answer depends on whether you are painting a full vehicle, blending a quarter panel, spraying high-build primer, or trying to maximize booth efficiency over dozens of jobs. But from the Amazon.com products you supplied, the list above gives you a real professional framework rather than generic affiliate fluff.
FAQ
What is the best automotive spray gun?
For premium professional automotive refinishing, the SATA X5500 HVLP 1.3 is one of the strongest overall choices from the Amazon.com products listed.
What is the best automotive HVLP spray gun?
The top HVLP choices here are the SATA X5500 HVLP, 3M Performance Fine Finish Spray Gun System, and Iwata WS400 Series S2 Clear, depending on whether you prioritize all-around use, workflow efficiency, or clear coat performance.
What is the best spray gun for automotive finishes?
For the best finish quality, especially in basecoat-clearcoat work, the strongest candidates are SATA, Iwata, DeVilbiss, and 3M from the provided list.
Is a pressure pot spray gun good for automotive work?
Yes, pressure pot systems like the Binks Paint Pressure Pot Outfit Kit and TCP Global 2 Quart Pressure Pot can be excellent for medium- to high-volume automotive work, especially when continuous material feed is valuable.
Is an airless sprayer good for automotive paint?
It can be useful for certain tasks, but most traditional automotive finish work still favors HVLP or other refinish-specific spray gun systems for maximum control and finish quality.
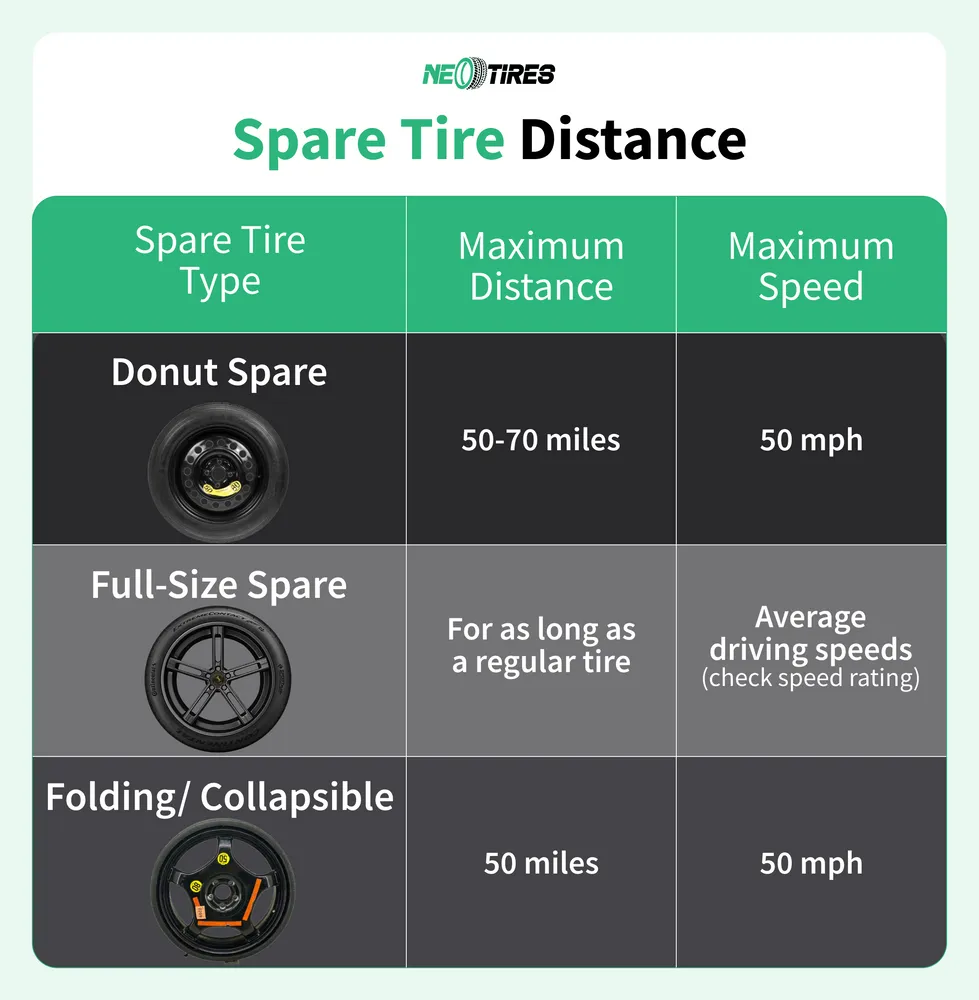
A spare tyre is not a free pass to keep driving normally. It is an emergency mobility tool designed to get you to a safe place and then to a repair facility, with limits that depend on the type of spare you have. In most real-world cases, the safe rule is:
- Temporary “space saver” or “donut” spare: keep speeds low and distance short, typically around 50 mph (80 km/h) and roughly 50 miles (80 km) as a planning baseline. (AAA)
- Full-size spare: you can usually drive more normally, but you still should treat it as temporary and match tire size, load rating, and inflation, especially on AWD systems.
If you drive a Chrysler, Dodge, Jeep, or Ram and want the safest, quickest path to get the flat fixed or replaced, start with Simi Valley CDJR service here:
https://www.simivalleychryslerdodgejeepram.com/service.aspx
Or book directly here:
https://www.simivalleychryslerdodgejeepram.com/book-your-service.html
The most important thing: what kind of spare is it?
People ask “how long can I drive on a spare tyre” as if there is one number. There is not. The answer changes dramatically based on spare type.
1) Temporary spare (space saver, donut)
This is the skinny, compact spare that saves weight and trunk space. It is designed for short-distance, low-speed use only.
Authoritative road clubs and tire brands consistently point to similar limits:
- AAA says you should not drive over 50 mph and no more than 50 miles on a donut-type spare. (AAA)
- UK guidance commonly sets the maximum speed at 50 mph for space saver spares. (RAC)
- Australia-focused guidance frequently notes space saver spares are typically limited to 80 km/h and short distance, with the exact limit on the sidewall or vehicle manual. (NRMA)
These are not “performance numbers.” They are safety limits driven by the spare’s narrower contact patch, different construction, and reduced grip.
2) Full-size spare
A full-size spare is the same size as your normal wheel and tire, or at least the same rolling diameter and load rating. This is the best spare to have from a drivability and safety standpoint.
Even so, you still want to:
- Confirm tire pressure is correct
- Confirm the tire size matches
- Avoid hard driving until you repair the original tire
- Be especially cautious if the vehicle is AWD and the tires are unevenly worn
3) Run-flat or extended-mobility tires (not a spare, but relevant)
Some vehicles have no spare because the tires can be driven temporarily when deflated. These have their own strict distance and speed limits. For example, Goodyear notes deflated operation is typically restricted to 50 mph (80 km/h) for up to 50 miles (80 km) for certain extended mobility designs, but you must follow your specific tire and vehicle guidance. (Goodyear Canada)
The practical baseline limits that answer your keyword directly
If you want a simple, high-confidence baseline for a temporary spare, this is the safest planning answer to “how long can you drive on a spare tyre”:
Typical temporary spare limits
- Speed: do not exceed 50 mph (80 km/h) (AAA)
- Distance: aim to keep it under 50 miles (80 km) as a conservative “get to a shop” guideline (AAA)
That covers the dominant real-world scenario: a space saver spare.
Two important notes:
- Your spare’s sticker and sidewall are the final authority. Many space saver spares have a clear speed marking, and your owner’s manual may specify distance and placement restrictions. The AA (UK) specifically advises checking your handbook and labels and notes there can be restrictions such as front-only or rear-only use for safety or drivetrain reasons. (The AA)
- Distance is not a “legal allowance.” It is a risk threshold. Some safety groups say there may be no explicit legal mileage cap, but it is still not recommended to drive far on a space saver. (TyreSafe | Safe Tyres Save Lives)
UK specific: how long can you drive on a spare tyre UK?
In the UK, “space saver” is the common phrase. The consistent guidance from major UK motoring organizations is:
- Do not exceed 50 mph with a space saver spare (RAC)
- Treat it as temporary mobility only, with altered handling and braking characteristics (RAC)
The RAC also highlights that grip and stability are reduced, and heavy braking or acceleration can make the vehicle more likely to skid. (RAC)
In other words, the UK version of the answer is:
- 50 mph max
- Replace or repair the original tyre as soon as possible
- Drive gently and avoid long trips
Australia specific: how long can you drive on a spare tyre Australia?
In Australia, the common rule-of-thumb for space saver spares is:
- 80 km/h maximum (NRMA)
Distance guidance varies depending on spare design, but many Australian sources describe space savers as designed for short, emergency use to reach a repair facility, often implying an “as little as necessary” approach. (NRMA)
The best Australia-specific answer is:
- Treat it as short-term emergency use
- Do not exceed 80 km/h unless the spare explicitly states a lower limit
- Head straight to a tire shop
Why the limits exist (and what actually changes when you install a spare)
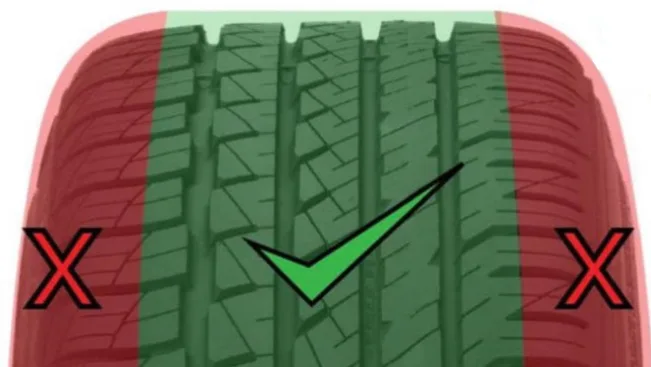
A temporary spare changes your vehicle in ways that matter:
1) Less grip, especially under braking and in the wet
Space saver spares are narrower and can have different rubber compounds and tread patterns. Reduced contact patch equals reduced traction.
2) Different handling balance
One corner of the car now has a tire with different grip and stiffness. Under cornering and braking, stability can feel “off.” This is why UK organizations emphasize reduced grip and altered handling. (RAC)
3) ABS, traction control, and stability control behavior can change
These systems infer wheel speed and traction based on what the wheels are doing. If the spare has a different rolling circumference or grip level, the system can respond differently.
4) Potential drivetrain stress on AWD or 4WD
If the spare is not the same rolling diameter as the other tires, AWD systems can be forced to compensate constantly. Even a small mismatch can create heat and wear over time. This is one reason you do not want to “run it for a week” if you have AWD.
A clear “how long” answer by spare type
Here is a direct guide you can use.
Temporary spare (space saver, donut)
- Max speed: commonly 50 mph (80 km/h) (AAA)
- How long: treat as “get to repair” only, often planned around 50 miles (80 km) (AAA)
Full-size spare
- Max speed: typically normal road speeds, assuming correct rating and pressure
- How long: you can drive longer than a space saver, but you should still repair the original tire soon. If it is a matching full-size tire, the risk is far lower than a donut.
Run-flat mobility (no spare)
- Max speed and distance: depends on the tire and vehicle; 50 mph (80 km/h) for up to 50 miles (80 km) is a common design reference point in some systems, but always follow your tire’s guidance (Goodyear Canada)
What you should do immediately after installing a spare tyre
This is where people accidentally create risk.
1) Inflate the spare properly
Space saver spares often require higher PSI than your normal tires. The correct PSI is usually on:
- the spare tire sidewall
- a sticker in the trunk area
- the driver door placard
- the owner’s manual
2) Check the spare’s condition
Spare tires age out. If it is cracked, dry-rotted, or visibly damaged, it may not be safe even if it has tread.
3) Retorque the lug nuts
After driving a short distance, it is good practice to have lug torque verified. This reduces risk of wheel vibration or loosening.
4) Adjust your driving style
With a temporary spare:
- Increase following distance
- Avoid sudden lane changes
- Avoid hard braking
- Avoid potholes and rough roads where possible
- Keep speed comfortably below the spare’s rating
Can you drive on the motorway or highway with a spare?
You can, but it is not ideal with a temporary spare because highway speeds often exceed the spare’s limits, and the consequences of failure are higher.
If you must use a motorway:
- Keep speed under the spare’s rating (often 50 mph, which is below typical motorway flow) (RAC)
- Use hazard awareness and stay in the safest lane for your region
- Get off as soon as reasonably possible
The correct mindset is: a spare tyre is to get you off the road hazard and to service, not to continue your trip.
What if the spare tyre is on the front vs rear?
Some vehicles have restrictions about where a temporary spare can be used. The AA notes that temporary spares can be restricted to front-only or rear-only to avoid interference with braking components or transmission damage. (The AA)
This matters because:
- Some cars have larger front brakes that may not clear certain spares
- Some drivetrains react badly if the spare is on a driven axle
- Stability can change if the spare is on the steering axle
If you have any label on the spare that indicates front or rear placement only, follow it.
When you should not drive at all on a spare
Do not drive, even slowly, if:
- The spare is underinflated and you cannot inflate it
- The spare has visible cracking, bulging, or cord showing
- You have multiple damaged tires
- You have severe vibration after installing the spare
- The spare is a different bolt pattern or does not seat correctly
If any of those apply, tow is safer and often cheaper than dealing with a wheel-off or blowout scenario.
How long should you keep the spare on before replacing the original tyre?
The honest, safety-first answer is: as short as possible. Even when no law limits distance, multiple safety resources emphasize minimal necessary travel and prompt replacement or repair. (The AA)
A practical guideline:
- Space saver: same day repair if possible
- Full-size spare: repair within a few days, and sooner on AWD
If you need tire service and you are local, book through Simi Valley CDJR:
https://www.simivalleychryslerdodgejeepram.com/service.aspx
https://www.simivalleychryslerdodgejeepram.com/book-your-service.html
A simple reference table
| Spare type | Typical max speed | Practical distance mindset |
|---|---|---|
| Space saver, donut | 50 mph (80 km/h) | Get to repair, roughly 50 miles (80 km) baseline |
| Full-size spare | Normal, if properly rated | Short-term is fine, still repair soon |
| Run-flat mobility | Often 50 mph (80 km/h) in deflated mode | Often up to 50 miles (80 km) depending on tire |
Speed and distance references align with major guidance like AAA and Goodyear, but always defer to the tire label and your manual. (AAA)
Bottom line
If you are on a temporary spare, the safest in-depth answer is:
Sometimes, yes, for a short, controlled trip to get it repaired. But it depends on where the nail is, how much air you’re losing, and whether the tire has already been driven underinflated. The wrong call here can turn a simple puncture repair into a tire replacement, a blowout, or wheel damage.
AAA and tire manufacturers emphasize that a “small problem, such as a nail,” should be addressed early before it becomes more expensive or unsafe. (exchange.aaa.com) Michelin is even more conservative and states any puncture should be checked by a qualified professional and warns that driving on a damaged tire can lead to rupture and unsafe handling. (michelin.ca)
Below is a practical, 2026-ready decision guide that prioritizes safety and cost control.
The fast decision rule
You can usually drive a short distance only if all these are true
- The tire is still holding close to normal pressure (or drops very slowly).
- The nail is in the tread area, not the sidewall or shoulder.
- There is no vibration, thumping, wobble, or pulling.
- You can go directly to a tire shop without high speeds or long highway miles.
You should NOT drive and should stop/air up/put on a spare if any of these are true
- The tire is visibly low, losing air fast, or the TPMS warning is on and pressure keeps dropping.
- The nail is in the sidewall or shoulder (near the outer edge of the tread).
- You hear hissing, feel handling changes, or see bulging, cuts, or tearing.
- You already drove on it while it was low (risk of internal sidewall damage).
- You have a run-flat that has been driven beyond its limits (run-flats still have strict distance/speed limits per brand).
Why driving with a nail can be risky (even if it “feels fine”)
A nail puncture is often deceptively stable because the nail can partially “plug” the hole. The danger is what happens when:
- the nail shifts
- the tire warms up
- the puncture widens
- the tire pressure drops below safe operating range
Once a tire runs underinflated, the sidewall flexes more, heat builds up, and internal damage can occur. That internal damage is not always visible from the outside, which is why reputable repair standards require removing the tire and inspecting the inside before repair. U.S. Tire Manufacturers Association guidance says tires must be removed from the wheel and inspected internally, and the proper repair uses a combination repair (plug/stem plus patch), not a plug alone. (ustires.org) Michelin also states the tire should be removed for inspection and that a repair performed without demounting can be improper and “can result in an accident.” (Michelin)
First steps: what to do the moment you notice a nail
1) Do not pull the nail out in the parking lot
Leaving it in place can reduce air loss until you reach a repair shop. Many tire safety guides advise assessing first and avoiding removing the object until you are prepared to repair. (gtradial-us.com)
2) Check tire pressure right away
Use a gauge. Do not rely only on how the tire looks.
- If pressure is near normal, you may be able to drive carefully to service.
- If pressure is low, add air (portable inflator) and reassess.
- If pressure won’t hold, put on the spare or tow.
3) Visually assess where the nail is
Location determines whether the tire is repairable.
The most important factor: nail location
Tread center area (often repairable)
Most punctures in the center of the tread can be repaired if they meet size and damage criteria. The Tire Industry Association notes repairs are limited to the center of the tread; punctures or damage in the shoulder or sidewall are not repairable. (tireindustry.org)
Shoulder and sidewall (usually not repairable)
A puncture in the shoulder or sidewall is typically a replacement because those zones flex more and are structurally critical. TIA specifically says shoulder/sidewall punctures are not repairable. (tireindustry.org)
Repairability rules (what shops follow)
A quality shop will generally follow rules like these (they vary slightly by manufacturer, but the theme is consistent):
1) Puncture must be in the repairable tread zone
Center tread only. (tireindustry.org)
2) Puncture size limit
TIA guidance: never repair tread punctures larger than 1/4 inch (6 mm). (tireindustry.org)
3) No overlapping repairs or structurally compromised damage
TIA warns that overlapping injuries or certain positioning can make the tire non-repairable. (tireindustry.org)
4) Proper method is a combination repair
USTMA says a plug/stem must fill the injury and a patch seals the inner liner; plug-only is unacceptable. (ustires.org)
Michelin similarly emphasizes that repairs must be the combined plug-and-inside-patch type and that demounting/inspection is required. (Michelin)
How far can you drive with a nail in the tire?
There is no universal mileage number because the leak rate varies. The safe guidance is “drive only as far as needed to reach service.”
A practical way to interpret that:
If the tire is holding pressure
- Drive directly to the nearest repair shop.
- Keep speed moderate and avoid aggressive maneuvers.
If the tire is losing air slowly
- Air it up to correct PSI.
- Drive only a short distance to service.
- If the TPMS warning returns quickly, stop and reassess.
If the tire is losing air fast
- Do not drive on it. Use a spare or tow.
The core idea is that the moment you drive underinflated, you risk internal damage that may force replacement even if the hole is small.
What if you have TPMS and it’s not warning you?
TPMS is helpful, but it is not perfect. Some systems only warn when pressure is significantly below the placard value. You can still be low enough to cause excess heat and wear without a warning. Always use a gauge if you suspect a puncture.
What you should avoid while driving to service
If you decide it’s safe to drive to a shop, reduce risk:
- Avoid highway speeds if possible.
- Avoid potholes and hard impacts.
- Avoid hard cornering and heavy braking.
- Keep the route short and direct.
- Recheck pressure if the drive is more than a few miles.
If you have passengers or cargo, keep loads lighter if possible.
Plug kit vs. proper repair (what’s actually “correct”)
You will see conflicting advice online about “just plug it.” Here is the standard the serious organizations push:
- The preferred repair is a demount + internal inspection + combination patch/stem repair. (ustires.org)
- Plug-only repairs are widely considered inferior because they may not seal the inner liner correctly and skip internal damage inspection. (ustires.org)
A plug kit can be a temporary roadside measure in some situations, but it should not replace a proper internal inspection and repair if you care about long-term safety and tire integrity.
Special cases that change the answer
Run-flat tires
Run-flats may allow limited driving after puncture, but they have strict distance and speed limits and can be damaged internally if driven too far. If you’re not sure, treat it conservatively and get professional help.
AWD/4WD vehicles
With AWD, tread depth mismatches can matter more. If you end up needing a replacement and the other tires are worn, you may need to consider replacing more than one tire depending on the manufacturer’s tolerance.
Nail near the edge of the tread
This is the gray zone. It might look like “tread,” but if it’s close to the shoulder, many shops will refuse repair based on industry guidance. (tireindustry.org)
The cost difference: repair now vs. replace later
Catching a nail early often means:
- a straightforward repair (if in the repairable zone)
- minimal risk of internal damage
- less chance you destroy the tire by driving low
Waiting often means:
- the puncture worsens
- you drive underinflated
- internal damage forces tire replacement
- possible wheel damage if driven flat
AAA’s maintenance guidance frames this as a classic “small problem becomes expensive” situation if ignored. (exchange.aaa.com)
What to tell the tire shop (to get the right result)
When you arrive, be specific:
- “There is a nail in the tire, pressure is currently at X PSI.”
- “I have/have not driven on it while low.”
- “Please demount and inspect internally.”
- “If repairable, I want a combination patch/stem repair.”
That aligns with USTMA and Michelin’s stated approach. (ustires.org)
If you’re in the Simi Valley area (CDJR owners)
If you drive a Ram, Jeep, Dodge, or Chrysler and want it inspected and handled properly, you can start with the dealership service page or book directly:
- https://www.simivalleychryslerdodgejeepram.com/service.aspx
- https://www.simivalleychryslerdodgejeepram.com/book-your-service.html
Bottom line
You can sometimes drive with a nail in your tire only long enough to reach service, and only if the tire is still holding pressure and the puncture is in the tread area. The safest move is:
- Do not remove the nail immediately (gtradial-us.com)
- Check pressure with a gauge
- If pressure is stable, drive carefully and directly to a shop
- Get a demount + internal inspection + combination patch/stem repair (if repairable) (ustires.org)
- If the nail is in the shoulder or sidewall, expect replacement because it is generally not repairable (tireindustry.org)
Disabling Anti Lock Brakes: What You Should Do Instead, Why ABS Exists, and How to Fix the Real Problem
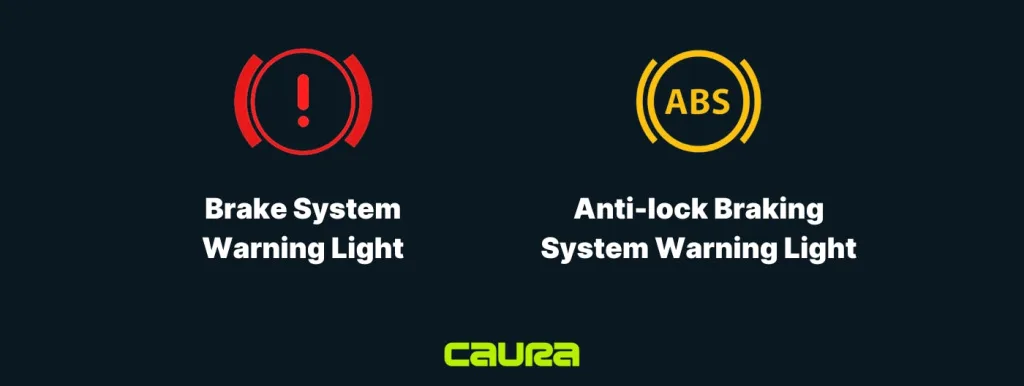
If you are driving a Chrysler, Dodge, Jeep, or Ram and want this diagnosed properly, start here:
https://www.simivalleychryslerdodgejeepram.com/service.aspx
Or book an appointment here:
https://www.simivalleychryslerdodgejeepram.com/book-your-service.html
What ABS actually does (and why it feels weird when it activates)
ABS, Anti Lock Braking System, prevents the wheels from locking during hard braking. It does this by reading wheel speed and rapidly controlling brake pressure at each wheel. Bosch, one of the major ABS system suppliers, describes the core components as wheel-speed sensors, a control unit, and a hydraulic unit with valves and a pump that modulate pressure when a wheel is about to lock. (bosch-mobility.com)
When ABS activates, the brake pedal often pulses and you may hear a buzzing or grinding-like sound. That is normal for ABS operation. It is the system cycling pressure many times per second to keep the tire rolling enough to maintain steering control.
NHTSA summarizes ABS behavior similarly: it senses a wheel about to lock, releases and reapplies pressure repeatedly, and enables steering while braking. (crashstats.nhtsa.dot.gov)
The key point
ABS does not exist to make the brake pedal feel smooth. ABS exists to help you retain control under panic braking, especially when traction is uneven across the tires.
Why “turning ABS off” is usually the wrong solution
Disabling ABS can increase stopping distance on many real-world surfaces and can reduce your ability to steer during an emergency stop. NHTSA’s research and evaluations repeatedly emphasize that ABS helps maintain directional stability and steering control while braking. (NHTSA)
Also, ABS is not isolated anymore. On most modern vehicles, ABS is the foundation for:
- traction control
- electronic stability control
- brake-based torque vectoring
- hill descent control on some models
- brake lock differential type features on some off-road vehicles
So the moment you try to defeat ABS, you often create a cascade of issues.
If you want less ABS intervention off-road, use factory-supported settings
This is the safe and correct approach. Many 4x4s and trucks adjust braking logic by design depending on:
- 4WD High vs 4WD Low
- terrain modes (sand, mud, snow, rock)
- stability control mode changes
Factory modes are engineered to allow some wheel slip or changed thresholds without removing the safety logic entirely.
If you are driving a Jeep, use the normal Jeep 4×4 system guidance as your baseline for when to use high range vs low range in different conditions. (Jeep Canada)
If you tell me your exact year and model, I can outline what modes your vehicle likely has and what each mode is intended to do. I will keep it at an operational level, not bypass instructions.
If your ABS is activating when it should not, it is usually a sensor or hardware problem
This is the most common reason people want ABS disabled. The driver is not actually trying to lose ABS. They are trying to stop the annoying low-speed pulsing, vibration, or unexpected activation on bumps.
Common symptom patterns
1) Low-speed ABS activation near a stop
You are slowing down gently, almost stopped, and the pedal pulses as if you slammed the brakes. This often points to a wheel speed sensor signal dropping out at low speed.
Typical causes:
- dirty or damaged wheel speed sensor
- cracked or rusty tone ring, also called reluctor ring
- wiring damage near the wheel hub
- wheel bearing play changing the sensor air gap
- mismatched tire sizes or uneven tire wear confusing wheel speed logic
2) ABS and traction control lights turning on together
This often means the vehicle detected a fault in wheel speed data, yaw rate data, steering angle input, or a module communication issue. The system may disable ABS and stability features and store diagnostic codes.
3) ABS activates on bumps or rough pavement
A sensor signal interruption, loose connector, failing bearing, or harness issue can cause momentary signal loss that the module interprets as lockup.
How ABS is diagnosed properly (what to ask for)
A real diagnosis is not guessing. It is a process:
Step 1: Scan ABS codes, not just engine codes
Many basic scanners read powertrain codes only. You need an ABS-capable scan tool to pull the stored fault codes and freeze frame data.
Step 2: Read live wheel-speed data
A technician should watch wheel speed readings while driving slowly and compare all four wheels. The “bad” corner often shows:
- drop to zero too early
- erratic spikes
- lag compared to other wheels
- intermittent signal loss on turns or bumps
Step 3: Inspect the physical components at the fault corner
This includes:
- sensor mounting and tip condition
- tone ring condition and tooth integrity
- debris, rust, or metal shavings
- hub bearing play
- connector pin corrosion
- harness routing and chafing points
Step 4: Verify tires match and inflation is correct
Different rolling diameters can create wheel speed differences that trigger traction and stability systems.
Step 5: Confirm charging and battery health if voltage-related codes exist
Low voltage and unstable voltage can trigger module faults.
If you want a CDJR-focused shop to do this process, schedule through:
https://www.simivalleychryslerdodgejeepram.com/service.aspx
https://www.simivalleychryslerdodgejeepram.com/book-your-service.html
Why ABS sometimes increases stopping distance on loose gravel or snow
Some drivers notice that on loose gravel, deep snow, or sand, locked wheels can build a wedge of material in front of the tire, sometimes stopping faster than rolling tires with ABS modulation. That is one of the reasons some vehicles change ABS calibration in off-road settings.
However, that situation is nuanced:
- locked wheels reduce steering
- surface conditions vary drastically
- modern off-road calibrations try to balance stopping and steering
So the right move is not to disable ABS. The right move is to use the manufacturer’s off-road settings if they exist, and drive with technique appropriate to the surface.
The practical “what should I do” checklist
If your goal is “I want ABS to stop acting up,” do this in order:
1) Confirm what the warning lights are actually telling you
- ABS light on means ABS may be disabled by the vehicle due to a fault.
- traction control light indicates wheel slip control.
- stability control light indicates the system is actively intervening.
2) Check tire basics
- all four tires same size
- tread depth reasonably consistent
- correct inflation
3) Scan ABS codes
This is the turning point. Without codes, you are guessing.
4) Identify the corner
Wheel-speed sensor faults usually show a pattern tied to one wheel.
5) Inspect and repair the root cause
Most often wheel speed sensor or tone ring issues.
6) Road-test and confirm live data stability
A proper fix ends the random interventions.
If your real goal is better braking performance, do not blame ABS first
ABS is the control layer. It cannot create traction. If your braking feels weak, inconsistent, or noisy, look at the mechanical and hydraulic fundamentals:
Pads and rotors
- pad thickness
- rotor thickness and condition
- rotor runout or thickness variation causing pulsation
- glazed pads or uneven deposits
Caliper hardware
- slide pins must move freely
- boots must seal
- pad ears must slide in bracket freely
Brake fluid condition
Brake fluid absorbs moisture over time. Moisture reduces boiling point and can contribute to a soft pedal under heat.
A good brake service includes both pad wear evaluation and hardware condition, not just pad swapping.
If you need a brake inspection or repair, start with the dealership service department:
https://www.simivalleychryslerdodgejeepram.com/service.aspx
What not to do
If you are serious about safety and avoiding bigger repair bills, do not do these:
- Do not pull fuses or cut wiring to “turn off ABS.” This can create unpredictable braking behavior and can affect stability control and other systems.
- Do not rely on an ABS fault as a permanent solution. If ABS is disabled because of a fault, you are driving without key safety functions.
- Do not ignore an ABS light. When you need ABS, you usually need it immediately, not after you get around to it.
A clear explanation of the ABS components (so you know what fails)
ABS is usually made up of:
Wheel speed sensors
One at each wheel or axle, sending speed data.
Tone rings or encoder rings
These are toothed rings or magnetic encoder surfaces that the sensor reads.
ABS control module
This is the logic brain.
Hydraulic modulator
Contains valves and a pump that modulate brake pressure. Bosch describes the hydraulic unit and valves controlling braking pressure at each wheel and reducing pressure when lockup risk occurs. (bosch-mobility.com)
When your ABS acts up, most of the time it is a wheel speed sensor signal quality problem, not a master cylinder or brake booster issue.
When ABS behavior is normal
ABS activation is normal when:
- you brake hard on wet pavement
- you brake on ice or packed snow
- you brake hard on a surface with mixed traction
- you brake hard while turning and the tire grip is near the limit
ABS pedal pulsation during these conditions is expected.
NHTSA testing and long-term evaluations consistently emphasize that ABS helps maintain control and can reduce stopping distances on many surfaces versus locked-wheel skidding. (crashstats.nhtsa.dot.gov)
When ABS behavior is not normal
ABS activation is not normal when:
- it activates during gentle stops on dry pavement
- it activates consistently at low speeds without harsh braking
- you have warning lights related to ABS, traction control, or stability control
- the vehicle pulls, drags, or one wheel gets unusually hot
This is when diagnosis matters.
Service CTA for CDJR owners in Simi Valley
If you are driving a Jeep Wrangler, Grand Cherokee, Gladiator, Ram 1500, or any Dodge or Chrysler product and your ABS is acting up, get it scanned and road-tested with live wheel-speed data. That is the fastest path to a real fix.
Start here:
https://www.simivalleychryslerdodgejeepram.com/service.aspx
Book here:
https://www.simivalleychryslerdodgejeepram.com/book-your-service.html
If you prefer quick-service maintenance routing, Simi Valley CDJR also provides Express Lane information here:
https://www.simivalleychryslerdodgejeepram.com/express-lane.html
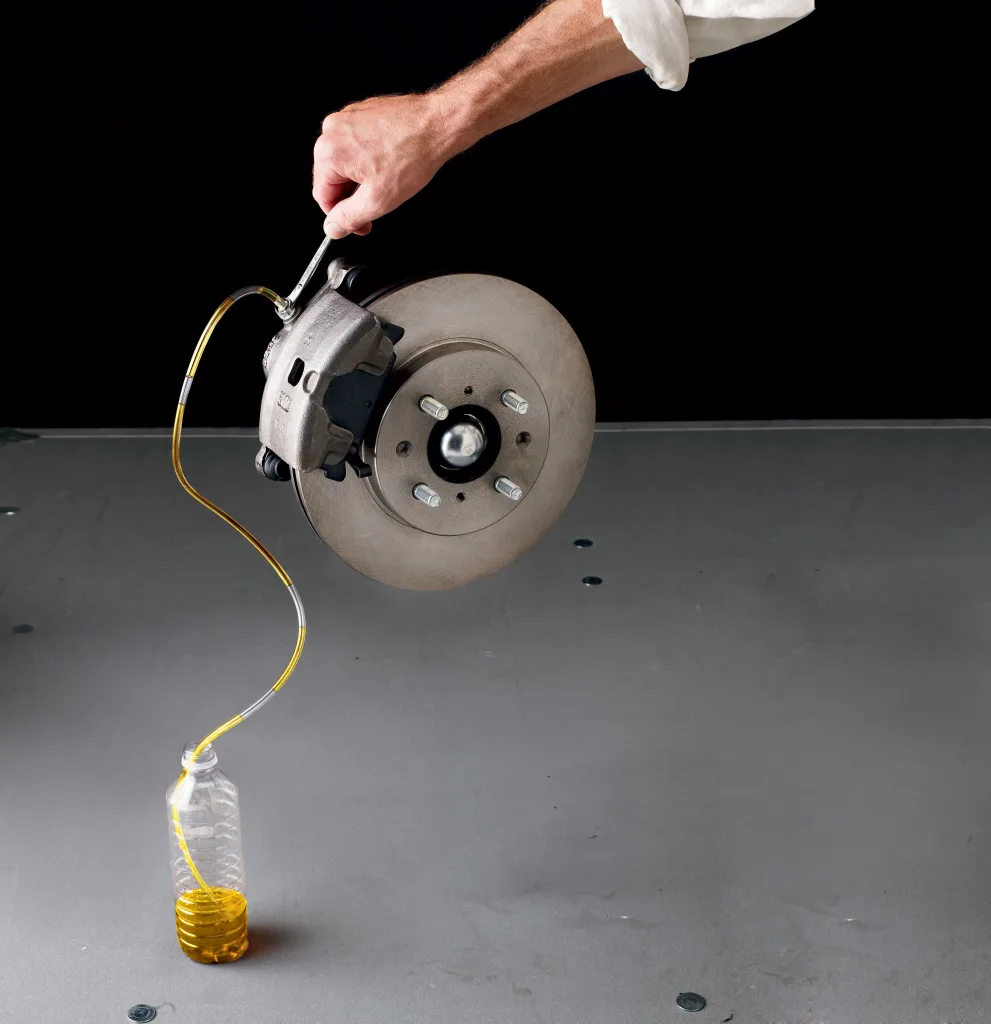
If you are replacing brake pads, cleaning brake hardware, or trying to fix squeaks and uneven pad wear, one of the most common questions is simple: where exactly do you grease brake pads?
The answer is straightforward once you understand how the brake assembly actually moves. You do not grease the friction surface of the brake pad. You do not grease the rotor. You do not coat everything in lubricant and hope for the best. Brake lubricant belongs only on the specific metal-to-metal contact points and moving hardware that need to slide smoothly without binding. PowerStop’s brake lubrication guidance specifically says brake lubricant should be applied only to the outside of the pad and contact areas, never the friction material that touches the rotor. (PowerStop Brakes)
For drivers who want professional brake service, inspections, or hardware replacement on a Dodge, Jeep, Ram, or Chrysler, Simi Valley Chrysler Dodge Jeep Ram offers brake repair and fluid checks through its service department at https://www.simivalleychryslerdodgejeepram.com/service.aspx. The dealership also offers online booking at https://www.simivalleychryslerdodgejeepram.com/book-your-service.html and Express Lane information at https://www.simivalleychryslerdodgejeepram.com/express-lane.html. (simivalleychryslerdodgejeepram.com)
Why brake pad grease matters in the first place
A disc brake system is not just pads squeezing a rotor. The whole assembly depends on controlled movement. The pads must slide freely in the bracket. The caliper slide pins must move smoothly. The backing plate contact points must not bind or chatter. If these areas corrode, dry out, or accumulate debris, you can end up with:
- brake squeal
- uneven pad wear
- pad drag
- overheated brakes
- reduced fuel economy
- premature rotor wear
- sticking calipers
- poor pedal feel
That is why proper lubrication matters. PowerStop’s installation guidance specifically calls for brake lube on guide pins and pad contact points after cleaning rust and inspecting hardware. (PowerStop Brakes)
In practical terms, brake grease is not there to make the pad “slippery.” It is there to keep the non-friction moving points operating correctly.
The short answer: where to grease brake pads
If you want the quick checklist, these are the main places where brake lubricant is typically applied during a disc brake service:
- Caliper slide pins
- Pad ears or tabs where the pads sit and slide in the bracket
- Abutment clip contact surfaces
- Caliper bracket contact points
- Back of the pad backing plate only where the caliper piston or caliper fingers make contact
That is the core answer. PowerStop, Wagner, and Ferodo all align on the basic principle: lubricate the hardware and metal contact points lightly, and keep grease away from the friction material and rotor braking surface. (PowerStop Brakes)
Where exactly to grease brake pads
Let’s go point by point so there is no confusion.
1. Caliper slide pins
This is one of the most important lubrication points in the whole brake assembly. On a floating caliper setup, the slide pins allow the caliper to move laterally so both pads apply even pressure. If the pins are dry, rusty, seized, or lubricated with the wrong product, the caliper can stick. That can cause one pad to wear faster than the other, brake pull, overheating, and constant drag.
Brake installation guidance from PowerStop specifically calls for brake lube on the guide pins. (PowerStop Brakes)
When servicing slide pins:
- remove the pins
- wipe off old grease
- inspect for rust, scoring, or damage
- inspect the rubber boots
- apply the correct brake lubricant sparingly
- reinstall without overpacking
If the slide pins are damaged or the boots are torn, lubrication alone is not enough. The hardware may need replacement.
For brake inspections and repair scheduling, Simi Valley CDJR’s service department is here: https://www.simivalleychryslerdodgejeepram.com/service.aspx
2. Brake pad ears or tabs
The pad ears, tabs, or ends are the portions of the pad backing plate that sit in the caliper bracket or abutment clips. These are major sliding contact points. If corrosion builds up underneath the clips or on the bracket, the pads can bind instead of retracting cleanly after braking.
PowerStop notes that lubricant belongs on the side of the pad that slides into the caliper housing, not on the friction face. Wagner similarly advises applying grease where the pad touches metal, while cautioning against using too much because excess grease can contaminate the rotor. (PowerStop Brakes)
This area is where technicians usually apply a thin film of lubricant, not a blob.
3. Abutment clips
If your brake setup uses stainless abutment clips, those clips are part of the sliding interface. Depending on the hardware design, lubricant may be applied:
- on the bracket surfaces under the clips
- lightly on the clip contact areas where the pad ears ride
The key point is to keep the movement smooth without overapplying grease. Too much product here can attract dirt and brake dust.
4. Caliper bracket contact points
The bracket is where a lot of brake pad binding starts. Even a small amount of rust scale under the clips can reduce clearance enough to stop the pads from moving freely. That is why brake service usually includes cleaning the bracket thoroughly with a wire brush before reinstalling hardware.
PowerStop explicitly says to clean rust from the bracket contact areas and then apply brake lube to the pad contact points as needed. (PowerStop Brakes)
This is one of the reasons cheap brake jobs often do not last. If someone swaps the pads but skips bracket cleaning and hardware prep, squeaks and uneven wear tend to come back.
5. Back of the brake pad backing plate
This is the area many DIYers misunderstand. Some lubrication may be applied to the back of the pad, but only at the small points where the caliper piston or caliper fingers contact the backing plate. Ferodo’s guidance describes applying a small amount of brake grease only to metal-to-metal friction points on the back of the pads. (ferodo.com)
This is not the same as smearing grease across the whole pad backing. It is a targeted application at the touch points.
Where you should never grease brake pads
This part matters just as much as the correct contact points.
Do not grease the brake pad friction material
The friction surface is what clamps the rotor and slows the vehicle. Any lubricant on that surface contaminates the pad and reduces braking effectiveness. PowerStop explicitly warns not to get lubricant on the side of the pad that contacts the rotor. Ferodo says the same. (PowerStop Brakes)
Do not grease the rotor surface
This should be obvious, but it still happens. Brake grease on the rotor can lead to contamination, poor stopping power, smoke, noise, or a dangerous reduction in friction. Wagner specifically warns against overapplying because excess grease can smear onto the rotor. (Wagner Brake)
Do not coat the entire pad backing plate
Only the specific touch points need lubricant. If you smear grease across the entire back of the pad, you risk mess, contamination, and trapping dirt. You also may interfere with shim behavior depending on the pad design.
Do not use general-purpose grease
Brake systems run hot. They also involve rubber components, metal surfaces, and harsh contaminants. Use a brake-specific high-temperature lubricant designed for the relevant application. PowerStop states the lubricant should be brake-specific and heat resistant. (PowerStop Brakes)
How much grease should you use?
Very little.
This is one of the most important practical details. Brake grease should go on as a thin film, not a heavy layer. PowerStop’s video guidance and written instructions both emphasize using only a minimal amount. Wagner also says not to go overboard. (youtube.com)
A good rule is this:
- enough to create a light lubricating barrier
- not so much that it squeezes out
- not so much that it can fling, drip, or attract large amounts of debris
More grease does not mean better brakes. It usually means more mess and more risk.
Why bad lubrication causes brake problems
Improper lubrication can create the exact issues people are trying to solve.
Too little lubrication
This can cause:
- squeaks
- pad binding
- uneven wear
- hardware corrosion
- sticking slide pins
Too much lubrication
This can cause:
- contamination
- grease migration
- brake dust buildup
- messy reassembly
- reduced braking if grease reaches the pad or rotor
Lubricating the wrong areas
This can cause:
- unsafe braking
- rotor contamination
- reduced friction
- unpredictable brake response
That is why brake lube is not a random step. It is a precision step.
Brake pad grease does not replace a full brake service
A lot of people chase squeaks by adding grease, but noise is not always a lubrication problem. Squeal, grinding, dragging, or vibration can also come from:
- worn-out pads
- glazed pads
- damaged shims
- rusty brackets
- seized pins
- warped or uneven rotors
- bad hardware
- hydraulic issues
If the brake system is already worn or damaged, adding lubricant will not fix the root cause.
Simi Valley Chrysler Dodge Jeep Ram’s service department lists brake repair among its core services, alongside fluid checks and broader maintenance support, which is exactly what matters when a brake issue needs diagnosis rather than guesswork. (simivalleychryslerdodgejeepram.com)
Service page: https://www.simivalleychryslerdodgejeepram.com/service.aspx
The most common DIY mistakes
Mistake 1: Greasing the pad face
This is the fastest way to turn a simple brake job into a braking problem.
Mistake 2: Skipping bracket cleaning
If there is rust under the clips, the pads may not slide correctly even with grease.
Mistake 3: Ignoring the slide pins
A seized slide pin can destroy one pad while the opposite side still looks usable.
Mistake 4: Using the wrong lubricant
Brake-specific lubricant exists for a reason.
Mistake 5: Reusing damaged hardware
If clips, boots, or pins are worn out, fresh grease alone is not enough.
Mistake 6: Applying way too much
A thin film works. Heavy smears do not.
When to have a shop do it instead
Brake lubrication sounds simple, but it sits inside a safety-critical system. If you have any of the following, it is smarter to let a professional handle it:
- grinding or metal-on-metal noise
- severe pad taper wear
- stuck caliper
- broken hardware
- torn pin boots
- rotor scoring or pulsation
- brake pull
- soft pedal
- fluid leaks
If you drive a Ram truck, Jeep SUV, Dodge performance model, or Chrysler family vehicle and want the system inspected properly, schedule brake service here:
https://www.simivalleychryslerdodgejeepram.com/book-your-service.html
You can also start from the main dealership site here:
https://www.simivalleychryslerdodgejeepram.com/
Final answer
So, where do you grease brake pads?
You apply brake lubricant only to the non-friction contact points:
- caliper slide pins
- pad ears or tabs
- abutment clip contact areas
- caliper bracket contact points
- small touch points on the back of the pad where the piston or caliper fingers contact the backing plate
You do not grease:
- the brake pad friction material
- the rotor surface
- the entire pad backing
- any area where grease can contaminate the braking surfaces
That is the correct approach supported by current brake-lubrication guidance from aftermarket brake manufacturers and installation resources. (PowerStop Brakes)
Where to Grease Brake Pads: The Right Contact Points, the Biggest Mistakes, and Why It Matters
The answer is straightforward once you understand how the brake assembly actually moves. You do not grease the friction surface of the brake pad. You do not grease the rotor. You do not coat everything in lubricant and hope for the best. Brake lubricant belongs only on the specific metal-to-metal contact points and moving hardware that need to slide smoothly without binding. PowerStop’s brake lubrication guidance specifically says brake lubricant should be applied only to the outside of the pad and contact areas, never the friction material that touches the rotor.
For drivers who want professional brake service, inspections, or hardware replacement on a Dodge, Jeep, Ram, or Chrysler, Simi Valley Chrysler Dodge Jeep Ram offers brake repair and fluid checks through its service department at https://www.simivalleychryslerdodgejeepram.com/service.aspx. The dealership also offers online booking at https://www.simivalleychryslerdodgejeepram.com/book-your-service.html and Express Lane information at https://www.simivalleychryslerdodgejeepram.com/express-lane.html. (simivalleychryslerdodgejeepram.com)
Why brake pad grease matters in the first place
A disc brake system is not just pads squeezing a rotor. The whole assembly depends on controlled movement. The pads must slide freely in the bracket. The caliper slide pins must move smoothly. The backing plate contact points must not bind or chatter. If these areas corrode, dry out, or accumulate debris, you can end up with:
- brake squeal
- uneven pad wear
- pad drag
- overheated brakes
- reduced fuel economy
- premature rotor wear
- sticking calipers
- poor pedal feel
That is why proper lubrication matters. PowerStop’s installation guidance specifically calls for brake lube on guide pins and pad contact points after cleaning rust and inspecting hardware. (PowerStop Brakes)
In practical terms, brake grease is not there to make the pad “slippery.” It is there to keep the non-friction moving points operating correctly.
The short answer: where to grease brake pads
If you want the quick checklist, these are the main places where brake lubricant is typically applied during a disc brake service:
- Caliper slide pins
- Pad ears or tabs where the pads sit and slide in the bracket
- Abutment clip contact surfaces
- Caliper bracket contact points
- Back of the pad backing plate only where the caliper piston or caliper fingers make contact
That is the core answer. PowerStop, Wagner, and Ferodo all align on the basic principle: lubricate the hardware and metal contact points lightly, and keep grease away from the friction material and rotor braking surface. (PowerStop Brakes)
Where exactly to grease brake pads
Let’s go point by point so there is no confusion.
1. Caliper slide pins
This is one of the most important lubrication points in the whole brake assembly. On a floating caliper setup, the slide pins allow the caliper to move laterally so both pads apply even pressure. If the pins are dry, rusty, seized, or lubricated with the wrong product, the caliper can stick. That can cause one pad to wear faster than the other, brake pull, overheating, and constant drag.
Brake installation guidance from PowerStop specifically calls for brake lube on the guide pins. (PowerStop Brakes)
When servicing slide pins:
- remove the pins
- wipe off old grease
- inspect for rust, scoring, or damage
- inspect the rubber boots
- apply the correct brake lubricant sparingly
- reinstall without overpacking
If the slide pins are damaged or the boots are torn, lubrication alone is not enough. The hardware may need replacement.
For brake inspections and repair scheduling, Simi Valley CDJR’s service department is here: https://www.simivalleychryslerdodgejeepram.com/service.aspx
2. Brake pad ears or tabs
The pad ears, tabs, or ends are the portions of the pad backing plate that sit in the caliper bracket or abutment clips. These are major sliding contact points. If corrosion builds up underneath the clips or on the bracket, the pads can bind instead of retracting cleanly after braking.
PowerStop notes that lubricant belongs on the side of the pad that slides into the caliper housing, not on the friction face. Wagner similarly advises applying grease where the pad touches metal, while cautioning against using too much because excess grease can contaminate the rotor. (PowerStop Brakes)
This area is where technicians usually apply a thin film of lubricant, not a blob.
3. Abutment clips
If your brake setup uses stainless abutment clips, those clips are part of the sliding interface. Depending on the hardware design, lubricant may be applied:
- on the bracket surfaces under the clips
- lightly on the clip contact areas where the pad ears ride
The key point is to keep the movement smooth without overapplying grease. Too much product here can attract dirt and brake dust.
4. Caliper bracket contact points
The bracket is where a lot of brake pad binding starts. Even a small amount of rust scale under the clips can reduce clearance enough to stop the pads from moving freely. That is why brake service usually includes cleaning the bracket thoroughly with a wire brush before reinstalling hardware.
PowerStop explicitly says to clean rust from the bracket contact areas and then apply brake lube to the pad contact points as needed. (PowerStop Brakes)
This is one of the reasons cheap brake jobs often do not last. If someone swaps the pads but skips bracket cleaning and hardware prep, squeaks and uneven wear tend to come back.
5. Back of the brake pad backing plate
This is the area many DIYers misunderstand. Some lubrication may be applied to the back of the pad, but only at the small points where the caliper piston or caliper fingers contact the backing plate. Ferodo’s guidance describes applying a small amount of brake grease only to metal-to-metal friction points on the back of the pads. (ferodo.com)
This is not the same as smearing grease across the whole pad backing. It is a targeted application at the touch points.
Where you should never grease brake pads
This part matters just as much as the correct contact points.
Do not grease the brake pad friction material
The friction surface is what clamps the rotor and slows the vehicle. Any lubricant on that surface contaminates the pad and reduces braking effectiveness. PowerStop explicitly warns not to get lubricant on the side of the pad that contacts the rotor. Ferodo says the same. (PowerStop Brakes)
Do not grease the rotor surface
This should be obvious, but it still happens. Brake grease on the rotor can lead to contamination, poor stopping power, smoke, noise, or a dangerous reduction in friction. Wagner specifically warns against overapplying because excess grease can smear onto the rotor. (Wagner Brake)
Do not coat the entire pad backing plate
Only the specific touch points need lubricant. If you smear grease across the entire back of the pad, you risk mess, contamination, and trapping dirt. You also may interfere with shim behavior depending on the pad design.
Do not use general-purpose grease
Brake systems run hot. They also involve rubber components, metal surfaces, and harsh contaminants. Use a brake-specific high-temperature lubricant designed for the relevant application. PowerStop states the lubricant should be brake-specific and heat resistant. (PowerStop Brakes)
How much grease should you use?
Very little.
This is one of the most important practical details. Brake grease should go on as a thin film, not a heavy layer. PowerStop’s video guidance and written instructions both emphasize using only a minimal amount. Wagner also says not to go overboard. (youtube.com)
A good rule is this:
- enough to create a light lubricating barrier
- not so much that it squeezes out
- not so much that it can fling, drip, or attract large amounts of debris
More grease does not mean better brakes. It usually means more mess and more risk.
Why bad lubrication causes brake problems
Improper lubrication can create the exact issues people are trying to solve.
Too little lubrication
This can cause:
- squeaks
- pad binding
- uneven wear
- hardware corrosion
- sticking slide pins
Too much lubrication
This can cause:
- contamination
- grease migration
- brake dust buildup
- messy reassembly
- reduced braking if grease reaches the pad or rotor
Lubricating the wrong areas
This can cause:
- unsafe braking
- rotor contamination
- reduced friction
- unpredictable brake response
That is why brake lube is not a random step. It is a precision step.
Brake pad grease does not replace a full brake service
A lot of people chase squeaks by adding grease, but noise is not always a lubrication problem. Squeal, grinding, dragging, or vibration can also come from:
- worn-out pads
- glazed pads
- damaged shims
- rusty brackets
- seized pins
- warped or uneven rotors
- bad hardware
- hydraulic issues
If the brake system is already worn or damaged, adding lubricant will not fix the root cause.
Simi Valley Chrysler Dodge Jeep Ram’s service department lists brake repair among its core services, alongside fluid checks and broader maintenance support, which is exactly what matters when a brake issue needs diagnosis rather than guesswork. (simivalleychryslerdodgejeepram.com)
Service page: https://www.simivalleychryslerdodgejeepram.com/service.aspx
The most common DIY mistakes
Mistake 1: Greasing the pad face
This is the fastest way to turn a simple brake job into a braking problem.
Mistake 2: Skipping bracket cleaning
If there is rust under the clips, the pads may not slide correctly even with grease.
Mistake 3: Ignoring the slide pins
A seized slide pin can destroy one pad while the opposite side still looks usable.
Mistake 4: Using the wrong lubricant
Brake-specific lubricant exists for a reason.
Mistake 5: Reusing damaged hardware
If clips, boots, or pins are worn out, fresh grease alone is not enough.
Mistake 6: Applying way too much
A thin film works. Heavy smears do not.
When to have a shop do it instead
Brake lubrication sounds simple, but it sits inside a safety-critical system. If you have any of the following, it is smarter to let a professional handle it:
- grinding or metal-on-metal noise
- severe pad taper wear
- stuck caliper
- broken hardware
- torn pin boots
- rotor scoring or pulsation
- brake pull
- soft pedal
- fluid leaks
If you drive a Ram truck, Jeep SUV, Dodge performance model, or Chrysler family vehicle and want the system inspected properly, schedule brake service here:
https://www.simivalleychryslerdodgejeepram.com/book-your-service.html
You can also start from the main dealership site here:
https://www.simivalleychryslerdodgejeepram.com/
Final answer
So, where do you grease brake pads?
You apply brake lubricant only to the non-friction contact points:
- caliper slide pins
- pad ears or tabs
- abutment clip contact areas
- caliper bracket contact points
- small touch points on the back of the pad where the piston or caliper fingers contact the backing plate
You do not grease:
- the brake pad friction material
- the rotor surface
- the entire pad backing
- any area where grease can contaminate the braking surfaces
That is the correct approach supported by current brake-lubrication guidance from aftermarket brake manufacturers and installation resources. (PowerStop Brakes)
“New brakes” usually means brake pads or brake shoes, and sometimes rotors or drums if they are worn, warped, or below minimum thickness. There is no single universal interval because brake wear is driven by friction, heat, vehicle weight, and driving environment. That said, there are reliable mileage ranges and inspection habits you can use to stay ahead of it.
If you want a professional inspection or brake repair on a Chrysler, Dodge, Jeep, or Ram, start here:
https://www.simivalleychryslerdodgejeepram.com/service.aspx
https://www.simivalleychryslerdodgejeepram.com/book-your-service.html
The realistic mileage range for brake pads
For most modern vehicles, brake pads commonly last somewhere around 30,000 to 70,000 miles, but that range can swing wider depending on use and pad material. (Northside Ford)
A more conservative way to think about it is:
- City driving, hills, heavy loads, frequent stop and go: pads can wear faster, sometimes closer to the lower end of typical ranges.
- Mostly highway cruising, gentle braking, flat terrain: pads often last longer, sometimes reaching the higher end of the normal range. (AutoZone.com)
If you want a clean, practical benchmark for planning purposes, use this:
- Plan on checking brake pads every oil change
- Expect replacement sometime between 30,000 and 70,000 miles
- Expect earlier replacement if you do mostly city, hills, towing, or heavy payloads (Northside Ford)
How long do rotors last?
Rotors often last longer than pads, but not always. Many drivers can get around 60,000 miles or more in lighter use, while heavy stop and go use can shorten rotor life significantly.
If you want a planning range, a common expectation is:
- Rotors can last 30,000 to 70,000 miles, and sometimes longer depending on conditions and how the brakes are serviced. (CarParts)
Important nuance: rotors do not always need replacement every time you do pads. A good technician measures rotor thickness, checks runout, and looks for heat spotting, cracking, and uneven wear before deciding whether to resurface or replace.
For a brake inspection and measurement-based recommendation, use the service entry points here:
https://www.simivalleychryslerdodgejeepram.com/service.aspx
https://www.simivalleychryslerdodgejeepram.com/book-your-service.html
Front brakes vs rear brakes
On most vehicles, front pads wear faster than rear pads because the front axle does more of the braking work due to weight transfer under deceleration. That means it is normal to replace front pads more often.
However, some vehicles with aggressive rear brake bias, certain stability control tuning, or heavy rear loads can wear rears faster. The only correct way to know is inspection.
A better way to think about “how often” is inspections, not mileage
Because the range is wide, the best practice is:
- Inspect pad thickness regularly, not just when symptoms start.
- Replace pads when they reach the minimum safe thickness range recommended by manufacturers and service standards.
- Evaluate rotors by measurement and condition, not guesswork.
Many pads have wear indicators designed to alert you as they approach the end of life. (Firestone Complete Auto Care)
Signs you likely need new brakes now
Mileage is only a planning tool. The decision is made by symptoms and measurements. These are the most common real-world indicators that it is time to inspect, and often replace, brake components:
1) Squealing or chirping during braking
Many pads have a metal wear tab that contacts the rotor when the pad material is low. That creates a high-pitched squeal designed to get your attention. (Firestone Complete Auto Care)
2) Grinding, scraping, or metal-on-metal noise
Grinding is a red flag because it can mean the friction material is gone and you are into backing plate contact. This can quickly damage rotors and push the repair from “pads” to “pads plus rotors.” (Subaru of Ontario)
3) Vibration or pulsation in the pedal or steering wheel
This can indicate rotor thickness variation, heat spots, or runout issues. Mopar notes that jittering, jerking, and vibration sensations are warning signs worth addressing. (blog.mopar.com)
4) Soft or mushy pedal feel
A mushy pedal can be related to brake fluid condition, air in the system, or other hydraulic concerns. Mopar specifically calls out “mushy” pedal feel as a symptom to take seriously. (blog.mopar.com)
5) Pulling left or right under braking
Pulling can indicate uneven pad wear, caliper issues, or hydraulic imbalance. Mopar flags pulling as a brake warning sign. (blog.mopar.com)
6) Increased stopping distance or reduced brake response
If your braking performance feels worse, do not wait for a noise. Performance drop is a common sign that pads are worn or there is another brake system issue. (Subaru of Ontario)
If any of these apply, book a check:
https://www.simivalleychryslerdodgejeepram.com/book-your-service.html
What factors change brake life the most?
Here is what moves you toward the low end or high end of brake life.
Driving environment
- Stop and go traffic: more braking events per mile equals faster wear.
- Hills and mountain roads: more heat and repeated braking cycles.
- Short trips: brakes can see frequent heat cycling without long cooldown periods.
- Wet or dusty environments: can accelerate corrosion and contamination.
City driving and aggressive stop and start can shorten rotor life dramatically compared with gentle highway driving. (AutoZone.com)
Driving style
- Late braking, hard braking, and riding the brakes will wear pads faster.
- Smooth deceleration, longer following distances, and earlier lift-off reduce wear.
Vehicle weight and use case
- Trucks and large SUVs often stress brakes more because there is more mass to slow down.
- Towing and hauling increases brake workload and heat.
- Performance trims or larger wheels can change brake hardware and heat behavior.
Brake pad material
- Ceramic pads: often quieter, low dust, may last longer in some conditions, but feel and heat behavior varies by application.
- Semi-metallic pads: often good bite and heat tolerance, sometimes more dust and noise.
- Organic pads: softer, can wear faster depending on formulation.
Material impacts wear rate, heat performance, and rotor wear. The best choice depends on how you drive and what the vehicle is designed for.
Brake system health
A stuck caliper slide pin, a dragging caliper, or uneven piston movement can destroy pad life quickly on one corner. This is why a proper brake service includes hardware inspection, not just pad swapping.
A practical replacement schedule that actually works
If you want a simple plan that will keep you out of “surprise brake job” territory, use this.
Every 5,000 to 10,000 miles (or every oil service)
- Quick visual inspection of pad thickness
- Check for uneven wear
- Look for leaks, torn dust boots, or abnormal rotor scoring
Every 20,000 to 30,000 miles
- More thorough inspection
- Measure pad thickness and rotor thickness
- Inspect caliper operation and slide hardware
- Check fluid condition if pedal feel is changing
At the first sign of noise, vibration, pull, or soft pedal
- Diagnose immediately, not later
Simi Valley CDJR lists brake repair and fluid checks among its service capabilities, which is exactly what you want when you are diagnosing symptoms instead of guessing. (Simi Valley Chrysler Dodge Jeep Ram)
Service link: https://www.simivalleychryslerdodgejeepram.com/service.aspx
“Do I need pads, rotors, or both?”
This is the question that matters for cost and safety.
You likely need pads if:
- Pad thickness is low but rotors are within spec and not damaged.
- No major vibration or pulsation.
- Rotor surfaces are healthy and wear is even.
You may need rotors and pads if:
- Rotors are below minimum thickness
- Rotors are heat spotted, cracked, badly scored, or warped
- There is consistent pulsation under braking
- Pads wore down to metal and rotor damage occurred
Rotors can sometimes warp or develop thickness variation earlier in harsh city use, while highway use can extend their life. (AutoZone.com)
How long do brakes last in years?
If you drive an average number of miles per year, the pad mileage range often works out to something like 3 to 7 years, but it depends heavily on your annual miles and driving conditions. (Northside Ford)
If you drive relatively little, you still should not ignore brakes. Corrosion, sticking hardware, and old fluid can create problems even when miles are low.
Safety and cost reality: waiting usually costs more
A common pattern is: squeal ignored becomes grinding, and grinding becomes rotors. The longer you wait once symptoms start, the more likely collateral damage becomes. That is why inspections are cheaper than repairs.
If you are hearing noise or feeling vibration, it is better to get a measured diagnosis rather than drive until it gets worse:
https://www.simivalleychryslerdodgejeepram.com/book-your-service.html
Bottom line
Most drivers will need brake pads somewhere around 30,000 to 70,000 miles, and rotors often last longer but can fall in similar ranges depending on conditions. (Northside Ford)
The most reliable approach is to inspect regularly and act on symptoms plus measurements, not just mileage.
Connect with us


