


Where to Grease Brake Pads: The Right Contact Points, the Biggest Mistakes, and Why It Matters
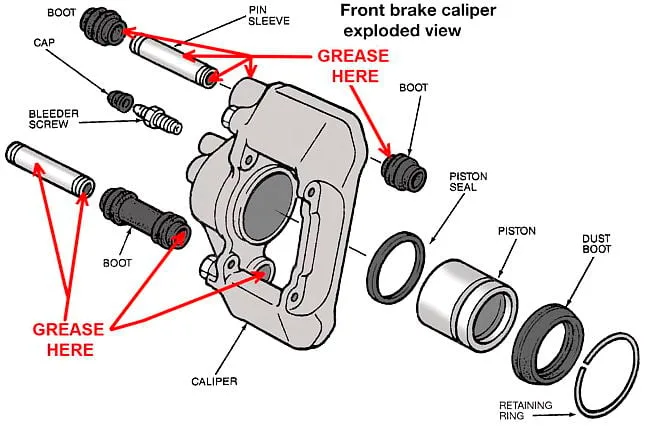
The answer is straightforward once you understand how the brake assembly actually moves. You do not grease the friction surface of the brake pad. You do not grease the rotor. You do not coat everything in lubricant and hope for the best. Brake lubricant belongs only on the specific metal-to-metal contact points and moving hardware that need to slide smoothly without binding. PowerStop’s brake lubrication guidance specifically says brake lubricant should be applied only to the outside of the pad and contact areas, never the friction material that touches the rotor.
For drivers who want professional brake service, inspections, or hardware replacement on a Dodge, Jeep, Ram, or Chrysler, Simi Valley Chrysler Dodge Jeep Ram offers brake repair and fluid checks through its service department at https://www.simivalleychryslerdodgejeepram.com/service.aspx. The dealership also offers online booking at https://www.simivalleychryslerdodgejeepram.com/book-your-service.html and Express Lane information at https://www.simivalleychryslerdodgejeepram.com/express-lane.html. (simivalleychryslerdodgejeepram.com)
Why brake pad grease matters in the first place
A disc brake system is not just pads squeezing a rotor. The whole assembly depends on controlled movement. The pads must slide freely in the bracket. The caliper slide pins must move smoothly. The backing plate contact points must not bind or chatter. If these areas corrode, dry out, or accumulate debris, you can end up with:
- brake squeal
- uneven pad wear
- pad drag
- overheated brakes
- reduced fuel economy
- premature rotor wear
- sticking calipers
- poor pedal feel
That is why proper lubrication matters. PowerStop’s installation guidance specifically calls for brake lube on guide pins and pad contact points after cleaning rust and inspecting hardware. (PowerStop Brakes)
In practical terms, brake grease is not there to make the pad “slippery.” It is there to keep the non-friction moving points operating correctly.
The short answer: where to grease brake pads
If you want the quick checklist, these are the main places where brake lubricant is typically applied during a disc brake service:
- Caliper slide pins
- Pad ears or tabs where the pads sit and slide in the bracket
- Abutment clip contact surfaces
- Caliper bracket contact points
- Back of the pad backing plate only where the caliper piston or caliper fingers make contact
That is the core answer. PowerStop, Wagner, and Ferodo all align on the basic principle: lubricate the hardware and metal contact points lightly, and keep grease away from the friction material and rotor braking surface. (PowerStop Brakes)
Where exactly to grease brake pads
Let’s go point by point so there is no confusion.
1. Caliper slide pins
This is one of the most important lubrication points in the whole brake assembly. On a floating caliper setup, the slide pins allow the caliper to move laterally so both pads apply even pressure. If the pins are dry, rusty, seized, or lubricated with the wrong product, the caliper can stick. That can cause one pad to wear faster than the other, brake pull, overheating, and constant drag.
Brake installation guidance from PowerStop specifically calls for brake lube on the guide pins. (PowerStop Brakes)
When servicing slide pins:
- remove the pins
- wipe off old grease
- inspect for rust, scoring, or damage
- inspect the rubber boots
- apply the correct brake lubricant sparingly
- reinstall without overpacking
If the slide pins are damaged or the boots are torn, lubrication alone is not enough. The hardware may need replacement.
For brake inspections and repair scheduling, Simi Valley CDJR’s service department is here: https://www.simivalleychryslerdodgejeepram.com/service.aspx
2. Brake pad ears or tabs
The pad ears, tabs, or ends are the portions of the pad backing plate that sit in the caliper bracket or abutment clips. These are major sliding contact points. If corrosion builds up underneath the clips or on the bracket, the pads can bind instead of retracting cleanly after braking.
PowerStop notes that lubricant belongs on the side of the pad that slides into the caliper housing, not on the friction face. Wagner similarly advises applying grease where the pad touches metal, while cautioning against using too much because excess grease can contaminate the rotor. (PowerStop Brakes)
This area is where technicians usually apply a thin film of lubricant, not a blob.
3. Abutment clips
If your brake setup uses stainless abutment clips, those clips are part of the sliding interface. Depending on the hardware design, lubricant may be applied:
- on the bracket surfaces under the clips
- lightly on the clip contact areas where the pad ears ride
The key point is to keep the movement smooth without overapplying grease. Too much product here can attract dirt and brake dust.
4. Caliper bracket contact points
The bracket is where a lot of brake pad binding starts. Even a small amount of rust scale under the clips can reduce clearance enough to stop the pads from moving freely. That is why brake service usually includes cleaning the bracket thoroughly with a wire brush before reinstalling hardware.
PowerStop explicitly says to clean rust from the bracket contact areas and then apply brake lube to the pad contact points as needed. (PowerStop Brakes)
This is one of the reasons cheap brake jobs often do not last. If someone swaps the pads but skips bracket cleaning and hardware prep, squeaks and uneven wear tend to come back.
5. Back of the brake pad backing plate
This is the area many DIYers misunderstand. Some lubrication may be applied to the back of the pad, but only at the small points where the caliper piston or caliper fingers contact the backing plate. Ferodo’s guidance describes applying a small amount of brake grease only to metal-to-metal friction points on the back of the pads. (ferodo.com)
This is not the same as smearing grease across the whole pad backing. It is a targeted application at the touch points.
Where you should never grease brake pads
This part matters just as much as the correct contact points.
Do not grease the brake pad friction material
The friction surface is what clamps the rotor and slows the vehicle. Any lubricant on that surface contaminates the pad and reduces braking effectiveness. PowerStop explicitly warns not to get lubricant on the side of the pad that contacts the rotor. Ferodo says the same. (PowerStop Brakes)
Do not grease the rotor surface
This should be obvious, but it still happens. Brake grease on the rotor can lead to contamination, poor stopping power, smoke, noise, or a dangerous reduction in friction. Wagner specifically warns against overapplying because excess grease can smear onto the rotor. (Wagner Brake)
Do not coat the entire pad backing plate
Only the specific touch points need lubricant. If you smear grease across the entire back of the pad, you risk mess, contamination, and trapping dirt. You also may interfere with shim behavior depending on the pad design.
Do not use general-purpose grease
Brake systems run hot. They also involve rubber components, metal surfaces, and harsh contaminants. Use a brake-specific high-temperature lubricant designed for the relevant application. PowerStop states the lubricant should be brake-specific and heat resistant. (PowerStop Brakes)
How much grease should you use?
Very little.
This is one of the most important practical details. Brake grease should go on as a thin film, not a heavy layer. PowerStop’s video guidance and written instructions both emphasize using only a minimal amount. Wagner also says not to go overboard. (youtube.com)
A good rule is this:
- enough to create a light lubricating barrier
- not so much that it squeezes out
- not so much that it can fling, drip, or attract large amounts of debris
More grease does not mean better brakes. It usually means more mess and more risk.
Why bad lubrication causes brake problems
Improper lubrication can create the exact issues people are trying to solve.
Too little lubrication
This can cause:
- squeaks
- pad binding
- uneven wear
- hardware corrosion
- sticking slide pins
Too much lubrication
This can cause:
- contamination
- grease migration
- brake dust buildup
- messy reassembly
- reduced braking if grease reaches the pad or rotor
Lubricating the wrong areas
This can cause:
- unsafe braking
- rotor contamination
- reduced friction
- unpredictable brake response
That is why brake lube is not a random step. It is a precision step.
Brake pad grease does not replace a full brake service
A lot of people chase squeaks by adding grease, but noise is not always a lubrication problem. Squeal, grinding, dragging, or vibration can also come from:
- worn-out pads
- glazed pads
- damaged shims
- rusty brackets
- seized pins
- warped or uneven rotors
- bad hardware
- hydraulic issues
If the brake system is already worn or damaged, adding lubricant will not fix the root cause.
Simi Valley Chrysler Dodge Jeep Ram’s service department lists brake repair among its core services, alongside fluid checks and broader maintenance support, which is exactly what matters when a brake issue needs diagnosis rather than guesswork. (simivalleychryslerdodgejeepram.com)
Service page: https://www.simivalleychryslerdodgejeepram.com/service.aspx
The most common DIY mistakes
Mistake 1: Greasing the pad face
This is the fastest way to turn a simple brake job into a braking problem.
Mistake 2: Skipping bracket cleaning
If there is rust under the clips, the pads may not slide correctly even with grease.
Mistake 3: Ignoring the slide pins
A seized slide pin can destroy one pad while the opposite side still looks usable.
Mistake 4: Using the wrong lubricant
Brake-specific lubricant exists for a reason.
Mistake 5: Reusing damaged hardware
If clips, boots, or pins are worn out, fresh grease alone is not enough.
Mistake 6: Applying way too much
A thin film works. Heavy smears do not.
When to have a shop do it instead
Brake lubrication sounds simple, but it sits inside a safety-critical system. If you have any of the following, it is smarter to let a professional handle it:
- grinding or metal-on-metal noise
- severe pad taper wear
- stuck caliper
- broken hardware
- torn pin boots
- rotor scoring or pulsation
- brake pull
- soft pedal
- fluid leaks
If you drive a Ram truck, Jeep SUV, Dodge performance model, or Chrysler family vehicle and want the system inspected properly, schedule brake service here:
https://www.simivalleychryslerdodgejeepram.com/book-your-service.html
You can also start from the main dealership site here:
https://www.simivalleychryslerdodgejeepram.com/
Final answer
So, where do you grease brake pads?
You apply brake lubricant only to the non-friction contact points:
- caliper slide pins
- pad ears or tabs
- abutment clip contact areas
- caliper bracket contact points
- small touch points on the back of the pad where the piston or caliper fingers contact the backing plate
You do not grease:
- the brake pad friction material
- the rotor surface
- the entire pad backing
- any area where grease can contaminate the braking surfaces
That is the correct approach supported by current brake-lubrication guidance from aftermarket brake manufacturers and installation resources. (PowerStop Brakes)
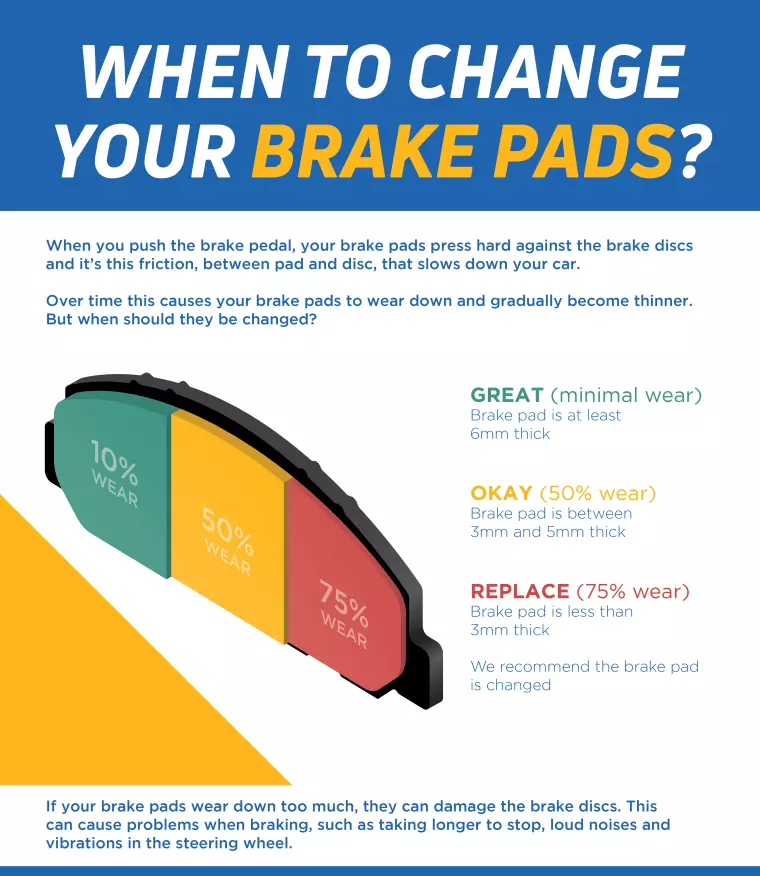
“New brakes” usually means brake pads or brake shoes, and sometimes rotors or drums if they are worn, warped, or below minimum thickness. There is no single universal interval because brake wear is driven by friction, heat, vehicle weight, and driving environment. That said, there are reliable mileage ranges and inspection habits you can use to stay ahead of it.
If you want a professional inspection or brake repair on a Chrysler, Dodge, Jeep, or Ram, start here:
https://www.simivalleychryslerdodgejeepram.com/service.aspx
https://www.simivalleychryslerdodgejeepram.com/book-your-service.html
The realistic mileage range for brake pads
For most modern vehicles, brake pads commonly last somewhere around 30,000 to 70,000 miles, but that range can swing wider depending on use and pad material. (Northside Ford)
A more conservative way to think about it is:
- City driving, hills, heavy loads, frequent stop and go: pads can wear faster, sometimes closer to the lower end of typical ranges.
- Mostly highway cruising, gentle braking, flat terrain: pads often last longer, sometimes reaching the higher end of the normal range. (AutoZone.com)
If you want a clean, practical benchmark for planning purposes, use this:
- Plan on checking brake pads every oil change
- Expect replacement sometime between 30,000 and 70,000 miles
- Expect earlier replacement if you do mostly city, hills, towing, or heavy payloads (Northside Ford)
How long do rotors last?
Rotors often last longer than pads, but not always. Many drivers can get around 60,000 miles or more in lighter use, while heavy stop and go use can shorten rotor life significantly.
If you want a planning range, a common expectation is:
- Rotors can last 30,000 to 70,000 miles, and sometimes longer depending on conditions and how the brakes are serviced. (CarParts)
Important nuance: rotors do not always need replacement every time you do pads. A good technician measures rotor thickness, checks runout, and looks for heat spotting, cracking, and uneven wear before deciding whether to resurface or replace.
For a brake inspection and measurement-based recommendation, use the service entry points here:
https://www.simivalleychryslerdodgejeepram.com/service.aspx
https://www.simivalleychryslerdodgejeepram.com/book-your-service.html
Front brakes vs rear brakes
On most vehicles, front pads wear faster than rear pads because the front axle does more of the braking work due to weight transfer under deceleration. That means it is normal to replace front pads more often.
However, some vehicles with aggressive rear brake bias, certain stability control tuning, or heavy rear loads can wear rears faster. The only correct way to know is inspection.
A better way to think about “how often” is inspections, not mileage
Because the range is wide, the best practice is:
- Inspect pad thickness regularly, not just when symptoms start.
- Replace pads when they reach the minimum safe thickness range recommended by manufacturers and service standards.
- Evaluate rotors by measurement and condition, not guesswork.
Many pads have wear indicators designed to alert you as they approach the end of life. (Firestone Complete Auto Care)
Signs you likely need new brakes now
Mileage is only a planning tool. The decision is made by symptoms and measurements. These are the most common real-world indicators that it is time to inspect, and often replace, brake components:
1) Squealing or chirping during braking
Many pads have a metal wear tab that contacts the rotor when the pad material is low. That creates a high-pitched squeal designed to get your attention. (Firestone Complete Auto Care)
2) Grinding, scraping, or metal-on-metal noise
Grinding is a red flag because it can mean the friction material is gone and you are into backing plate contact. This can quickly damage rotors and push the repair from “pads” to “pads plus rotors.” (Subaru of Ontario)
3) Vibration or pulsation in the pedal or steering wheel
This can indicate rotor thickness variation, heat spots, or runout issues. Mopar notes that jittering, jerking, and vibration sensations are warning signs worth addressing. (blog.mopar.com)
4) Soft or mushy pedal feel
A mushy pedal can be related to brake fluid condition, air in the system, or other hydraulic concerns. Mopar specifically calls out “mushy” pedal feel as a symptom to take seriously. (blog.mopar.com)
5) Pulling left or right under braking
Pulling can indicate uneven pad wear, caliper issues, or hydraulic imbalance. Mopar flags pulling as a brake warning sign. (blog.mopar.com)
6) Increased stopping distance or reduced brake response
If your braking performance feels worse, do not wait for a noise. Performance drop is a common sign that pads are worn or there is another brake system issue. (Subaru of Ontario)
If any of these apply, book a check:
https://www.simivalleychryslerdodgejeepram.com/book-your-service.html
What factors change brake life the most?
Here is what moves you toward the low end or high end of brake life.
Driving environment
- Stop and go traffic: more braking events per mile equals faster wear.
- Hills and mountain roads: more heat and repeated braking cycles.
- Short trips: brakes can see frequent heat cycling without long cooldown periods.
- Wet or dusty environments: can accelerate corrosion and contamination.
City driving and aggressive stop and start can shorten rotor life dramatically compared with gentle highway driving. (AutoZone.com)
Driving style
- Late braking, hard braking, and riding the brakes will wear pads faster.
- Smooth deceleration, longer following distances, and earlier lift-off reduce wear.
Vehicle weight and use case
- Trucks and large SUVs often stress brakes more because there is more mass to slow down.
- Towing and hauling increases brake workload and heat.
- Performance trims or larger wheels can change brake hardware and heat behavior.
Brake pad material
- Ceramic pads: often quieter, low dust, may last longer in some conditions, but feel and heat behavior varies by application.
- Semi-metallic pads: often good bite and heat tolerance, sometimes more dust and noise.
- Organic pads: softer, can wear faster depending on formulation.
Material impacts wear rate, heat performance, and rotor wear. The best choice depends on how you drive and what the vehicle is designed for.
Brake system health
A stuck caliper slide pin, a dragging caliper, or uneven piston movement can destroy pad life quickly on one corner. This is why a proper brake service includes hardware inspection, not just pad swapping.
A practical replacement schedule that actually works
If you want a simple plan that will keep you out of “surprise brake job” territory, use this.
Every 5,000 to 10,000 miles (or every oil service)
- Quick visual inspection of pad thickness
- Check for uneven wear
- Look for leaks, torn dust boots, or abnormal rotor scoring
Every 20,000 to 30,000 miles
- More thorough inspection
- Measure pad thickness and rotor thickness
- Inspect caliper operation and slide hardware
- Check fluid condition if pedal feel is changing
At the first sign of noise, vibration, pull, or soft pedal
- Diagnose immediately, not later
Simi Valley CDJR lists brake repair and fluid checks among its service capabilities, which is exactly what you want when you are diagnosing symptoms instead of guessing. (Simi Valley Chrysler Dodge Jeep Ram)
Service link: https://www.simivalleychryslerdodgejeepram.com/service.aspx
“Do I need pads, rotors, or both?”
This is the question that matters for cost and safety.
You likely need pads if:
- Pad thickness is low but rotors are within spec and not damaged.
- No major vibration or pulsation.
- Rotor surfaces are healthy and wear is even.
You may need rotors and pads if:
- Rotors are below minimum thickness
- Rotors are heat spotted, cracked, badly scored, or warped
- There is consistent pulsation under braking
- Pads wore down to metal and rotor damage occurred
Rotors can sometimes warp or develop thickness variation earlier in harsh city use, while highway use can extend their life. (AutoZone.com)
How long do brakes last in years?
If you drive an average number of miles per year, the pad mileage range often works out to something like 3 to 7 years, but it depends heavily on your annual miles and driving conditions. (Northside Ford)
If you drive relatively little, you still should not ignore brakes. Corrosion, sticking hardware, and old fluid can create problems even when miles are low.
Safety and cost reality: waiting usually costs more
A common pattern is: squeal ignored becomes grinding, and grinding becomes rotors. The longer you wait once symptoms start, the more likely collateral damage becomes. That is why inspections are cheaper than repairs.
If you are hearing noise or feeling vibration, it is better to get a measured diagnosis rather than drive until it gets worse:
https://www.simivalleychryslerdodgejeepram.com/book-your-service.html
Bottom line
Most drivers will need brake pads somewhere around 30,000 to 70,000 miles, and rotors often last longer but can fall in similar ranges depending on conditions. (Northside Ford)
The most reliable approach is to inspect regularly and act on symptoms plus measurements, not just mileage.
What Color Is the Brake Fluid? – Expert Reviewed
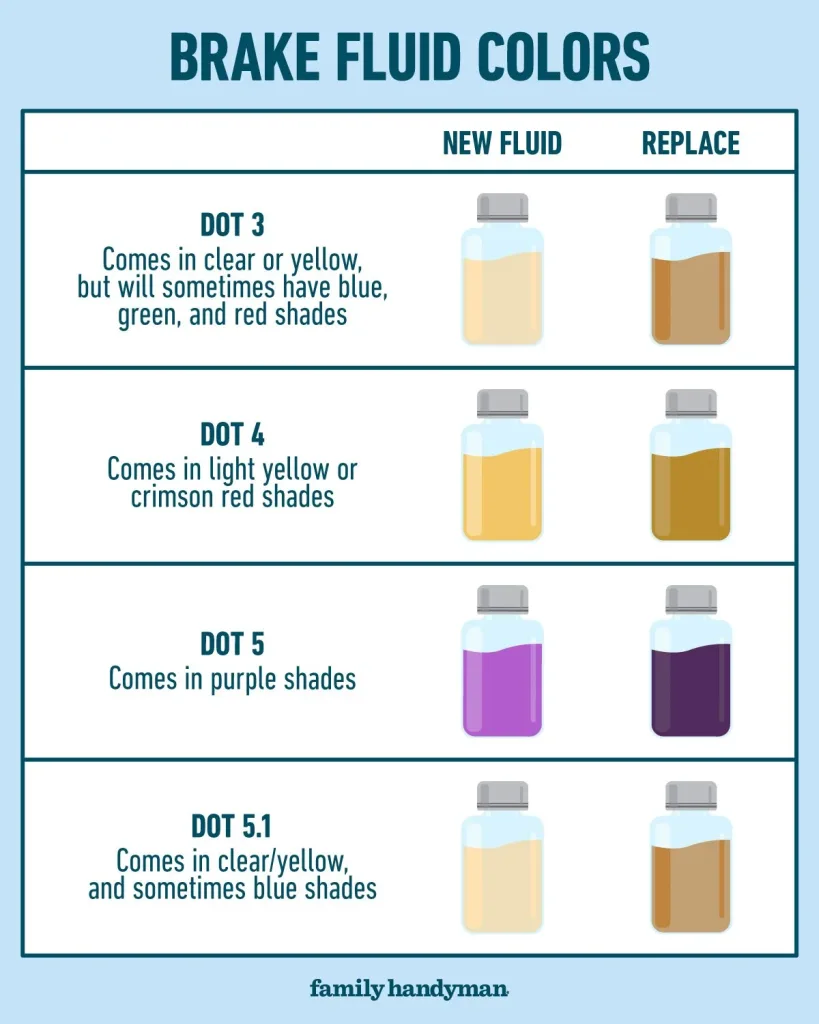
The short answer is this: healthy brake fluid is usually clear to light yellow or light amber. If it has turned dark brown, black, cloudy, or dirty-looking, that is often a sign the fluid has aged, absorbed moisture, or picked up contamination. Brake fluid is hygroscopic, which means it absorbs moisture over time, and that moisture can reduce boiling point and braking performance.
For drivers in California, especially anyone driving a Dodge, Jeep, Chrysler, or Ram vehicle in regular traffic, mountain grades, heat, or stop-and-go conditions, brake fluid condition matters more than most people think. If you need brake service, fluid inspection, or a full system check, the Simi Valley Chrysler Dodge Jeep Ram service department handles brake repair, fluid checks, and preventative maintenance. (Simi Valley Chrysler Dodge Jeep Ram)
What brake fluid is supposed to look like
Fresh brake fluid is generally transparent with a pale amber tint, though the exact shade can vary slightly by brand and specification. Valvoline describes DOT 4 brake fluid as a light amber coloured product, which aligns with how fresh fluid is normally identified in real-world service work. Industry specifications also commonly describe DOT 3, DOT 4, and DOT 5.1 brake fluid as clear to amber. (Valvoline Global)
That means if you open the reservoir and the fluid looks nearly clear, lightly golden, or faintly honey-colored, that is usually normal. What you do not want to see is fluid that looks like old engine oil, muddy tea, or dark syrup.
Why brake fluid changes color
Brake fluid does not stay fresh-looking forever. Over time, it is exposed to heat cycles, microscopic wear particles, and moisture intrusion through hoses, seals, and the reservoir venting system. That is why older brake fluid often darkens. Moisture contamination is one of the biggest concerns because it lowers the fluid’s boiling point and can contribute to corrosion or deposits inside the braking system. (alldata.com)
A color change does not always mean immediate failure, but it is a warning sign that the fluid should be inspected. Dark fluid may indicate:
- moisture contamination
- internal corrosion
- rubber seal degradation
- suspended particles or sludge
- overdue maintenance
Firestone notes that darker tint, floating particles, or an unusual emulsion can indicate contamination, though color alone is not the only diagnostic factor. (Firestone Complete Auto Care)
When the color becomes a problem
There is a major difference between light amber and dark brown or black. Once the fluid becomes very dark, the issue is not cosmetic. It can mean the fluid has degraded enough that braking performance may no longer be optimal, especially under hard use or repeated braking.
This is where people get into trouble. A vehicle can still “stop fine” in normal daily driving, yet the brake fluid may already be compromised. Under high heat, long downhill driving, towing, or repeated emergency braking, degraded fluid can create a softer pedal feel or reduced confidence. Moisture in brake fluid has been serious enough to appear in safety documentation and recalls because excess moisture can contribute to deposits or system problems. (NHTSA)
If you want your brakes inspected by a shop familiar with Mopar vehicles, you can use Simi Valley CDJR’s online service booking page or go through Mopar’s online scheduling page for Simi Valley Chrysler Dodge Jeep Ram. (mopar.com)
What color means what
Here is the practical breakdown:
Clear to light yellow / light amber
This is typically what good, fresh brake fluid looks like. (Valvoline Global)
Medium amber to brownish
Usually indicates aging fluid. It may still function, but inspection is smart, especially if it has been a long time since the last brake fluid service. (Firestone Complete Auto Care)
Dark brown or black
Often suggests old, contaminated, or moisture-laden fluid. This is where a brake fluid flush becomes more likely. (Firestone Complete Auto Care)
Cloudy or milky
Can indicate contamination or moisture problems. This should be checked promptly. (Firestone Complete Auto Care)
Fluid with particles or sludge
Not normal. That points to contamination or component wear and needs professional diagnosis. (Firestone Complete Auto Care)
Does Dodge, Jeep, Chrysler, or Ram brake fluid look different?
Not in any dramatic visual sense. On CDJR vehicles, the correct fluid type matters more than the brand color shade. Mopar sells brake fluid meeting different standards, including products identified as DOT 4 and others meeting Mopar specifications such as MS-4574 and MS-9971 depending on application. The exact fluid requirement depends on the model and year, so the owner’s manual or a dealership service department should be the final authority. (store.mopar.ca)
So while the fluid in your Ram 1500, Jeep Grand Cherokee, Dodge Durango, or Chrysler Pacifica may still look light amber when healthy, you should not assume every CDJR vehicle uses the exact same brake fluid specification. Correct spec matters.
For model-specific help, start from the Simi Valley Chrysler Dodge Jeep Ram homepage and route into service from there. (Simi Valley Chrysler Dodge Jeep Ram)
Can you judge brake fluid condition by color alone?
Not completely. Color is a useful screening clue, but it is not a laboratory test. A technician may also check:
- moisture content
- boiling point condition
- service history
- pedal feel
- reservoir level
- signs of leaks or seal wear
That said, color is still one of the fastest ways to catch a possible issue early. If the reservoir fluid looks significantly darker than a pale amber shade, it is reasonable to have it inspected.
Common mistake drivers make
A lot of owners focus on pads and rotors and ignore fluid. That is a mistake. Brake pads are visible wear items, but the hydraulic fluid is what transfers pedal force into actual braking pressure. Even with good pads, degraded brake fluid can undermine the system.
That is especially relevant for trucks and SUVs that haul weight or see hotter operating conditions. Simi Valley CDJR specifically lists brake repair and fluid checks and corrections among its service capabilities, which is exactly the type of maintenance that helps prevent bigger brake issues later. (Simi Valley Chrysler Dodge Jeep Ram)
Final answer
Brake fluid should normally be clear to light yellow or light amber. If it is dark brown, black, cloudy, or full of debris, that is not normal and it should be inspected because old brake fluid can absorb moisture and lose performance. (Valvoline Global)
For a CDJR owner, the safest move is to have the fluid checked against the correct factory specification and maintenance schedule. You can do that through Simi Valley Chrysler Dodge Jeep Ram Service or Book Service at Simi Valley CDJR. (Simi Valley Chrysler Dodge Jeep Ram)
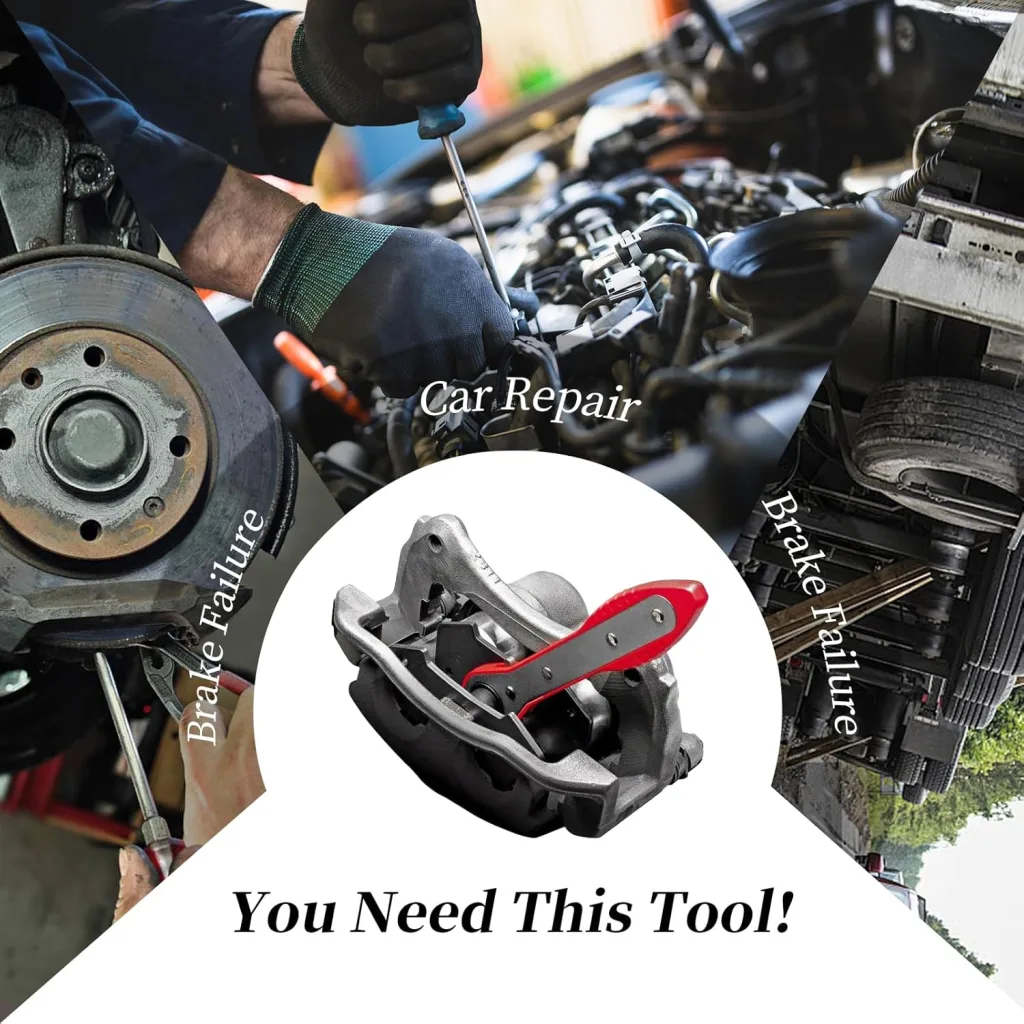
Brake Caliper Compression Tool: The Best Guide to Compressing Front and Rear Caliper Pistons the Right Way
A brake caliper compression tool is one of those tools that looks simple until you actually try to do a brake job without one. Then it becomes obvious very quickly why so many DIYers search for terms like brake caliper compression tool, brake caliper piston compression tool, rear brake caliper compression tool, disc brake caliper compression tool, and best brake caliper compression tool.
When you replace brake pads, the new pads are thicker than the worn-out ones you are removing. That means the caliper piston has to be pushed back into the caliper housing to make room. If you do not compress it correctly, the caliper will not fit over the new pads, you can damage components, and on some rear calipers you can make the job much worse by using the wrong method.
This guide explains everything properly:
- what a tool for compressing brake calipers actually does,
- the different types of brake caliper compression tools,
- front vs rear caliper piston differences,
- when a simple tool works and when you need a full kit,
- how to compress a brake caliper safely,
- and what to know about how to compress brake caliper without tool in an emergency.
What Is a Brake Caliper Compression Tool?
A brake caliper compression tool is a tool used to push or rotate the caliper piston back into the caliper bore during a brake pad replacement or brake service.
Its job is simple in theory:
- retract the piston,
- create space for new brake pads,
- and help the caliper fit back over the rotor and pad assembly.
But not all calipers work the same way. Some front calipers only need to be pressed straight in. Many rear calipers, especially those integrated with a parking brake system, need to be turned and pressed at the same time. That is why there are multiple tool types and why a random clamp is not always enough.
Why You Need to Compress the Brake Caliper Piston
As brake pads wear down, the caliper piston gradually moves outward to maintain contact with the pads. When you install new pads, they are much thicker, so the piston must go back in.
If you do not retract the piston:
- the caliper may not clear the new pads,
- you may struggle to reinstall the caliper,
- you risk forcing parts together incorrectly,
- and you can damage the piston, seals, or slide hardware.
This is why a brake caliper piston compression tool is a standard part of any brake-service setup.
What the Tool Actually Does
A good tool to compress brake calipers applies even force to the piston face without damaging it. Depending on the design, it may:
- push the piston straight back,
- rotate and push the piston simultaneously,
- spread evenly across the piston face,
- or fit into piston notches for rear parking-brake calipers.
That last part matters. Rear calipers are where many DIYers get caught. They assume all pistons just push in. Many do not.
Types of Brake Caliper Compression Tools
There is no single universal design that covers every vehicle equally well. Here are the main types.
1. Basic piston press or spreader tool
This is the simplest style. It is often a screw-driven press that pushes the piston back slowly and evenly. It works well for many front calipers.
Best for:
- front disc brake jobs,
- simple floating calipers,
- occasional DIY work.
This is often what people mean when they search disc brake caliper compression tool.
2. Ratcheting brake caliper compression tool
A ratcheting brake caliper compression tool uses a ratchet-style mechanism to spread or compress with more speed and control. These are popular because they are easy to use and work well on many front calipers.
Best for:
- faster pad changes,
- frequent brake jobs,
- people who want easier one-hand control.
The main advantage is convenience. The better ones also feel smoother and more controlled than improvised methods.
3. Cube brake caliper compression tool
A cube brake caliper compression tool is a compact multi-face tool designed mainly for rotating rear caliper pistons with different notch patterns.
Best for:
- rear calipers that must be turned,
- occasional DIY use,
- budget-conscious users.
It is cheap and compact, but not always the easiest or fastest tool to use. It usually requires a ratchet or extension and can be awkward in tight spaces.
4. Brake caliper compression tool kit
A brake caliper compression tool kit is the most versatile choice. It usually includes:
- left-hand and right-hand threaded forcing tools,
- multiple adapter plates,
- and a carrying case.
These kits are designed for front and rear calipers across many makes and models.
Best for:
- working on multiple vehicles,
- rear screw-in calipers,
- enthusiasts and serious DIYers,
- anyone wanting better compatibility.
If you do your own brakes regularly, a full kit is often the smartest buy.
5. Rear brake caliper compression tool
A rear brake caliper compression tool is specifically meant for calipers that need to rotate while retracting. These are common on rear brakes with integrated parking brake mechanisms.
Best for:
- rear caliper service,
- vehicles with screw-in piston designs,
- jobs where a standard press tool will not work.
This is where people most often damage parts by using the wrong method.
Front vs Rear Brake Caliper Compression: The Big Difference
This is the part many guides rush past, but it is the most important.
Front caliper pistons
Most front caliper pistons are compressed by simply pressing them straight back into the bore. A clamp, press tool, or ratcheting spreader can often do the job.
Rear caliper pistons
Many rear caliper pistons must be rotated while being pressed inward. This is because the parking brake mechanism is built into the caliper. These pistons often have notches or slots on the piston face for a turning tool.
If you try to force one of these straight in with raw pressure, you can:
- damage the parking brake mechanism,
- tear seals,
- strip internal components,
- or fail to retract the piston at all.
So when someone searches how to compress rear brake caliper piston without tool, the real answer is: sometimes you should not attempt it unless you know exactly what style of caliper you are working with.
The Best Brake Caliper Compression Tool for Each Type of User
Best for occasional DIYers
A basic press tool or simple ratcheting brake caliper compression tool is usually enough if you mainly work on common front calipers.
Best for mixed front and rear jobs
A full brake caliper compression tool kit is the strongest all-around choice. It covers more vehicles and saves frustration on rear calipers.
Best for rear brake service
A proper rear brake caliper compression tool or full wind-back kit is the safest option.
Best for value
A cube brake caliper compression tool is inexpensive and useful, but it is not the easiest option for repeated work.
Best overall
For most people who do their own brakes more than once, the best brake caliper compression tool is a full kit with multiple adapters plus a proper threaded press. It gives you front and rear capability and prevents a lot of headaches.
How to Use a Brake Caliper Compression Tool Properly
Now let’s get into the real-world process.
Step 1: Confirm what type of caliper you have
Before touching the piston, determine whether the caliper:
- pushes straight in,
- or must be turned while pressing.
Do not guess. If it is a rear caliper with an integrated parking brake, it often requires a wind-back style tool.
Step 2: Check the brake fluid reservoir
As you compress the piston, brake fluid returns to the reservoir. If the reservoir is already full, fluid may overflow.
Before compressing:
- inspect fluid level,
- remove some fluid if necessary,
- protect painted surfaces because brake fluid damages paint.

Step 3: Open the bleeder or not?
There are two common approaches.
Compress with bleeder closed
This is common and fast. Fluid is pushed backward through the system.
Compress with bleeder open
Some mechanics prefer opening the bleeder so old fluid exits at the caliper instead of being pushed back upstream. This can be cleaner hydraulically, especially on older systems, but it requires more care and usually a hose/bottle setup.
Either way, the important point is to compress slowly and under control.
Step 4: Position the tool correctly
A brake caliper piston compression tool should sit squarely on the piston face. Uneven pressure can cock the piston or damage the dust boot.
For rear wind-back tools:
- match the adapter to the piston notch pattern,
- confirm thread direction,
- and make sure the tool stays centered.
Step 5: Compress slowly
Do not rush. Whether using a ratcheting spreader, screw press, or full wind-back kit, retract the piston gradually.
Watch for:
- torn boots,
- binding,
- fluid overflow,
- unusual resistance,
- or crooked piston movement.
Any of those mean stop and reassess.
Step 6: Align rear piston notches if needed
Many rear calipers require the piston face to end in a specific orientation so the brake pad pin or tab can sit correctly in the notch. This step gets missed often.
If the piston is not aligned properly:
- the pad may not sit correctly,
- the caliper may not assemble right,
- or the rear brakes may drag.
How to Compress Brake Caliper Without Tool
Searches for how to compress brake caliper without tool, how to compress brake caliper piston without tool, and how to compress rear brake caliper piston without tool are common because people often start a brake job and realize they do not have the right tool.
Here is the honest answer.
For front calipers
In some cases, you can compress a front piston carefully using:
- a large C-clamp,
- channel-lock pliers with an old pad in place,
- or another improvised pressing method.
But even then, you need to be careful not to:
- damage the piston face,
- crack the caliper body,
- tear the dust boot,
- or apply uneven force.
So yes, sometimes a front caliper can be compressed without a dedicated tool, but it is still better to use a proper tool for compressing brake calipers.
For rear calipers
This is where the answer changes.
If the rear caliper is a screw-in design, trying to compress it without the proper rotating tool is a bad idea. You may get nowhere, or worse, damage the caliper.
So for most rear parking-brake calipers, how to compress rear brake caliper piston without tool should really be read as: do not force it without verifying the correct method first.
Common Mistakes When Compressing Brake Calipers
1. Assuming all pistons push straight in
This is the classic error on rear brake jobs.
2. Forcing a rear screw-in piston with a clamp
This can damage the internal parking brake mechanism.
3. Compressing too fast
Rapid compression can shock seals and cause fluid overflow.
4. Ignoring the brake fluid reservoir
Overflowed brake fluid creates a mess and can damage paint.
5. Damaging the dust boot
A torn boot invites dirt and moisture into the caliper.
6. Using the wrong adapter in a tool kit
If the adapter does not seat properly, the piston can slip or bind.
7. Failing to inspect slide pins and hardware
A stuck caliper problem is not always a piston problem. Sometimes the real issue is seized slide pins or worn bracket hardware.
8. Not checking for piston binding
If the piston is unusually hard to retract, there may be corrosion, seal failure, or caliper damage.
Signs the Caliper Piston or Caliper May Have a Problem
A compression tool is not meant to brute-force a bad caliper back into service. If you notice any of the following, inspect more closely:
- piston will not retract even with the correct tool,
- dust boot is ripped,
- fluid leakage is visible,
- caliper is sticking badly,
- one pad is worn far more than the other,
- rear piston refuses to rotate correctly,
- piston retracts unevenly or at an angle.
In those cases, the problem may be:
- seized piston,
- internal corrosion,
- parking brake mechanism failure,
- collapsed hose preventing pressure release,
- or slide pin binding.
A brake caliper compression tool kit helps with the service, but it does not fix a damaged caliper.
Ratcheting Tool vs Full Compression Kit
This is one of the most useful comparisons.
Ratcheting brake caliper compression tool
Best for:
- quick front brake jobs,
- convenience,
- simple compression tasks.
Pros:
- fast,
- easy to use,
- great for straightforward front calipers.
Cons:
- less useful for rear screw-in calipers,
- not as universal.
Full brake caliper compression tool kit
Best for:
- front and rear brake service,
- multiple vehicles,
- long-term DIY value.
Pros:
- much more versatile,
- handles screw-in rear pistons,
- better for mixed fleets.
Cons:
- larger,
- more pieces,
- slightly slower to set up.
For a single vehicle with standard front calipers, a ratcheting tool may be enough. For broader brake work, the kit wins.
Harbor Freight, AutoZone, O’Reilly, and Nearby Tool Searches
A lot of people search:
- brake caliper compression tool harbor freight
- brake caliper compression tool autozone
- brake caliper compression tool oreillys
- brake caliper compression tool nearby
That tells you something important: this is often a same-day need. People usually realize they need the tool in the middle of a brake job.
If that is your situation, the priority is not fancy branding. The priority is getting the correct type:
- straight press for front pistons,
- or wind-back kit for rear calipers.
The wrong nearby tool is still the wrong tool.
What to Look for in the Best Brake Caliper Compression Tool
If you are buying one and want the smartest choice, focus on these features.
Strong threaded mechanism
Cheap screw tools can bind or feel rough under load.
Good adapter fit
A full kit is only useful if the adapters seat properly on piston faces.
Left- and right-hand threaded options
Some rear calipers require different thread directions.
Durable case and organization
Tool kits are frustrating when adapters get mixed up or lost.
Clear compatibility
The best kits cover a broad range of vehicle types and rear piston patterns.
Smooth action under pressure
You want control, not a jerky tool that feels like it will slip.
Do You Need a Full Brake Caliper Compression Tool Kit?
You should strongly consider a full brake caliper compression tool kit if:
- you work on more than one vehicle,
- you do rear brakes often,
- you own European or mixed-brand vehicles,
- you do your own brake service regularly,
- or you want to avoid mid-job surprises.
If you only do basic front pads once in a while, a simpler tool may be enough. But the full kit usually pays for itself quickly in saved time and reduced frustration.
Final Verdict
A brake caliper compression tool is not optional if you want brake jobs to go smoothly. It is one of the core tools that separates a controlled pad replacement from a frustrating fight with the caliper.
For simple front brake jobs, a basic press tool or ratcheting brake caliper compression tool may be enough.
For rear brake service, especially on vehicles with integrated parking brakes, a proper rear brake caliper compression tool or full brake caliper compression tool kit is the right answer.
And for most DIYers who want one solution that covers real-world brake work, the best brake caliper compression tool is usually a complete kit with multiple adapters and a proper wind-back mechanism. It gives you the flexibility to handle both front and rear pistons correctly, which is exactly where most people run into trouble.
Using the correct tool to compress brake calipers does three things:
- makes the job faster,
- reduces the chance of damage,
- and helps ensure the new pads fit and function the way they should.
That is the difference between just getting the caliper back on and doing the brake job properly.
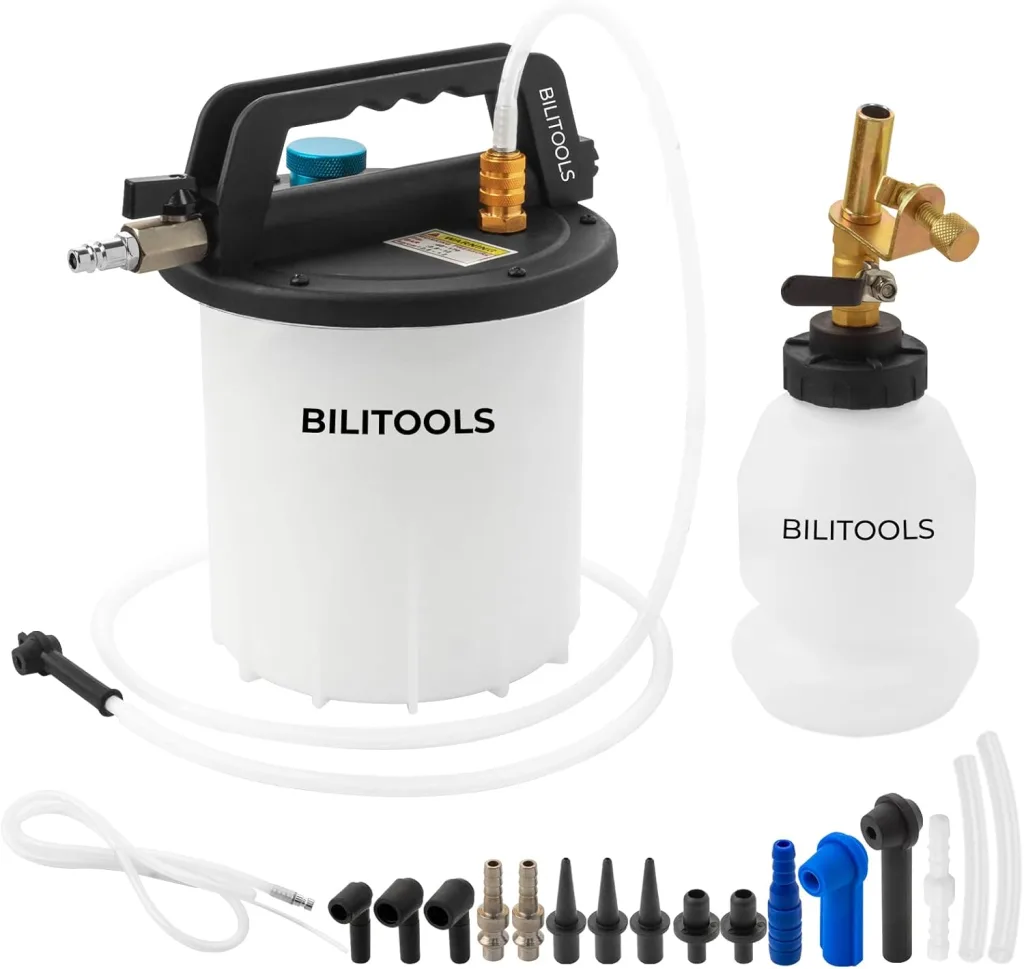
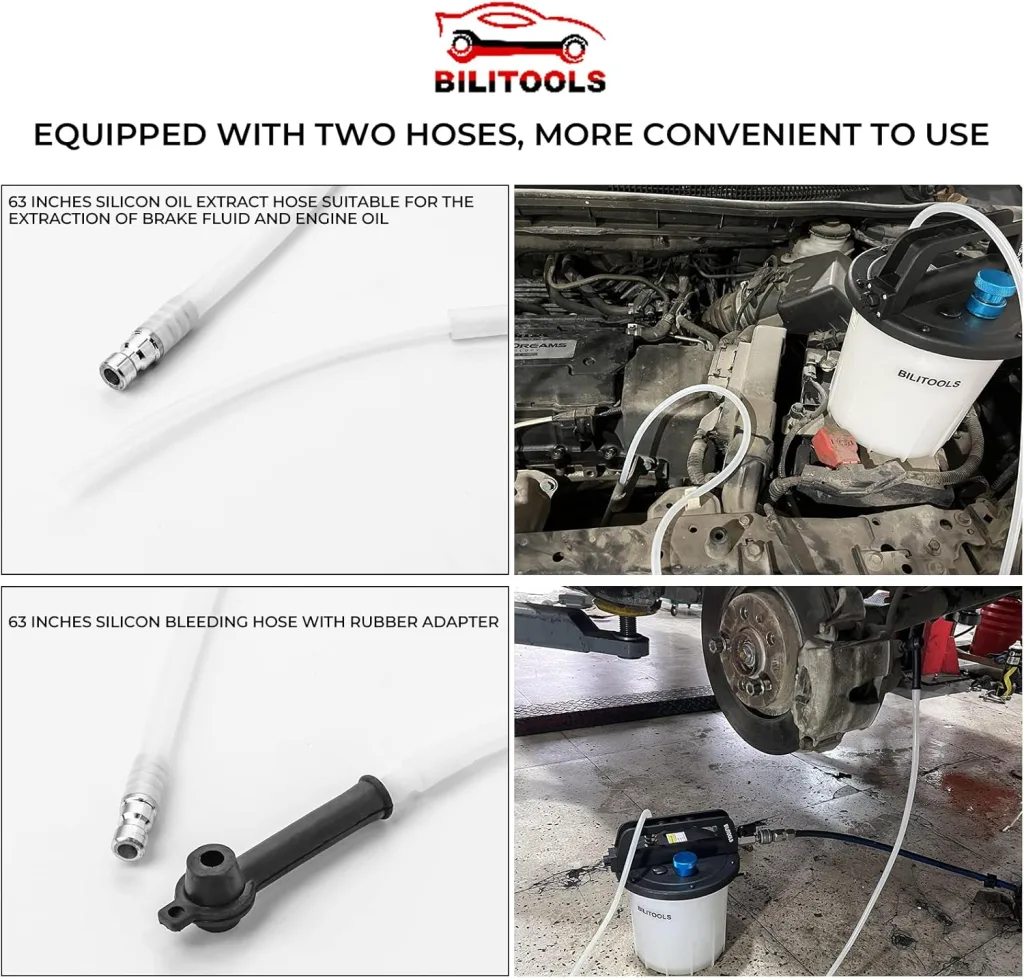
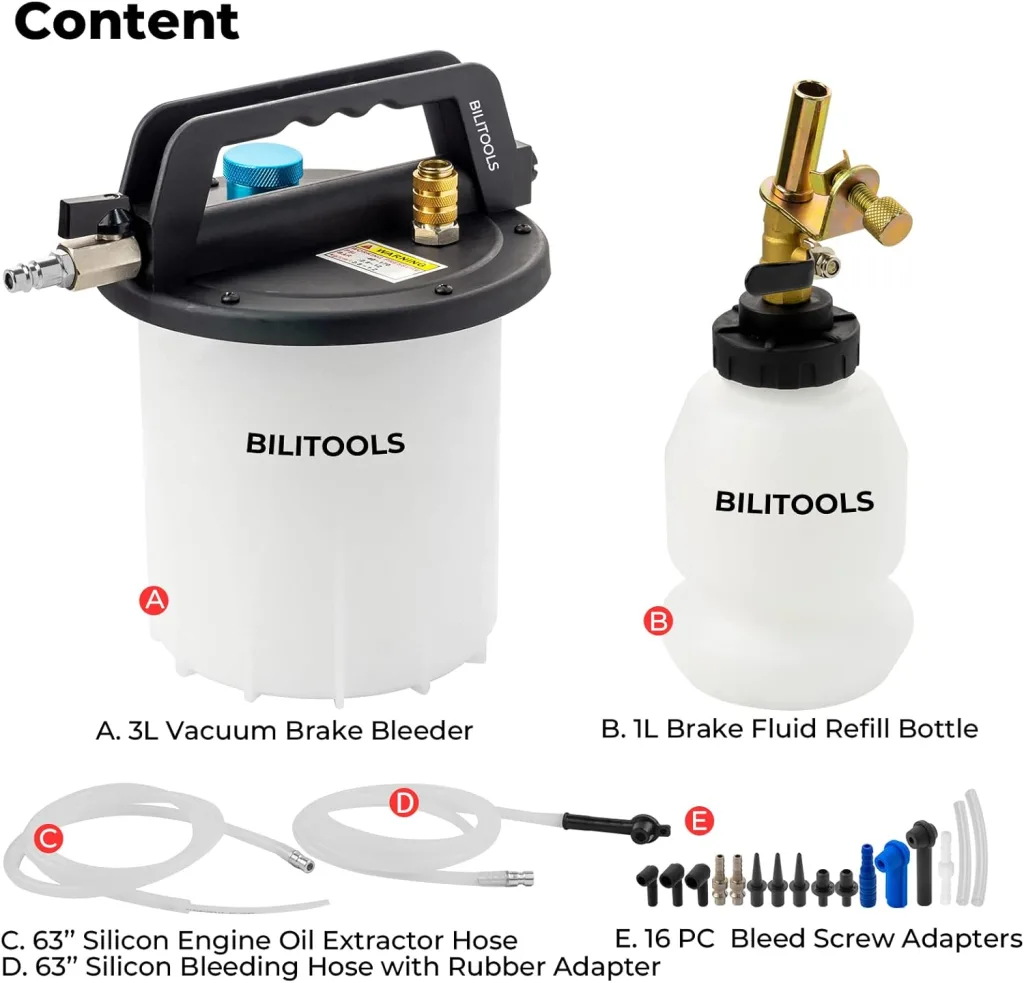
If you are trying to choose the right brake bleeder kit, learn how bleeding brakes works, or figure out whether you need a vacuum brake bleeder, brake pressure bleeder, or a simple one man brake bleeder kit, this is the guide that covers it properly.
Brake bleeding sounds simple, but it is one of those jobs people mess up all the time. A small mistake can leave you with a soft pedal, trapped air, wasted brake fluid, stripped bleeder screws, or in the worst case, unsafe braking performance. That is why understanding the process matters just as much as buying the right brake bleeder tool.
This guide explains:
- what a brake bleeder actually does,
- the different types of brake bleeding kits,
- the best methods for bleeding brakes by yourself,
- how to bleed ABS systems,
- common mistakes when bleeding brake lines,
- and how to choose the best brake bleeder kit for your garage.
What Is a Brake Bleeder?
A brake bleeder is any tool or setup used to remove air from a hydraulic brake system. Since brake systems rely on incompressible brake fluid to transfer force, any air trapped in the lines causes a spongy pedal and reduced braking performance.
When you open a bleeder screw and force fluid through the system, you push out trapped air bubbles. That process is called brake bleeding.
You usually need to bleed brakes after:
- replacing calipers,
- replacing brake hoses or hard lines,
- changing a master cylinder,
- installing wheel cylinders,
- opening the hydraulic system for repairs,
- or when the pedal feels soft and air contamination is suspected.
In some cases, a full flush is also done simply because old brake fluid absorbs moisture over time.
Why Bleeding Brakes Matters
A brake system works on hydraulic pressure. When you press the brake pedal, the master cylinder pushes fluid through lines to the calipers or wheel cylinders. If there is air in the system, that air compresses. Fluid does not compress the same way, but air does. That is what causes the mushy pedal feel.
Proper brake bleeding restores:
- firm pedal feel,
- consistent braking response,
- better modulation,
- safer stopping performance.
You are not just doing maintenance. You are restoring hydraulic integrity.
Types of Brake Bleeder Kits
Not all brake bleeder kits work the same way. Choosing the right type depends on your budget, how often you work on brakes, and whether you usually work alone.
1. Manual two-person brake bleeding
This is the old-school method. One person pumps the brake pedal while another opens and closes the bleeder screw.
How it works
- One person pumps the pedal several times.
- The helper holds the pedal down.
- The second person opens the bleeder valve.
- Air and fluid escape.
- The bleeder is closed before the pedal is released.
Pros
- Cheap
- No special tools required
- Effective when done correctly
Cons
- Requires two people
- Easy to mess up timing
- Can overstroke an old master cylinder
- More annoying than modern methods
This still works, but it is not the best option for most DIYers today.
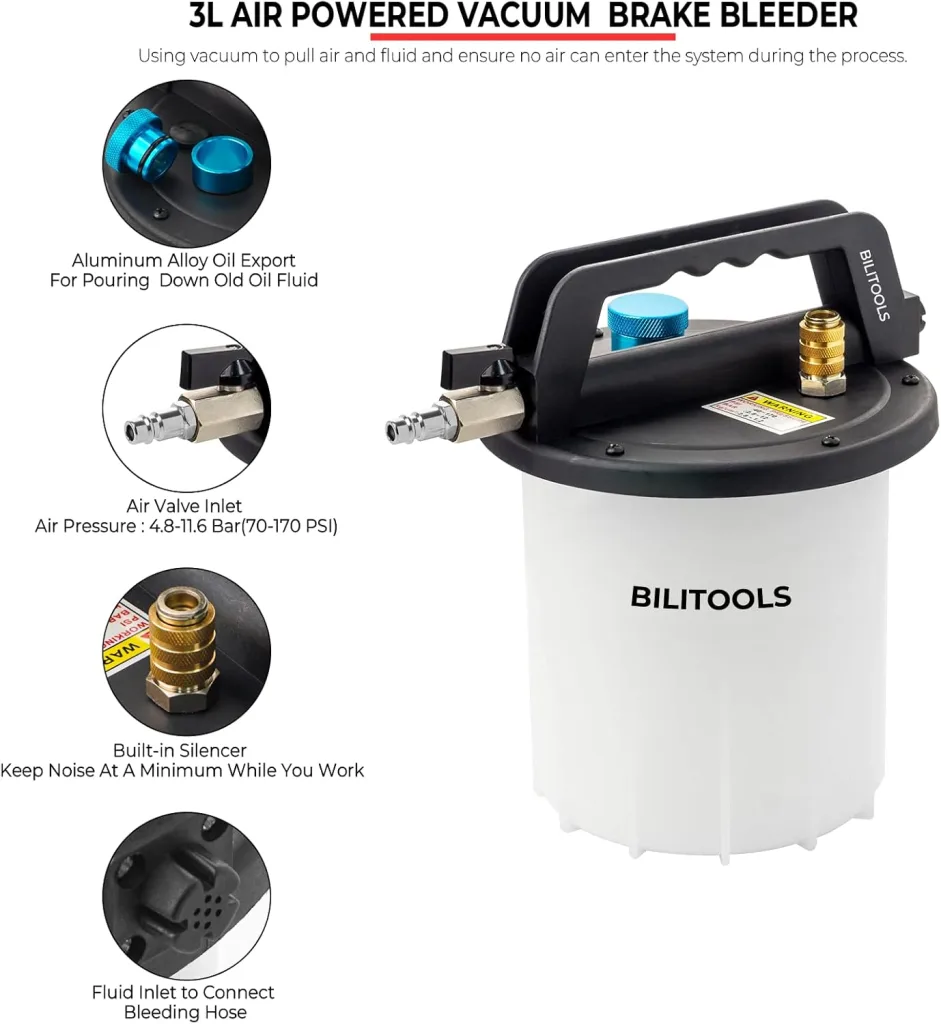
2. Vacuum brake bleeder
A vacuum brake bleeder uses suction at the bleeder screw to pull brake fluid and air through the system. This is one of the most popular options for DIY use.
It is often sold as a brake bleeder vacuum pump, vacuum brake bleeder kit, or brake bleeder and vacuum pump kit.
Pros
- Good for one-person operation
- Affordable
- Easy to use on many vehicles
- Useful for general fluid extraction tasks too
Cons
- Can pull false air past bleeder screw threads
- Sometimes confusing for beginners
- Requires good hose sealing
- May be slower on stubborn systems
If someone wants a practical one person brake bleeder, vacuum kits are often the first serious upgrade from the basic bottle-and-hose method.
3. Pressure brake bleeder
A brake pressure bleeder attaches to the master cylinder reservoir and pressurizes the system from the top. This pushes brake fluid through the lines and out the bleeder screws.
It is also called a pressure brake bleeder, pressurized brake bleeder, or power brake bleeder.
Pros
- Excellent for full system flushing
- Very effective for one-person use
- Fast and clean
- Often the best method for modern vehicles
- Great for consistent fluid flow
Cons
- Costs more than basic methods
- Requires the correct reservoir cap adapter
- Can make a mess if improperly sealed
- Needs careful pressure management
For many enthusiasts and serious home mechanics, a pressure brake bleeder is the best all-around tool.
4. Pneumatic brake bleeder
A pneumatic brake bleeder uses compressed air to generate vacuum or assist fluid extraction. These are more common in shop environments.
Pros
- Fast
- Good for repeated shop use
- Less manual effort
Cons
- Requires an air compressor
- Less practical for casual users
- More equipment involved
If you work on brakes frequently, this can be worthwhile. For occasional DIY jobs, a manual vacuum or pressure setup is usually more sensible.
5. One man brake bleeder kit
A one man brake bleeder kit is a general category. It may be vacuum-based, pressure-based, or use a simple one way brake bleeder valve or check-valve bottle setup.
Pros
- Lets you bleed brakes by yourself
- Great for DIY garages
- Available in many price ranges
Cons
- Cheap kits vary wildly in quality
- Simple check-valve kits are less reliable than pressure systems
- Not all designs work equally well on stubborn ABS systems
If your main goal is bleeding brakes by yourself, this is the category to shop carefully.
Brake Bleeder Tools You Should Know
A complete brake bleeding job often involves more than just one tool.
Brake bleeder wrench
A brake bleeder wrench is sized to fit bleeder screws without rounding them off. This matters more than people think. Bleeder screws strip easily.
Brake bleeder hose
A clear brake bleeder hose lets you see air bubbles and fluid color. It is one of the simplest but most helpful tools in the whole job.
Brake bleeder bottle
A brake bleeder bottle collects old fluid and helps you monitor bubbles. Many low-cost one-person kits rely on this.
Brake bleeder screw
The brake bleeder screw or brake bleeder valve is the small valve on the caliper or wheel cylinder that you open during bleeding. If it is seized, rusted, or damaged, your job becomes much harder.
Brake master cylinder bleeder kit
A brake master cylinder bleeder kit is usually for bench bleeding a master cylinder before installation. This is different from wheel-end bleeding and is essential when replacing the master cylinder.
The Best Brake Bleeder Kit for Different Users
Best for beginners
A quality vacuum brake bleeder kit is usually the easiest place to start. It is affordable, beginner-friendly, and lets one person do the job.
Best for serious DIYers
A brake pressure bleeder is often the best choice overall. It is cleaner, more consistent, and usually better for full fluid flushes.
Best for shops
A pneumatic brake bleeder or high-quality power brake bleeder makes sense if you do brake work regularly.
Best for occasional users
A one man brake bleeder kit with a bottle, hose, and check valve can work, but quality matters. Cheap kits can waste time.
Best for ABS-heavy modern vehicles
A pressure brake bleeder is often the better starting point, especially when followed by the correct ABS bleed procedure for the vehicle.
How to Bleed Brakes Properly
Now let’s get into the actual brake bleeding procedure.
Step 1: Gather the right tools
You will usually need:
- correct brake fluid type,
- brake bleeder kit,
- wrench for bleeder screws,
- clear hose,
- catch bottle,
- gloves,
- eye protection,
- jack and stands if wheels need to come off,
- shop towels,
- penetrating oil if bleeders are rusty.
Do not start if you are not sure what brake fluid spec your vehicle requires.
Step 2: Bench bleed the master cylinder if it was replaced
If you installed a new master cylinder, you should usually bench bleed it first using a master brake cylinder bleeding kit or brake master cylinder bleeder kit.
If you skip this, you may fight trapped air for much longer than necessary.
Step 3: Keep the master cylinder reservoir full
This is one of the most important rules in all of bleeding brakes.
Never let the reservoir run dry.
If it runs dry, you introduce new air into the system and may have to start all over again.
Step 4: Follow the correct brake bleeding sequence
The basic brake bleeding sequence on many vehicles is to start with the wheel farthest from the master cylinder and work toward the closest.
A common sequence is:
- Right rear
- Left rear
- Right front
- Left front
But not every vehicle uses the same order. Some diagonal systems, ABS systems, and specific OEM procedures differ. Always verify for your exact vehicle if possible.
Step 5: Use your chosen bleeding method
Manual method
- Pump pedal slowly
- Hold pedal down
- Open bleeder
- Let fluid and air out
- Close bleeder
- Release pedal
- Repeat until no bubbles
Vacuum brake bleeder method
- Attach hose securely to bleeder screw
- Apply vacuum
- Open bleeder screw
- Draw fluid until no bubbles remain
- Monitor reservoir constantly
Pressure brake bleeder method
- Attach pressure bleeder to reservoir
- Pressurize to safe specified level
- Open bleeder screw at each corner
- Let fluid run until clear and bubble-free
- Close bleeder and move to next wheel
Bleeding Brakes by Yourself
Many people search for bleeding brakes by yourself, bleeding brakes one person, one person brake bleeder, or 1 person brake bleeder kit because solo brake work is common.
The best ways to do it alone are:
1. Pressure bleeder
Usually the most reliable one-person method.
2. Vacuum brake bleeder
Very effective if your hose connections seal well and you understand false bubble issues.
3. Check valve bottle kit
Works, but usually less refined and less consistent than the two methods above.
If you ask me for the best solo method overall, the answer for most modern vehicles is a brake pressure bleeder.
Bleeding Brakes With a Mityvac
Bleeding brakes with a Mityvac is one of the most searched brake service methods for a reason. A Mityvac-style hand pump is a common brake bleeder vacuum pump setup.
Best practices
- Wrap bleeder threads lightly if needed to reduce false air
- Keep the hose tight
- Pull vacuum before opening the bleeder
- Watch actual fluid movement, not just tiny bubbles
- Refill the reservoir constantly
One thing beginners often misunderstand: vacuum systems can sometimes show bubbles that are not actually from trapped air in the brake line, but from tiny air leaks around the bleeder screw threads. That does not automatically mean the system is still full of air.
Bleeding Brakes With a Pressure Bleeder
Bleeding brakes with a pressure bleeder is one of the cleanest and most efficient methods.
Why it works so well
Instead of sucking fluid from the caliper end, it pushes fluid from the master cylinder down through the entire hydraulic system. That usually gives smoother, more consistent flow.
Best practices
- Use the correct cap adapter
- Do not overpressurize
- Check for leaks before starting
- Protect painted surfaces from brake fluid
- Use fresh brake fluid only
For many serious DIYers, a power brake bleeder is the best investment in brake service tools.
Bleeding Brakes on ABS Systems
Bleeding brakes on ABS system jobs can be straightforward or annoying depending on what was replaced and how much air entered the system.
In many standard pad-and-caliper jobs, a normal bleed may be enough.
But if:
- the master cylinder ran dry,
- the ABS hydraulic control unit got air in it,
- major line work was done,
- or the manufacturer requires special cycling procedures,
then you may need an ABS brake bleeding scan tool.
Some ABS systems require electronically cycling the ABS pump and valves to purge trapped air. Without that scan tool function, you can end up with a pedal that still feels wrong even after ordinary bleeding.
So for bleeding brakes with ABS or bleeding brakes with ABS system, remember this:
A normal brake bleeder kit may not be enough if air is trapped inside the ABS module.
Common Mistakes When Bleeding Brakes
Searches for common mistakes when bleeding brakes are popular because people make the same errors over and over.
1. Letting the reservoir run dry
This is the biggest mistake.
2. Using the wrong fluid
DOT 3, DOT 4, DOT 5, and DOT 5.1 are not interchangeable in every case.
3. Opening bleeders too far
You only need them cracked open, not fully backed out.
4. Stripping bleeder screws
Use the correct brake bleeder wrench and be gentle.
5. Misreading vacuum bubbles
Tiny bubbles may come from bleeder threads, not trapped system air.
6. Pumping the pedal too aggressively
Fast pumping can aerate fluid.
7. Ignoring ABS procedure requirements
Some vehicles need scan tool activation.
8. Reusing contaminated fluid
Never do this.
9. Spilling brake fluid on paint
Brake fluid damages painted surfaces fast.
10. Bleeding in the wrong sequence
Always verify the correct order for the vehicle.
Brake Bleeding Pressure: How Much Is Too Much?
When using a brake pressure bleeder, more pressure is not automatically better.
Too much pressure can:
- cause reservoir leaks,
- make a mess,
- damage seals,
- or create unnecessary risk.
Most DIY pressure bleeder setups are run at modest pressure, not extreme pressure. Always follow tool and vehicle guidance. The goal is controlled hydraulic flow, not brute force.
Signs Your Brake Bleeding Worked
After proper brake bleeding, you should usually notice:
- firmer pedal feel,
- more consistent pedal height,
- no obvious sponginess,
- improved braking response,
- clean fluid at the bleeder,
- no visible bubbles in final flow.
If the pedal is still soft, possible reasons include:
- air still trapped in the system,
- rear brake adjustment issues on drum systems,
- master cylinder problems,
- flexible hose expansion,
- ABS module air,
- or external leaks.
Brake Bleeder Kit Buying Guide
If you are shopping for the best brake bleeder kit, here is the simplest way to decide.
Choose a vacuum brake bleeder if:
- you want affordable one-person bleeding,
- you are a beginner,
- you want a multi-purpose vacuum tool,
- you only do brake jobs occasionally.
Choose a pressure brake bleeder if:
- you work on your own vehicles regularly,
- you want faster full fluid flushes,
- you want the best one-person workflow,
- you work on newer cars often.
Choose a pneumatic brake bleeder if:
- you already have compressed air,
- you do frequent brake service,
- you want shop-style speed.
Choose a basic one-man bottle kit if:
- budget is extremely tight,
- you only do occasional simple bleeding,
- you understand its limitations.
Final Verdict
The best approach to brake bleeding depends on how often you do the job and what kind of vehicles you work on.
For the average DIYer, a quality vacuum brake bleeder kit is a strong starting point.
For the enthusiast or serious home mechanic, a brake pressure bleeder is often the best overall solution because it makes bleeding brakes by yourself cleaner, faster, and more consistent.
For shop use, a pneumatic brake bleeder or higher-end power brake bleeder usually makes the most sense.
No matter which brake bleeder tool you use, the fundamentals stay the same:
- keep the reservoir full,
- use the correct fluid,
- follow the proper brake bleeding sequence,
- do not rush,
- and understand when an ABS system needs scan tool intervention.
That is what separates a quick brake job from a correct one.
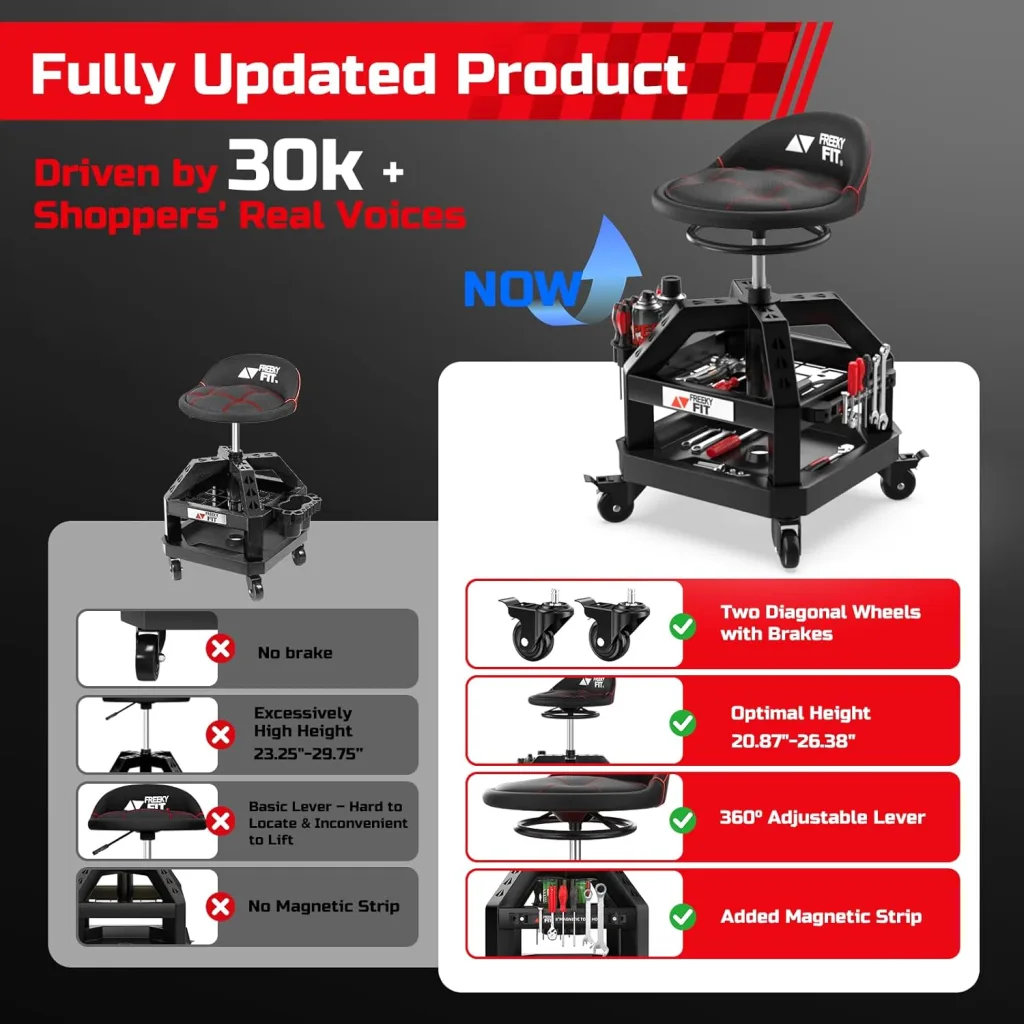
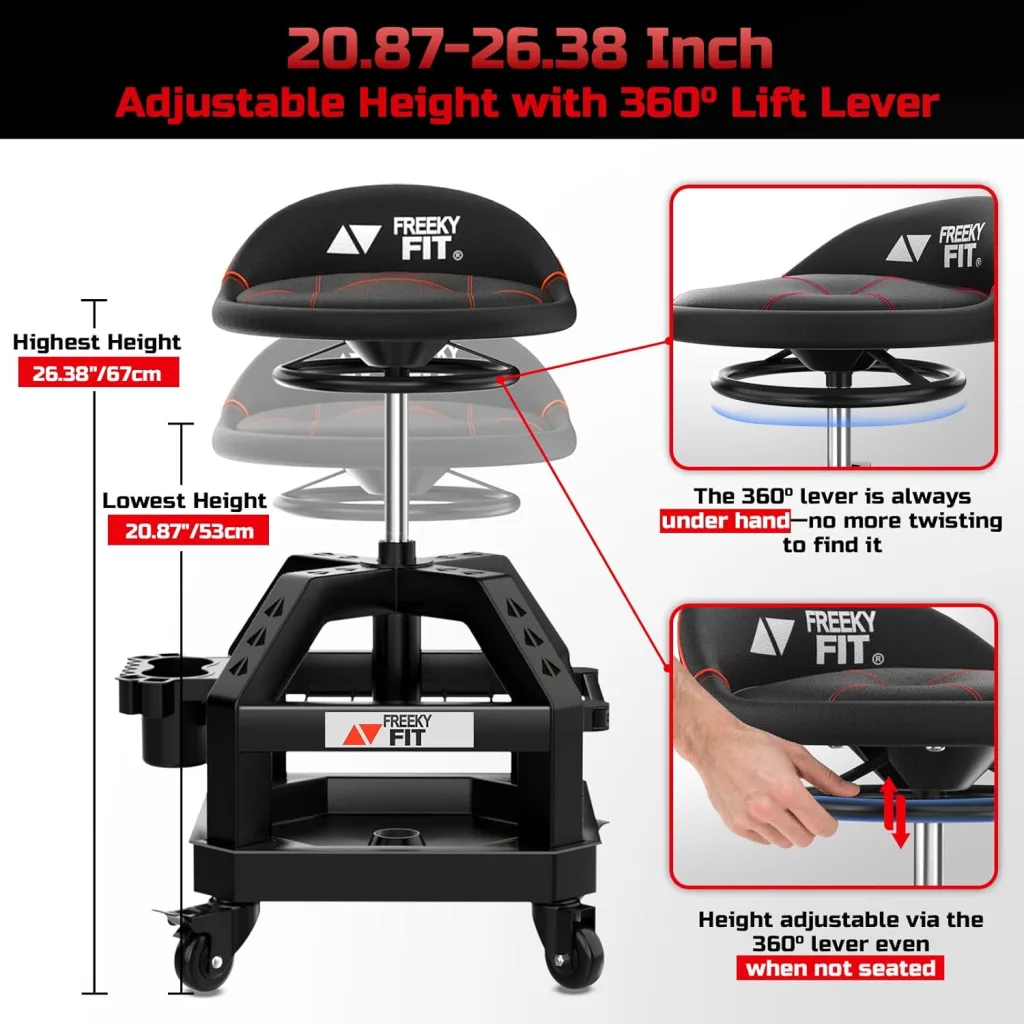
Best Garage Stool: How to Choose the Right Rolling Garage Stool for Comfort, Mobility, and Real Shop Work
A good garage stool is one of those tools people underestimate until they actually spend long hours in a garage, workshop, or detailing bay. Most DIYers obsess over tool chests, jacks, compressors, and lighting, but the humble stool often determines whether a long repair session feels manageable or miserable.
If you spend time changing brakes, polishing lower body panels, cleaning wheels, working on suspension parts, organizing shelves, or tackling bench-level jobs, a proper rolling garage stool can make a noticeable difference. The right stool reduces strain on your knees and lower back, improves mobility, and helps you work more efficiently without constantly crouching, kneeling, or standing back up every few minutes.
That is exactly why search terms like garage stool, garage stools, rolling garage stool, garage stool with wheels, garage stool with back, garage stool with backrest, heavy duty garage stool, and best rolling garage stool continue to attract steady interest. Buyers are not just looking for a seat. They are looking for a tool that makes real garage work easier.
This guide breaks down what matters most when choosing the best garage stool, how different types compare, and which features actually make sense depending on how you use your space.
Why a Garage Stool Matters More Than Most People Think
A garage stool is not just furniture. In a working garage, it is part of your workflow.
A lot of common jobs happen at awkward heights. Think about:
- wheel cleaning,
- brake work,
- polishing rocker panels,
- organizing lower drawers,
- detailing interiors,
- changing fluids,
- sanding,
- welding prep,
- or working around tool benches.
Without a proper stool, you end up kneeling on concrete, bending at bad angles, or squatting for longer than you should. That gets old fast. A proper garage rolling stool gives you a stable working height and lets you move around the vehicle or workspace without constantly resetting your position.
For professionals, that means less fatigue over a full day. For DIYers, it means you are more likely to actually finish the job without your body giving up before you do.
What Is a Garage Stool?
A garage stool is a work-oriented seat designed for use in garages, workshops, detailing spaces, and shop environments. Unlike a normal chair, it is built around utility. Many versions include:
- caster wheels,
- adjustable height,
- padded seats,
- trays for tools,
- backrests,
- or heavy-duty steel frames.
Some are designed more like mechanic seats, while others look more like garage bar stools intended for counters, benches, workstations, or display-oriented spaces. That distinction matters, because not every stool for a garage is meant for the same purpose.
Broadly, most stools fall into two categories:
1. Rolling work stools
These are the most practical for hands-on jobs. They usually have caster wheels, a lower seating height, and a compact footprint. If someone searches for a rolling stool for garage or garage stool with wheels, this is usually what they want.
2. Static or bar-height garage stools
These are more common for workbenches, garage bars, display spaces, or branded setups. Searches like garage bar stools, bar stools garage, and garage bar stool tend to fall into this category.
If your goal is actual repair, detailing, or mobile shop work, a rolling garage stool is usually the better choice.

Who Actually Needs a Rolling Garage Stool?
Not everyone needs one, but a lot more people would benefit from one than they realize.
A rolling garage stool is especially useful for:
- home mechanics,
- automotive detailers,
- tire and wheel specialists,
- painters and bodywork hobbyists,
- woodworkers,
- welders,
- motorcycle owners,
- boat owners,
- and anyone who spends long sessions in a shop or garage.
If you work close to the ground often, a garage stool on wheels becomes less of a luxury and more of a quality-of-life upgrade.
The Most Important Types of Garage Stools
Not all garage stools are built the same. The best one depends on your work style.
Rolling garage stool
This is the most popular and practical type. A rolling garage stool usually includes a padded seat, caster wheels, and a height intended for lower-level tasks. Some versions also add storage trays under the seat.
Best for:
- brake jobs,
- detailing,
- wheel cleaning,
- organizing lower shelves,
- side-panel work,
- and repetitive low-height tasks.
If your search intent is best rolling garage stool, this is the category to focus on.
Garage stool with wheels
This phrase overlaps heavily with rolling models, but it often reflects buyers specifically looking for mobility first. A garage stool with wheels is all about smooth repositioning around a vehicle or work area.
Best for:
- moving around a car without standing up,
- shifting between tool cart and vehicle,
- saving time in repetitive jobs.
Garage stool with back
A garage stool with back or garage stool with backrest is built for users who prioritize comfort and posture. This type is useful if you sit for long periods or do bench-level work where lumbar support matters more than maximum movement freedom.
Best for:
- longer seated tasks,
- workstation use,
- electronics or bench work,
- hobby work that lasts hours.
The trade-off is that some backrest models can be slightly bulkier and a bit less agile than ultra-compact mechanic stools.
Heavy duty garage stool
A heavy duty garage stool is meant for buyers who care most about weight capacity, durability, and frame strength. If you are searching terms like rolling garage stool 300lbs adjustable mechanic work shop seat w/casters, you are clearly looking for strength, stability, and confidence under load.
Best for:
- larger users,
- rough shop environments,
- frequent daily use,
- mechanics who do not want flex or wobble.
Garage bar stools
Garage bar stools are different from mechanic stools. These are usually taller, more decorative, and often used near counters, bars, workbenches, or display spaces. They can still be useful, but they are not the best choice for low-height repair work.
Best for:
- garage lounge spaces,
- workbench seating,
- showroom-style setups,
- branded man-cave or enthusiast garages.
If your garage is as much about presentation as utility, garage bar stool options may make sense.
What Features Actually Matter in the Best Garage Stool?
A lot of stools look good in photos. Fewer hold up in actual use. If you want the best garage stool, focus on these features.
1. Wheels that actually roll well
This sounds obvious, but not all caster setups are equal. A garage stool with wheels is only useful if those wheels move smoothly across your shop floor. Cheap casters can bind, wobble, or feel rough on seams and debris.
Good wheels should:
- roll smoothly,
- swivel easily,
- feel stable under weight,
- and avoid constant snagging.
If mobility is the main reason you are buying, wheel quality is one of the biggest factors.
2. Seat comfort
A stool does not need luxury-office-chair padding, but it should not feel like sitting on a steel dinner plate either. A properly padded garage stool seat matters when jobs run longer than expected.
A better seat should offer:
- moderate padding,
- durable upholstery,
- decent width,
- and a shape that supports long use without feeling too soft or too hard.
3. Height
This is one of the most overlooked parts of buying a stool for garage use. Some people need a low mechanic stool for wheel work. Others need something taller for bench tasks. An adjustable garage stool is often the smartest solution because it gives you more flexibility.
If you do a mix of tasks, adjustable height is a strong advantage.
4. Weight capacity
If the stool feels flimsy, it will not matter how nice the cushion is. A heavy duty garage stool should feel planted, solid, and structurally trustworthy.
Look for:
- steel frame construction,
- reinforced mounting points,
- stable base geometry,
- and a clearly stated load rating.
This matters especially if you are buying for a commercial shop or daily use.
5. Backrest or no backrest
A garage stool with backrest can be much more comfortable, but it depends on your use. If you need to lean and twist around a vehicle constantly, a backrest can sometimes get in the way. If you are doing longer stationary work, it may be absolutely worth it.
This is less about good versus bad and more about workflow fit.
6. Tool storage
Some of the best garage rolling stool designs include trays under the seat for sockets, towels, trim tools, fasteners, or detailing supplies. That is a genuinely useful feature, especially for repetitive work.
You do not need huge storage, but even a simple tray can save trips back and forth.
7. Build quality
A garage stool lives in a harsh environment. It will see dirt, oils, movement, dropped tools, and probably abuse. A good stool should feel like a shop tool, not cheap home furniture pretending to be one.
Rolling Garage Stool vs Garage Stool With Backrest
This is one of the most common buying dilemmas.
Choose a rolling garage stool if:
- you move around vehicles a lot,
- you do brake or wheel jobs,
- you detail lower panels,
- you want maximum mobility,
- or you prefer a compact design.
Choose a garage stool with backrest if:
- you sit longer in one place,
- you do workstation tasks,
- comfort is a top priority,
- or lower back support matters more than agility.
If you want the best all-around solution, a garage stool with backrest and wheels can offer both, though it needs to be well designed or it can feel bulky.
Best Garage Stool for Different Use Cases
There is no single perfect stool for every buyer. The right choice depends on how you use your garage.
Best for mechanics
A rolling garage stool with strong casters, storage tray, decent padding, and solid frame is usually the best fit.
Best for detailers
A garage stool on wheels with smooth movement and easy low-height access works best. Detailers spend a lot of time around wheels, side skirts, and lower body lines.
Best for comfort
A garage stool with back or garage stools with backs make more sense if you spend long periods seated.
Best for bigger users
A heavy duty garage stool with a wide seat and strong load rating is the smarter buy.
Best for bench areas
If you mainly sit at a workbench or counter, garage bar stools with back or a taller bench-style stool may be more useful than a mechanic creeper stool.
Garage Stool vs Creeper Seat
Some buyers compare a garage stool with a creeper seat. They overlap, but they are not identical.
A creeper seat is usually lower, more specialized, and sometimes built with repair work specifically in mind. A garage stool can be a broader category that includes mechanic stools, bench stools, and decorative shop seating.
If you want one stool that can handle most general shop tasks, the best garage stool with wheels is often more versatile than an ultra-specialized creeper seat.
Common Mistakes People Make When Buying a Garage Stool
A lot of buyers end up disappointed for predictable reasons.
Buying based only on price
The cheapest stool often ends up wobbling, wearing out, or rolling badly.
Ignoring seat height
A stool that is too high or too low for your tasks becomes annoying quickly.
Choosing looks over function
Some garage stools with logos or showroom-style stools look great but are not ideal for actual repair work.
Overlooking back support
If you sit for long stretches, a garage stool with backrest might be a much better long-term choice.
Not checking wheel quality
A stool lives or dies by how well it moves. Bad wheels ruin the experience.
How to Pick the Best Rolling Garage Stool
If your main goal is mobility, here is the easiest way to narrow down the right option.
Choose a best rolling garage stool based on:
- caster quality,
- frame strength,
- seat padding,
- height range,
- stability,
- and whether you need a tray or backrest.
For most buyers, the best balance is:
- four caster wheels,
- padded seat,
- steel frame,
- moderate storage,
- and enough capacity to feel stable without flex.
Are Garage Bar Stools Worth It?
Yes, but only for the right use case.
Garage bar stools are worth it if your garage has:
- a bench seating area,
- a garage bar,
- a display zone,
- or a social/lounge setup.
They are not the best solution for oil changes, brake jobs, or low-detail work. If your goal is utility, stay focused on garage rolling stool and garage stool with wheels options instead.
Final Verdict: What Is the Best Garage Stool?
The best garage stool is the one that matches the kind of work you actually do.
If you are a mechanic, detailer, or serious DIYer, the best choice is usually a rolling garage stool with:
- strong wheels,
- a comfortable padded seat,
- solid steel construction,
- and enough stability for daily use.
If comfort matters most, a garage stool with back or garage stool with backrest is worth considering. If durability is the priority, go for a heavy duty garage stool. If your garage is more of a social or display space, garage bar stools may be the better fit.
For most real-world shop users, though, the winning formula is simple: a garage stool with wheels that rolls smoothly, feels stable, and supports long work sessions without making your back, knees, and patience suffer.
That is what separates a random stool from the best garage stool for actual garage life.
Best Oil Extractor Pump: Why a Large-Capacity Manual Unit Still Makes Sense for DIY Oil Changes
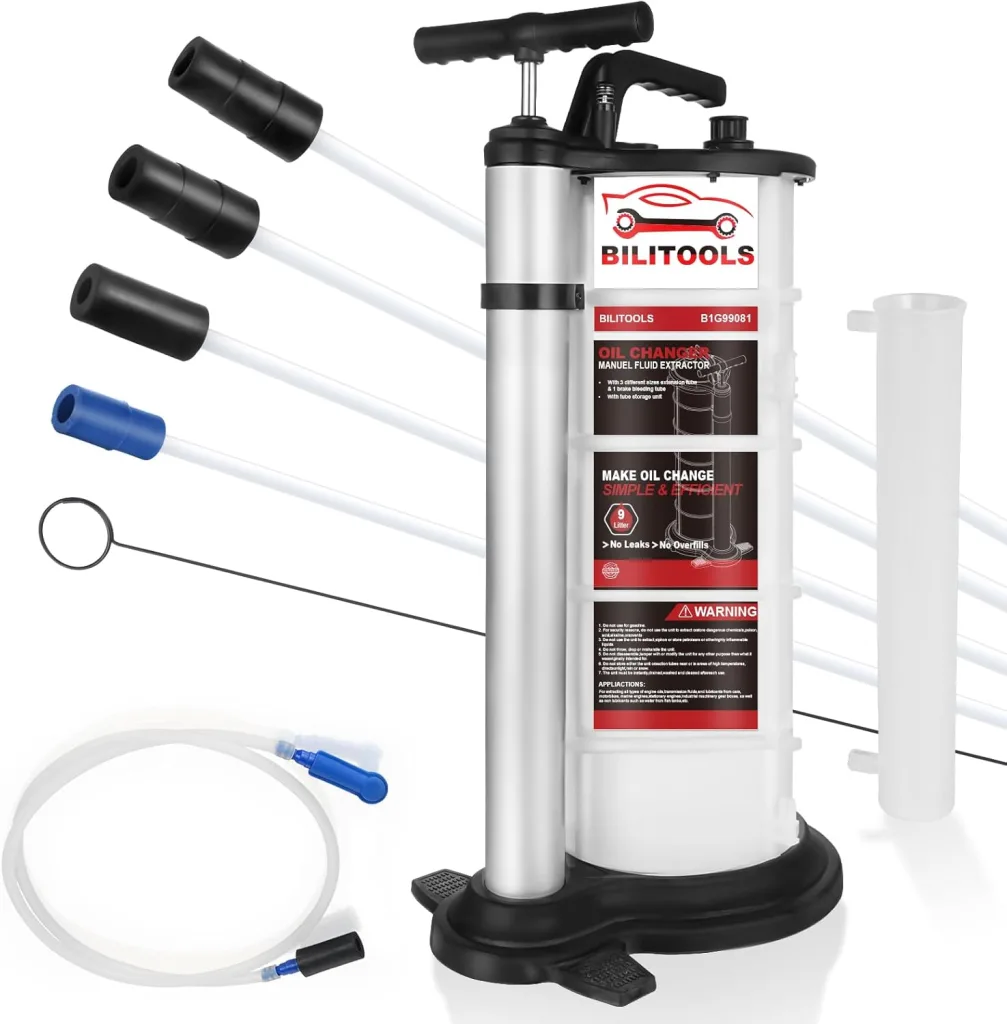
If you are searching for the best oil extractor pump, you are probably trying to solve a very specific problem: you want a cleaner, faster, and less frustrating way to remove engine oil without always crawling under the vehicle. That is exactly why terms like oil extractor pump, oil pump extractor, engine oil extractor pump, electric oil extractor pump, and extractor oil pump keep getting searched by DIYers, boat owners, small-equipment users, and even people maintaining multiple vehicles at home.
The truth is that the “best” oil extractor pump is not always the fastest or most expensive one. In many cases, the best option is the one that gives you the right balance of capacity, reliability, portability, and ease of use for your kind of maintenance routine. For a lot of users, that points directly toward a manual vacuum-style extractor rather than an electric one.
A good example is the BILITOOLS 9L Manual Oil Extractor Pump, which Amazon lists as a 9-liter manual vacuum fluid extractor designed for automotive engine oil changes and also marketed for boats, marine use, and jetskis. The listing highlights manual operation, a large 9L tank, a translucent body for fluid-level visibility, a hose storage solution, and the benefit of performing oil extraction without lifting the vehicle or crawling underneath it.
That combination makes it a strong case study for what many buyers should actually look for when choosing the best oil extractor pump.
What an Oil Extractor Pump Actually Does
An oil extractor pump is a tool that removes engine oil or other fluids by suction rather than by opening the drain plug underneath the vehicle. In most common automotive use cases, the user inserts a narrow hose down the dipstick tube, creates vacuum, and pulls the old oil up into a container or extractor reservoir. Family Handyman and iFixit both describe this as a valid top-side oil-change method for compatible vehicles.
That is the basic reason these tools have become so popular. They reduce mess, reduce setup time, and can make oil changes feel dramatically easier, especially when:
- the vehicle sits low to the ground,
- the drain plug is awkward to reach,
- underbody shields are annoying to remove,
- or you are servicing marine engines, lawn equipment, or motorcycles where access is limited.
In simple terms, the best engine oil extractor pump is the one that makes maintenance simpler without making the process unreliable.
Why So Many Buyers Are Looking for the Best Oil Extractor Pump
Traditional drain-plug oil changes still work perfectly well, and in some engines they may remain the preferred method. But there is a reason extractor pumps continue to gain attention.
Guides on oil extractors consistently point to the same advantages: less mess, easier access, and the ability to perform oil service from above the engine bay. Family Handyman specifically notes that extractor pumps are useful for removing oil through the dipstick tube, while iFixit provides a full step-by-step guide for using an oil extractor in a standard oil-change workflow.
For many DIYers, the real benefits are practical:
- no ramps or jack stands in some cases,
- cleaner hands and cleaner floor,
- easier maintenance on boats and seasonal equipment,
- less wrestling with drain pans,
- and more control in tight spaces.
That is why the category has expanded from simple oil pump extractor tools into a much broader market that includes manual, pneumatic, and electric oil extractor pump options. Industry guidance commonly divides the segment into those three main types.
The Three Main Types of Oil Extractor Pumps
Before deciding what the best oil extractor pump is, you have to understand the three major designs.
1. Manual oil extractor pump
This is the most common format for home users. A manual oil extractor pump uses a hand pump to create vacuum inside a reservoir. Once vacuum is established, the unit pulls oil through a hose into its tank. Guidance from EWK and other extractor-tool explainers notes that manual units are generally lower-cost, portable, and do not require electricity.
Pros:
- no electricity required,
- easy to use anywhere,
- fewer electrical components,
- often more affordable,
- great for garages, driveways, and mobile use.
Cons:
- slower than some powered units,
- requires hand pumping,
- less ideal if you are extracting large volumes repeatedly.
2. Electric oil extractor pump
An electric oil extractor pump uses a powered motor to move oil. These are attractive if you prioritize speed and want less manual effort. Some guides note that electric pumps can extract faster, making them appealing for larger jobs or repeat work.
Pros:
- faster extraction,
- less physical effort,
- convenient for repeated work.
Cons:
- requires a power source,
- often smaller and pump-only rather than all-in-one reservoir style,
- may be less convenient in remote or outdoor use.
3. Pneumatic oil extractor pump
These are more common in shop environments. They rely on compressed air and can be very effective, but they are usually less relevant for a casual home DIY buyer unless that buyer already has an air-compressor setup. Extractor-tool guides consistently list pneumatic systems as one of the standard categories.
For most people reading a blog on the best oil extractor pump, the real decision is between manual and electric.
Why the BILITOOLS 9L Manual Unit Stands Out
The Amazon listing for the BILITOOLS 9L Manual Oil Extractor Pump makes several notable claims that are directly relevant to buyers comparing options in this category.
According to the listing, this extractor offers:
- manual vacuum operation,
- a 9-liter capacity,
- a thick translucent tank so you can monitor fluid level,
- a hose storage holder,
- and a workflow designed to avoid lifting the vehicle or crawling underneath it.
That feature set matters because the best extractor oil pump is rarely about marketing hype. It is about solving the biggest pain points in DIY maintenance.
Large capacity is a bigger advantage than people think
A 9L tank is substantial for this class of product. The listing explicitly describes it as larger than competing options and frames that larger capacity as a way to reduce emptying frequency and speed up maintenance.
In practical terms, that matters because many passenger vehicles hold roughly 4 to 7 quarts of oil, and some hold even more. A larger extractor tank means you are less likely to interrupt the job mid-process. For someone working on SUVs, trucks, boats, or multiple engines, this is one of the strongest features a manual engine oil extractor pump can have.
Manual operation still has real value
A lot of buyers assume an electric oil extractor pump must automatically be better. Not necessarily.
Manual extractors have a major advantage: they are simple. You do not need a battery connection, power outlet, adapter, or motorized pump. The BILITOOLS listing emphasizes that it is designed for easy manual operation without additional equipment, and that the user simply pumps the handle to create vacuum and suction.
That simplicity becomes especially useful when:
- working outdoors,
- servicing boats or marine engines,
- doing roadside or remote maintenance,
- or simply wanting a tool that is always ready.
Some industry guidance also notes that manual units remain attractive because they are cost-effective and not limited by access to power.
Better storage means less mess
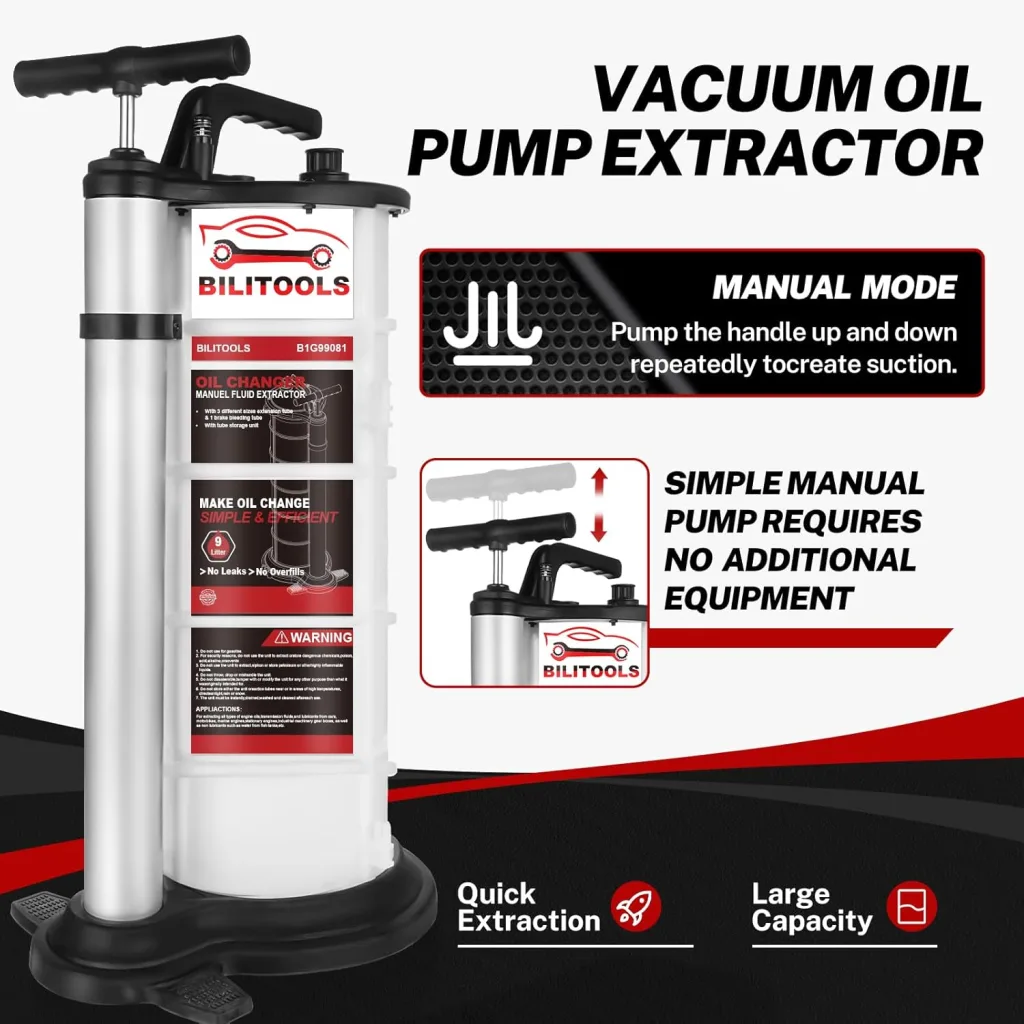
This sounds minor until you actually own one. The BILITOOLS listing specifically mentions a storage tube holder to keep hoses organized and reduce spills.
That is not just a cosmetic feature. Residual oil in loose hoses is one of the most annoying parts of using fluid-extraction tools. A cleaner hose-storage setup makes the extractor far easier to live with long-term.
What Makes the Best Oil Pump Extractor for Most DIYers?
If we strip away branding, the best oil pump extractor for most non-professional buyers usually checks these boxes:
1. Enough capacity for full oil changes
This is non-negotiable. You do not want a tiny extractor that fills too quickly. A larger reservoir is especially useful if you service more than one machine or vehicle.
2. Easy vacuum generation
If the hand pump is weak, awkward, or inconsistent, the tool becomes annoying. The BILITOOLS listing says the user pumps the handle to create a strong vacuum and even notes a base designed for foot stability during pumping.
3. Hose management
Good hose storage is a quality-of-life feature that separates a product you will keep using from one that ends up tossed in a corner.
4. Clear fluid-level visibility
A translucent body is useful for monitoring progress and preventing overfill. The BILITOOLS listing specifically calls this out.
5. Compatibility with your use case
Some people need an automotive-only tool. Others need a flexible extractor that can handle boats, lawnmowers, motorcycles, or seasonal equipment. The BILITOOLS unit is marketed across several of those use cases.
Manual vs Electric: Which Is Better?
This is the core buying question.
If your main concern is speed, an electric oil extractor pump may look more attractive. Some guides note that electric pumps generally offer quicker extraction, especially in larger-volume scenarios.
But if your priorities are:
- simplicity,
- portability,
- no dependence on electricity,
- lower complexity,
- and an all-in-one reservoir design,
then a manual unit often makes more sense.
That is why a large-capacity manual extractor can still be the best oil extractor pump for many home users. The extra pumping effort is often a fair trade for reliability and flexibility.
How to Use an Engine Oil Extractor Pump Properly
Even the best tool will disappoint if you use it badly. General oil-extractor instructions from iFixit and other guides consistently emphasize a few key steps.
Warm the oil first
Warm oil flows much better than cold oil. Several usage guides recommend running the engine briefly before extraction.
Insert the hose carefully
Feed the extraction tube through the dipstick tube until it reaches the oil in the pan. Some owners note that hose diameter and even the cut angle of the tubing can affect how easily it passes through restrictions.
Create vacuum and monitor flow
With a manual extractor, pump enough to establish vacuum, then watch extraction progress. EWK’s guidance for manual extractors similarly describes pumping to initiate suction and re-pumping if necessary to maintain vacuum.
Verify removed volume
This is one of the smartest habits you can develop. If your engine normally takes around five quarts and you extract dramatically less, the tube may not have reached properly or your engine may not be an ideal candidate for top-side extraction.
Still change the filter
An extractor pump simplifies oil removal, but it does not replace the oil filter. You still need to complete the full service properly.
When an Extractor Oil Pump Is a Great Idea
A good extractor oil pump is especially useful when:
- your vehicle has easy dipstick access,
- the filter is accessible from above or from the side,
- your engine bay is easier to work in than the underside,
- your boat or marine engine has tight lower access,
- or you regularly service lawnmowers, generators, ATVs, or motorcycles.
The BILITOOLS listing explicitly positions the tool for automotive, boats, trucks, and lawnmowers, which fits the kinds of tasks where extractors are often most appreciated.
When a Traditional Drain Might Still Be Better
No honest review should pretend extractors are perfect for every engine.
Some vehicles simply drain better through the plug. Some engines have sump designs, tube-routing quirks, or oil-pan geometry that make extraction less ideal. Enthusiast discussions show that while many users love extraction, others still prefer gravity draining for completeness or peace of mind.
That means the best engine oil extractor pump is not a universal replacement for every traditional oil change. It is the best option for the right engines and the right workflow.
Final Verdict: What Is the Best Oil Extractor Pump?
For many DIY users, the best oil extractor pump is not necessarily an electric one. A well-designed large-capacity manual extractor remains one of the smartest buys in the category because it combines portability, simplicity, and enough capacity for real oil-change work.
Based on the Amazon listing, the BILITOOLS 9L Manual Oil Extractor Pump stands out for exactly those reasons. It offers a 9L tank, manual vacuum operation, visible fluid-level monitoring, organized hose storage, and a use case tailored to cleaner, easier oil changes without lifting or crawling under the vehicle.
If you want:
- a dependable oil extractor pump,
- a practical oil pump extractor for home maintenance,
- a strong-value engine oil extractor pump,
- and a cleaner alternative to messy drain-pan oil changes,
then a large manual unit like this is a very credible answer.
If, however, your top priority is speed and minimal manual effort, then an electric oil extractor pump may still be the better fit.
For most DIYers, though, the real sweet spot is clear: a large-capacity manual extractor that is easy to use, easy to store, and big enough to handle real oil-change volume. That is exactly why this BILITOOLS model has a strong case as the best oil extractor pump in its segment.
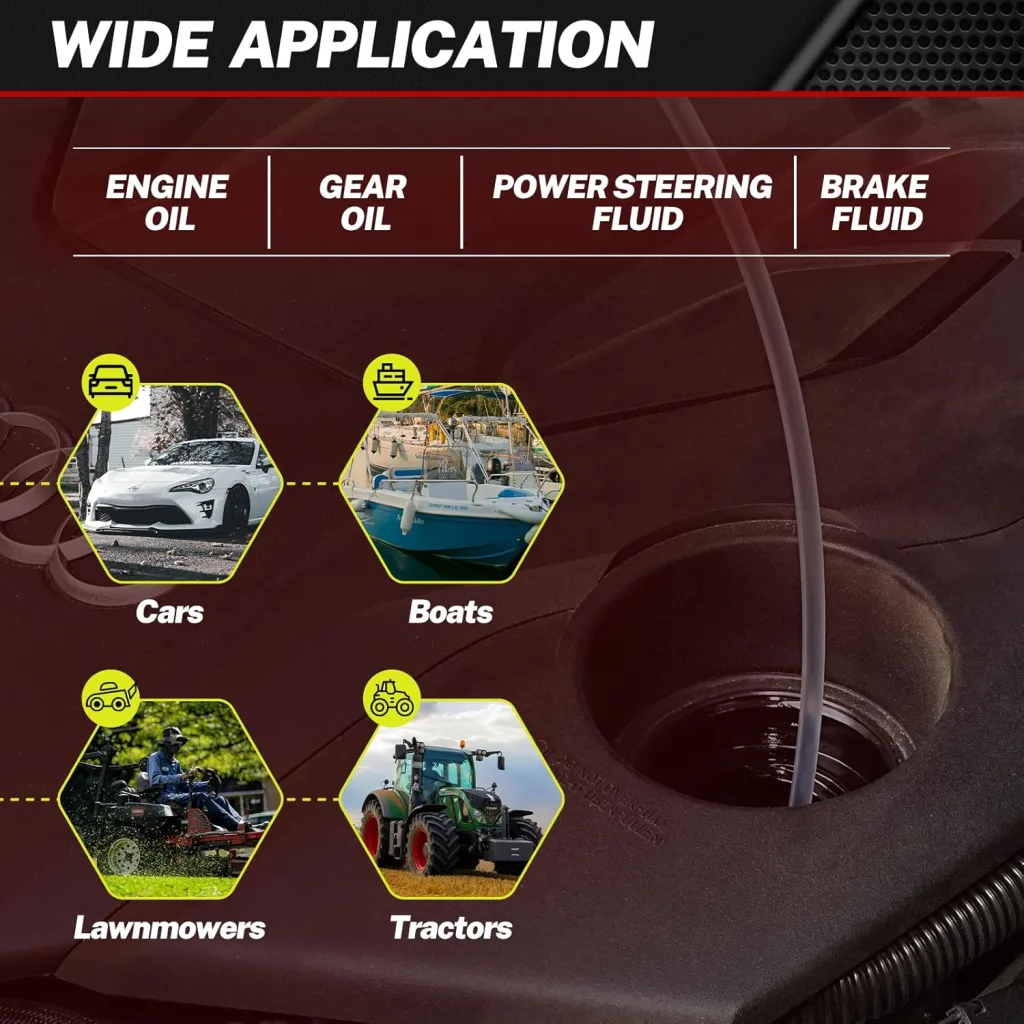

If you are shopping for an oil change pump extractor, chances are you want the same three things every DIYer wants: less mess, less time under the vehicle, and a faster way to pull used oil out of an engine. That is exactly the niche the Harpy Eagle Electric Oil Change Extractor Pump 12/24V 100W is trying to fill.
According to the product listing, this unit is a 12V/24V, 100W electric oil extractor that comes with a storage case, long hoses, and a design aimed at automotive, motorcycle, truck, and boat use. The listing also states that it can move oil at up to 1 gallon per minute, which immediately positions it as more than a small hobby tool.
For buyers searching terms like oil change pump extractor, oil change extractor pump, oil change extractor, oil extractor oil change, and fluid extractor oil change, this type of product is appealing because it can let you service certain engines without pulling the drain plug first. In many applications, that means a cleaner and more convenient oil service process. Guides from iFixit and Family Handyman both describe the extractor method as a practical way to remove oil through the dipstick tube or suction port rather than draining from below.
This blog breaks down what the Harpy Eagle unit appears to offer, where an electric oil extractor oil change setup makes sense, where it does not, and whether this style of fluid extractor oil change tool is worth adding to your garage.
What Is the Harpy Eagle Oil Change Pump Extractor?
The Harpy Eagle product is marketed as an electric oil change extractor pump for 12V and 24V systems with a 100W motor. The listing highlights several practical details: a portable format, a storage case, roughly 4-foot extraction hoses, and a 1.5-meter power cable for flexible setup. It is also described as suitable for cars, boats, motorcycles, and trucks.
On paper, that makes it more versatile than a simple manual suction tank. Instead of relying on hand-pumped vacuum pressure, this unit uses powered extraction, which should reduce physical effort and make the process more repeatable. For people handling multiple vehicles, seasonal equipment, or marine engines, that is a real convenience advantage.
The biggest selling point is obvious: you can potentially perform an oil change extractor service with less crawling underneath the vehicle. That matters for anyone working in a driveway, a cramped garage, or on equipment where access to the drain plug is awkward.

Why So Many People Want an Oil Change Extractor
The popularity of the oil change extractor pump category comes down to workflow.
Traditional oil changes are simple in theory: lift the vehicle if needed, remove the drain plug, catch the oil, replace the plug or washer, swap the filter, and refill. But in real life, that process can become annoying fast. Splashing oil, stripped plugs, bad access, underbody panels, and limited working space all make a normal drain-and-fill less attractive.
That is why oil extractor systems keep growing in popularity. Family Handyman notes that extractor pumps can simplify DIY oil changes by pulling used oil through the dipstick tube. iFixit similarly outlines the process as a legitimate oil change method on vehicles that support top-side extraction. Industry and enthusiast discussions also consistently point to cleanliness and convenience as the main benefits.
The core advantages are easy to understand:
- Cleaner service process
- Less need to jack up the vehicle
- Better for engines with poor drain access
- Useful on boats, generators, lawn equipment, and motorcycles
- Faster setup in many routine maintenance situations
That is the environment where the Harpy Eagle oil change pump extractor is supposed to win.
Key Features That Stand Out
1. 12V/24V flexibility
A lot of extractor pumps are built only around one power standard. The Harpy Eagle listing specifically calls out 12V/24V compatibility, which broadens potential use cases across passenger vehicles, heavy-duty applications, and equipment that may not run on a single voltage standard.
If you work on multiple types of vehicles, that matters. It gives the tool more utility than a single-purpose extractor.
2. 100W motor
The product is listed with a 100W motor and claims a pumping speed of up to 1 gallon per minute. Even allowing for real-world variation due to oil temperature and viscosity, that suggests this is not meant to be a weak, low-flow novelty unit. Warm oil will always move faster than cold oil, but the listed output indicates a respectable performance ceiling for DIY service.
3. Portable kit with case
The included case is more important than it sounds. Fluid transfer tools become messy fast when hoses, clamps, and fittings are tossed loosely on a shelf. A dedicated case makes this more practical for recurring use and helps keep contamination down between services. The product listing explicitly includes the storage case as part of the value proposition.
4. Hose and cable length
The listing mentions 4-foot hoses and a 1.5-meter power cable, both of which are useful for real-world maneuverability. On pickup trucks, boats, and some equipment, that extra reach matters. You do not want the pump awkwardly hanging in a bad position or pulling against a cable that is too short.
Who This Oil Change Extractor Is Best For
This type of oil extractor oil change tool is not for every person or every engine, but it can make a lot of sense for several groups.
DIY car owners
If your vehicle allows effective top-side extraction and the oil filter is easy to access, an electric oil change extractor can make routine maintenance much quicker. Some owners even prefer it because they never have to get under the car at all. That convenience has been echoed in both published DIY guides and enthusiast feedback.
Boat owners
Marine engines are one of the strongest use cases for extractors. Tight engine bays can make a conventional drain a chore. Discussions in marine forums often frame oil extractors as especially useful in boating applications, even though some still prefer draining when available.
Motorcycle and power equipment owners
Smaller engines can also benefit from controlled extraction, especially where access is awkward or you want to minimize spills. The Harpy Eagle product is specifically marketed for motorcycles and other equipment categories as well.
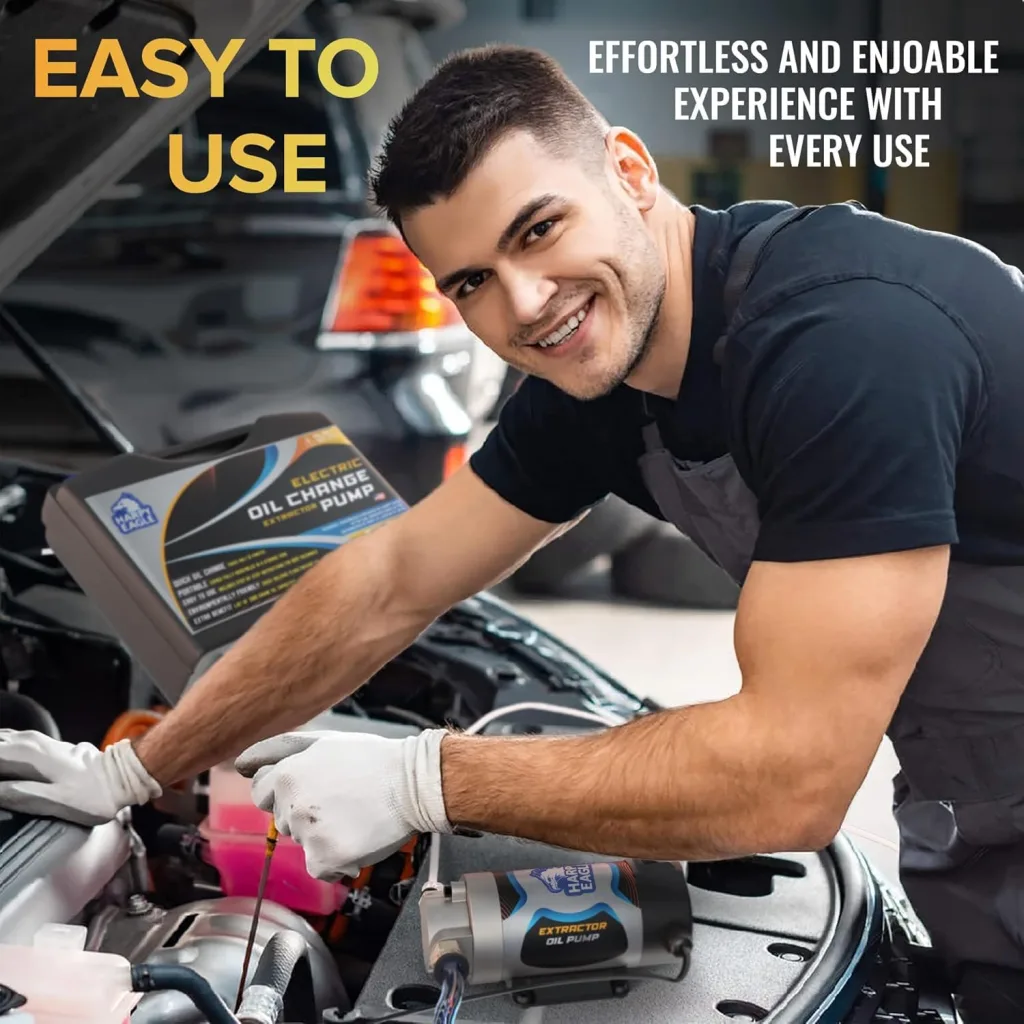
People maintaining multiple vehicles
If you do maintenance for your own fleet, family vehicles, or mixed equipment, convenience compounds over time. A powered fluid extractor oil change setup can save enough hassle to justify the upfront cost.
The Real Pros of an Electric Oil Change Pump Extractor
The biggest advantage is simple: less mess.
A traditional drain plug service can still be the gold standard in many cases, but there is no denying the cleanup factor. Extractors reduce the chance of oil splashing onto your hands, driveway, skid plate, crossmember, or garage floor. Sources discussing extractors versus draining consistently mention cleanliness and convenience as primary benefits.
Another major benefit is speed of setup. For a normal drain service, you may need ramps, jack stands, a creeper, gloves, drain pan placement, and possibly panel removal. With an oil change extractor pump, the setup is often closer to this:
- Warm the engine
- Remove the dipstick
- Feed in the suction hose
- Connect power
- Extract the oil
- Change the filter if needed
- Refill with fresh oil
That is a cleaner workflow for many users. iFixit’s guide confirms this basic top-side extraction approach and shows why it is so attractive for home mechanics.
There is also the issue of accessibility. Some vehicles and machines are simply frustrating to drain conventionally. If you have ever fought a low car, an undertray with too many fasteners, or a boat engine wedged into a tight compartment, you already understand the appeal.
The Limitations You Should Know Before Buying
This is where buyers need to stay realistic.
An oil change extractor is not automatically better than every drain-plug method. In some engines, extraction works brilliantly. In others, it may be less complete or less ideal depending on pan design, tube routing, oil temperature, and sludge conditions.
Some discussions and guides note that proper extraction can remove nearly all of the oil when done correctly, while others still prefer the flushing effect of gravity draining, especially on neglected engines or applications where sediment at the bottom of the pan is a concern. The mixed opinions are real, and they are worth respecting.
So before buying any oil change pump extractor, keep these points in mind:
- It works best with warm oil
- It depends on your engine design
- It may not replace drain-plug service in every vehicle
- You still need to change the oil filter
- You still need to verify extracted volume against expected oil capacity
That last point is critical. Even enthusiasts who like extractor-based service often recommend checking that you removed approximately the amount of oil your engine is supposed to hold.
How to Use an Oil Extractor Oil Change Setup Properly
If you buy a product like this, technique matters as much as the pump itself.
Step 1: Warm the engine
Warm oil flows better than cold oil. This helps the extractor reach its intended performance and shortens extraction time. Guides on using oil extractors consistently assume the oil is warm rather than cold.
Step 2: Identify the correct extraction point
Most extractor workflows use the dipstick tube or a designated suction route. iFixit specifically notes locating the dipstick or oil suction hole before starting.
Step 3: Insert the hose carefully
Do not force it. The suction tube needs to reach the lowest point it can access in the sump. If you feel resistance, reassess the routing.
Step 4: Power the unit and monitor flow
With an electric oil change extractor pump, you want steady flow, not guesswork. Watch the hose, container, and extraction progress.
Step 5: Compare removed volume
This is one of the smartest habits in DIY maintenance. If your engine typically takes around 5 quarts and you extracted far less, you should pause and make sure the tube placement was correct.
Step 6: Replace the filter and refill
An extractor pump does not eliminate the rest of the oil change process. You still need the correct oil, filter, refill amount, and final dipstick verification.
Harpy Eagle Review: Strengths Based on the Listing
Based on the publicly visible product information, the Harpy Eagle unit looks like a well-positioned DIY/mid-duty extractor rather than a bargain-bin throwaway tool.
Its strongest apparent advantages are:
- Broad use case range across cars, boats, motorcycles, and trucks
- 12V/24V support
- 100W motor
- Claimed up to 1 gallon per minute
- Included case, hoses, and cable reach
- Portable format for field or garage use
That combination makes it attractive for buyers who want something more substantial than a tiny transfer pump but less elaborate than a professional shop vacuum extractor cart.
Is It Better Than a Manual Fluid Extractor Oil Change Tool?
That depends on what you value.
A manual extractor can be cheaper and simpler, but it also requires pumping effort and may feel slower or less consistent in repeated use. An electric fluid extractor oil change tool like the Harpy Eagle is more appealing if you value speed, reduced effort, and easy repeatability.
If you only service one small engine once or twice a year, manual might be enough.
If you service:
- multiple vehicles,
- marine engines,
- motorcycles,
- lawn or utility equipment,
- or you simply hate messy oil changes,
then the electric route makes more sense.
Who Should Skip It?
You may want to skip this kind of oil change extractor if:
- your vehicle’s drain plug is already extremely easy to reach,
- your engine design is known to drain better conventionally,
- you prefer inspecting the drain plug and crush washer every service,
- or you are working on an engine with unknown maintenance history and want the bottom-drain method for inspection.
There is also a philosophical divide here. Some mechanics simply trust gravity draining more because it feels more complete. That preference is not irrational. It is just a different maintenance style, and the best choice often depends on the specific engine rather than internet dogma.
Final Verdict
The Harpy Eagle Electric Oil Change Extractor Pump 12/24V 100W looks like a strong option for anyone specifically shopping for an oil change pump extractor that is portable, electric, and broad in application. The listing’s feature set suggests a product aimed at real DIY convenience rather than gimmick appeal: powered extraction, dual-voltage compatibility, decent hose reach, storage case, and a claimed flow rate of up to 1 gallon per minute.
For the right user, that can make oil service dramatically easier.
If your goal is a cleaner, faster oil change extractor pump setup for cars, boats, motorcycles, or trucks, this tool makes sense. If you want a no-lift, less-mess oil extractor oil change routine, it fits the brief well. And if you are comparing products in the fluid extractor oil change category, the Harpy Eagle’s power rating and portability are meaningful selling points.
The main caution is the same caution that applies to any extractor: make sure your engine is suitable for top-side extraction, use warm oil, and verify that you removed the expected amount. Do that, and an electric oil change extractor can be one of the handiest maintenance tools in your garage.
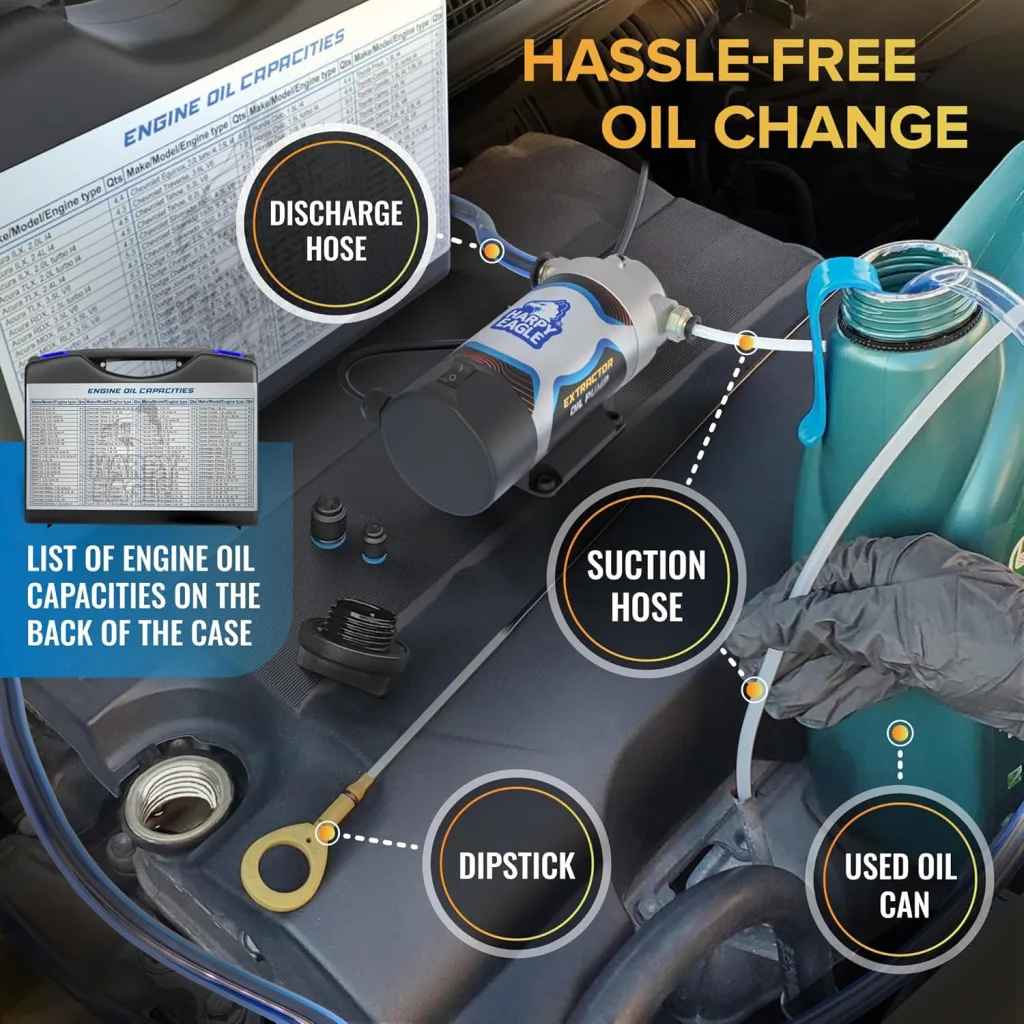
Diesel Exhaust Filter Cleaning: What It Means, How It Works, and When You Actually Have a DPF Problem
If you searched diesel exhaust filter cleaning, you are probably dealing with one of two situations. Either your truck or van has displayed a message like Cleaning Exhaust Filter, Exhaust Filter Full, or Regeneration in Process, or you are trying to figure out whether a diesel exhaust filter cleaner in a bottle can solve a real diesel particulate filter problem.
Those are not the same thing.
On modern diesel vehicles, the “diesel exhaust filter” people are usually referring to is the diesel particulate filter, or DPF. Its job is to trap soot from the exhaust stream and then burn that soot off through a process called regeneration. Ford, GM, and Ram owner materials all describe this as a normal part of diesel aftertreatment operation, not a defect. Ford manuals explicitly refer to Exhaust Filter Cleaning as the diesel particulate filter cleaning process; GM’s Duramax manual says the DPF traps particulates and the engine computer initiates cleaning when needed; and Ram’s diesel supplement describes the DPF as self-cleaning when the right conditions are met. (Ford Service Content)
That point matters because a lot of owners see the message and assume the truck is failing. Often, it is not. Sometimes it is just asking for the type of driving that allows the system to finish its cleaning cycle.
What diesel exhaust filter cleaning actually is
In plain English, cleaning diesel exhaust filter usually means the truck or van is trying to burn accumulated soot out of the DPF. The filter sits in the exhaust system and captures particulate matter. Over time, soot builds up. When the engine computer determines that the soot load is high enough, it raises exhaust temperatures to burn the soot off and restore normal flow through the filter. GM states that the DPF filters or traps particulates and that, when cleaning is needed, the engine computer initiates a cleaning action by warming the exhaust gas temperature; Ford and Ram describe similar automatic self-cleaning behavior in their owner documentation. (GMC)
This is why messages such as Cleaning Exhaust Filter, Exhaust Filter XX% Full, or Regeneration in Process are not automatically panic-level warnings. In many cases they are simply telling you the system is actively doing what it was designed to do. Ford’s diesel supplement says the Cleaning Exhaust Filter message is the normal regeneration process. Ram’s diesel material says Regeneration in Process indicates the DPF is self-cleaning. GM’s Duramax guide says the cleaning feature is designed to operate automatically. (Ford Service Content)
Why DPF cleaning matters so much
The DPF is central to diesel emissions control. DieselNet describes the DPF as the core particulate-control technology in modern diesel aftertreatment, and notes that ash accumulation and oil-derived contamination can significantly affect filter performance over time. DieselNet also notes that metallic fuel-borne catalyst additives have been studied to help regeneration, but that authorities remain cautious about metallic additives because they can increase ash emissions and are not a simple cure-all for modern systems. (dieselnet.com)
That means the DPF has two different enemies:
- Soot, which is meant to be burned off during regeneration.
- Ash, which does not burn off the same way and gradually accumulates over the life of the filter.
This distinction is where many owners get confused. Normal regeneration removes soot. It does not magically remove all ash forever. Over long mileage, a DPF can become ash-loaded and eventually require professional off-vehicle cleaning or replacement. DieselNet specifically notes that lubricating oil consumption is a major source of ash accumulation in DPFs and that excessive ash loading increases pressure drop and service needs. (dieselnet.com)
The three kinds of diesel exhaust filter cleaning people mix together
When people talk about diesel exhaust filter cleaning, they are usually lumping together three different things.
1. Automatic regeneration
This is the normal process. The vehicle handles it on its own while you drive, provided conditions are right. GM says the DPF cleaning feature is designed to operate automatically, and Ram says automatic regeneration self-cleaning cycles occur when the correct operating conditions are met. (GMC)
2. Driver-assisted or manual/stationary regeneration
Some trucks allow a more deliberate regeneration procedure if automatic cleaning cannot complete. Ford refers to operator commanded regeneration in its diesel supplement, and Ram’s diesel materials discuss manual DPF regeneration on certain applications. (Ford Service Content)
3. Professional DPF cleaning or replacement
This is a service procedure for a filter that is ash-loaded, clogged, damaged, or unable to regenerate properly anymore. That is not the same thing as just taking the truck on a highway drive.
If you do not separate these three categories, it becomes very easy to waste money on the wrong fix.
What the “Cleaning Exhaust Filter” message usually means
For Ford owners searching terms like ford diesel exhaust filter cleaning, ford 6.7 diesel cleaning exhaust filter, 08 ford diesel cleaning exhaust filter, or ford transit diesel exhaust filter cleaning, the big point is this: Ford documentation treats Cleaning Exhaust Filter as the normal regeneration message, not automatically a fault. The 2015 Ford diesel supplement says that if you operate the vehicle in a manner that allows effective automatic cleaning, the display will show a cleaning exhaust filter message, which is the normal regeneration process. Ford also warns that if the system gets more loaded, you may see messages like Exhaust Overloaded Drive to Clean, at which point the vehicle is asking you to drive in a way that allows regeneration or to use operator-commanded regeneration where applicable. (Ford Service Content)
Ford’s 2022 Super Duty manual also states that Exhaust Filter Cleaning means the DPF is full of soot and the vehicle is not being operated in a way that currently allows the system to finish regeneration. (Ford Service Content)
That means a Ford owner who only does short trips, extended idling, or low-speed city operation is much more likely to encounter repeated DPF-cleaning messages than someone who regularly drives longer highway distances.
Ford Transit diesel exhaust filter cleaning
The same logic applies to Transit diesels. Ford Transit owner materials include a DPF section and note that regeneration can involve very high temperatures, changes in exhaust sound, heat, and even fans running after shutdown. Ford’s Transit manuals describe the DPF as requiring periodic regeneration to maintain proper operation. (Ford Service Content)
For Transit owners, this often becomes a route-pattern issue. Delivery vans, service vans, and urban fleet vehicles tend to live in exactly the sort of short-trip, stop-and-go use cycle that is hardest on DPF regeneration. So if your search is ford transit diesel exhaust filter cleaning, the most likely explanation is repeated incomplete regeneration caused by duty cycle, not instantly a failed filter.
Dodge diesel exhaust filter cleaning
For Ram and Cummins owners searching dodge diesel exhaust filter cleaning, the system behaves in a very similar broad way. Ram’s diesel supplements explain that the truck is equipped with a DPF that removes soot from the exhaust gas and that automatic regeneration self-cleaning cycles occur when the correct operating conditions are met. Ram’s cluster messaging includes warnings such as Exhaust Filter XX% Full, Regeneration in Process, and Regeneration Completed, and its manuals also discuss conditions where manual regeneration may be needed. (Manuals+)
That means for a Dodge or Ram diesel, seeing a regeneration message is not inherently unusual. What matters is whether regeneration completes and whether the messages escalate.
Chevy diesel truck cleaning exhaust filter
For GM and Duramax owners searching chevy diesel truck cleaning exhaust filter, the owner manuals are also very direct. GM’s Duramax supplement says the filter needs to be cleaned of accumulated solids, and when cleaning is needed, the engine computer initiates a cleaning action by warming exhaust temperature. GM also says that when the message Cleaning Exhaust Filter Keep Driving Until Message Is Cleared appears, the vehicle should be driven above about 50 km/h (30 mph) until the message goes away, which the manual says can take around 30 minutes on the cited model-year guidance. (GMC)
That is one of the clearest OEM descriptions of how to respond: keep driving under the right conditions and let the truck finish the process.
Why your diesel keeps asking to clean the exhaust filter
Repeated DPF cleaning messages usually come down to one or more of these factors:
- Too many short trips
- Too much idling
- Low exhaust temperatures
- Interrupted regeneration cycles
- Excessive soot production from another engine issue
- Oil consumption contributing to aftertreatment contamination
- A sensor or aftertreatment malfunction
Ford, GM, and Ram all describe normal regeneration as dependent on correct operating conditions. DieselNet adds the important technical point that excessive oil consumption can increase ash loading and degrade DPF performance over time. (Ford Service Content)
So while driving pattern is often the first culprit, it is not the only one. If the same truck keeps requesting regeneration unusually often, you have to consider whether the engine is generating too much soot or the aftertreatment system is not functioning correctly.
How to help the system finish cleaning
If your truck is asking for diesel exhaust filter cleaning, the first-line response is usually not additives. It is operating the vehicle in a way that lets regeneration complete.
In general, OEM guidance points toward:
- Driving long enough for exhaust temperatures to stay elevated
- Avoiding shutting the vehicle off during an active regeneration
- Avoiding extended idle if the vehicle is already requesting cleaning
- Following cluster instructions rather than guessing
GM specifically says to keep driving above 50 km/h (30 mph) until the message clears on the referenced Duramax manual. Ford and Ram both indicate that proper operating conditions are necessary for automatic self-cleaning, and Ford/ Ram also outline commanded or manual regeneration procedures on supported vehicles when automatic cleaning cannot complete. (GMC)
The practical version is simple: if the truck is trying to regenerate, do not keep interrupting it with short trips if you can avoid it.
Diesel exhaust filter cleaner: does it work?
This is where the internet gets messy.
Searches for diesel exhaust filter cleaner often mix together:
- Fuel additives
- DPF spray cleaners
- Forced-service cleaners
- Off-vehicle industrial DPF cleaning
These are not interchangeable.
DieselNet’s technical material on fuel-borne catalysts shows that additives can influence soot oxidation and regeneration behavior in some systems, but it also cautions that metallic additives can increase ash concerns and are not universally embraced as a simple solution in modern diesel emissions systems. (dieselnet.com)
The safest general conclusion is:
- A bottle additive may help some soot-related situations.
- It will not reverse ash loading.
- It will not repair a cracked or melted DPF.
- It will not fix a bad sensor, injector issue, turbo issue, EGR fault, or oil-burning engine.
- It should not be treated as a substitute for OEM regeneration strategy or proper diagnosis.
So if you are comparing highway regeneration versus a diesel exhaust filter cleaner, the first one is normal system operation. The second is, at best, a supplemental product with limits.
When the DPF problem is no longer “normal cleaning”
You should stop thinking in terms of routine regeneration and start thinking diagnosis when:
- The warning messages escalate instead of clearing
- The truck goes into reduced power or derate
- Regeneration will not complete
- The warning returns unusually quickly
- You have related fault codes
- Fuel economy drops sharply
- There is excessive smoke, oil use, or another clear engine problem
Ram’s diesel supplement notes that if regeneration is disabled due to a malfunction, the cluster can show Exhaust Service Required — See Dealer Now and the powertrain control module will register a fault. Ford’s diesel supplement similarly distinguishes routine cleaning messages from more serious overload conditions. (Mopar Vehicle Information)
That is the line between “let it clean” and “this needs troubleshooting.”
The hidden cause many owners miss: oil consumption and ash
One of the most important technical points in this whole topic is that soot and ash are not the same problem. Soot is what regeneration is designed to burn off. Ash is what gradually accumulates from engine oil additives and other non-combustible material.
DieselNet notes that lubricating oil consumption can significantly impact DPFs because most ash accumulation in the filter is attributed to oil consumed in the engine, and that high ash load can increase pressure drop, increase regeneration frequency, and degrade the substrate over time. (dieselnet.com)
So if a diesel has persistent DPF trouble, you should think beyond “the filter is dirty.” Sometimes the filter is the victim. The real problem may be:
- Excessive oil consumption
- Injector or combustion problems creating excess soot
- Turbo issues
- EGR issues
- Repeated interrupted regens
- An aging DPF that is simply reaching its ash-capacity limit
Professional cleaning vs replacement
If the filter is ash-loaded but structurally sound, professional off-vehicle cleaning may make sense. If the substrate is cracked, melted, contaminated beyond recovery, or the system has other major failures, replacement may be necessary.
What you should not do is assume that every DPF issue means “replace the filter now.” Nor should you assume every problem can be fixed by taking one long drive. The correct path depends on whether the issue is:
- Normal soot loading
- Incomplete regeneration
- Ash accumulation
- Hardware failure
- Upstream engine problems
Final thoughts
Diesel exhaust filter cleaning is usually the diesel particulate filter regeneration process, and on Ford, GM, and Ram diesels it is a normal part of ownership when the system is working properly. Ford calls Cleaning Exhaust Filter the normal regeneration process, GM says the engine computer initiates DPF cleaning by raising exhaust temperature, and Ram describes the DPF as self-cleaning when conditions are correct. (Ford Service Content)
The key is understanding what kind of “cleaning” you are dealing with.
If the vehicle is simply asking to regenerate, the solution is often to let it complete the cycle under the right driving conditions. If messages escalate, regeneration will not complete, or the system keeps coming back with the same issue, then you are likely beyond routine cleaning and into diagnosis territory. And if ash loading or oil consumption is the underlying problem, no generic diesel exhaust filter cleaner is going to solve that permanently. DieselNet’s technical guidance is especially useful here: soot can be burned off, but ash accumulation and oil-related contamination are longer-term issues that eventually require service attention. (dieselnet.com)
Retractable Ratchet Straps : Guide
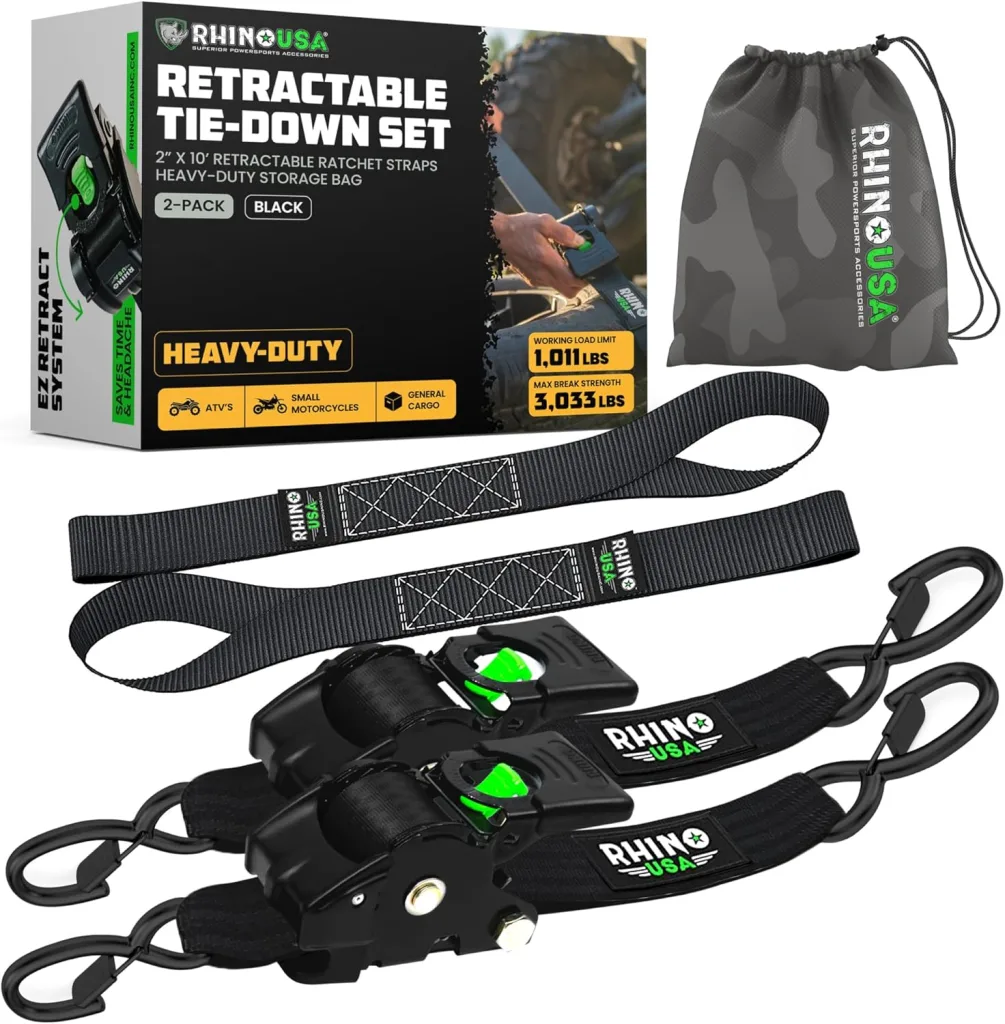
If you have ever used traditional tie-downs, you already know the single most annoying part of the job is not usually the tensioning. It is the loose webbing. Standard ratchet straps work, but they also leave you with extra strap flapping in the wind, dragging on the ground, tangling in the bed, or getting twisted into a mess the next time you need them. That is exactly why retractable ratchet straps have become such a strong search category. Buyers are not just looking for another cargo strap. They are looking for a cleaner, faster, more user-friendly way to secure loads without dealing with the usual tie-down chaos. That is the core appeal of retractable ratchet straps, retractable ratchet tie down straps, and self retracting ratchet straps. Rhino USA, for example, markets its retractable line around “instantly retracting excess strap length with the click of a button,” which is basically the entire value proposition in one sentence. (Rhino USA)
The category has exploded because it solves a real problem. A lot of people who haul motorcycles, ATVs, yard equipment, coolers, furniture, toolboxes, and general truck-bed cargo are not commercial flatbed operators. They want fast setup, less mess, and secure tensioning without becoming amateur knot artists. That is why search demand exists not only for generic phrases like retractable ratchet strap and best retractable ratchet straps, but also for brand-led queries like rhino retractable ratchet straps, rhino usa retractable ratchet straps, and rhino retractable ratchet straps review. Buyers want convenience, but they also want to know if these systems are actually strong enough, durable enough, and worth paying extra for. (Rhino USA)
What retractable ratchet straps actually are
A retractable ratchet strap is a tie-down strap with a built-in retraction mechanism that stores excess webbing inside the ratchet housing or spool assembly. Instead of feeding long loose strap tails through a traditional ratchet and then tying off whatever remains, a self-retracting unit pulls the unused length back into the body of the strap. In simple terms, it combines the tensioning power of a ratchet strap with the tidy storage behavior people usually associate with a seatbelt-style mechanism. US Cargo Control describes retractable ratchet straps as featuring a quick-release or retracting function that automatically stores the webbing neatly when not in use. (US Cargo Control)
That sounds like a small improvement until you actually use them. Then it becomes obvious why this category performs so well in search. Traditional ratchet straps are effective, but they are not elegant. Retractable systems reduce tangles, keep strap ends off the ground, simplify storage, and often speed up loading and unloading. For many truck owners and trailer users, that convenience is the upgrade.
Why retractable ratchet straps have become so popular
The popularity of retracting ratchet straps and auto retractable ratchet straps is not driven only by appearance. It is driven by workflow. People want less wasted time and less frustration. If you secure cargo often, even shaving a few minutes off setup and teardown matters.
The main reasons buyers move to retractable designs are:
- No long loose ends flapping in the wind
- Faster setup and cleanup
- Cleaner storage in truck boxes, trailers, and garages
- Less chance of straps getting dirty, wet, or tangled
- Easier use for occasional haulers who hate traditional threading
Rhino USA’s retractable collection is marketed as “fast, tangle-free, and durable,” and that lines up directly with what most buyers are after. The concept is not that traditional ratchet straps are obsolete. It is that retractable ones are more convenient for many real-world uses. (Rhino USA)
Are retractable ratchet straps actually as secure as regular ratchet straps?
This is the most important question in the category. Convenience means nothing if the system is weak. The good news is that reputable retractable ratchet straps are still sold with defined strength ratings, attachment styles, and intended use cases, just like conventional straps. What matters is choosing the right width, hardware, and rating for the cargo.
FMCSA cargo securement rules are clear on the broader principle: tiedowns must be strong enough for the load, and the aggregate working load limit of the securement system must be at least half the weight of the cargo being secured. FMCSA also notes that cargo length affects the number of tiedowns required. For example, an article over 5 feet but under 10 feet needs two tiedowns regardless of weight, and longer/heavier cargo may need more. (FMCSA)
That matters because the best retractable ratchet strap is not just the one with the nicest mechanism. It is the one with the right rating and configuration for your cargo. A clean retracting design does not override physics.
Understanding working load limit vs break strength
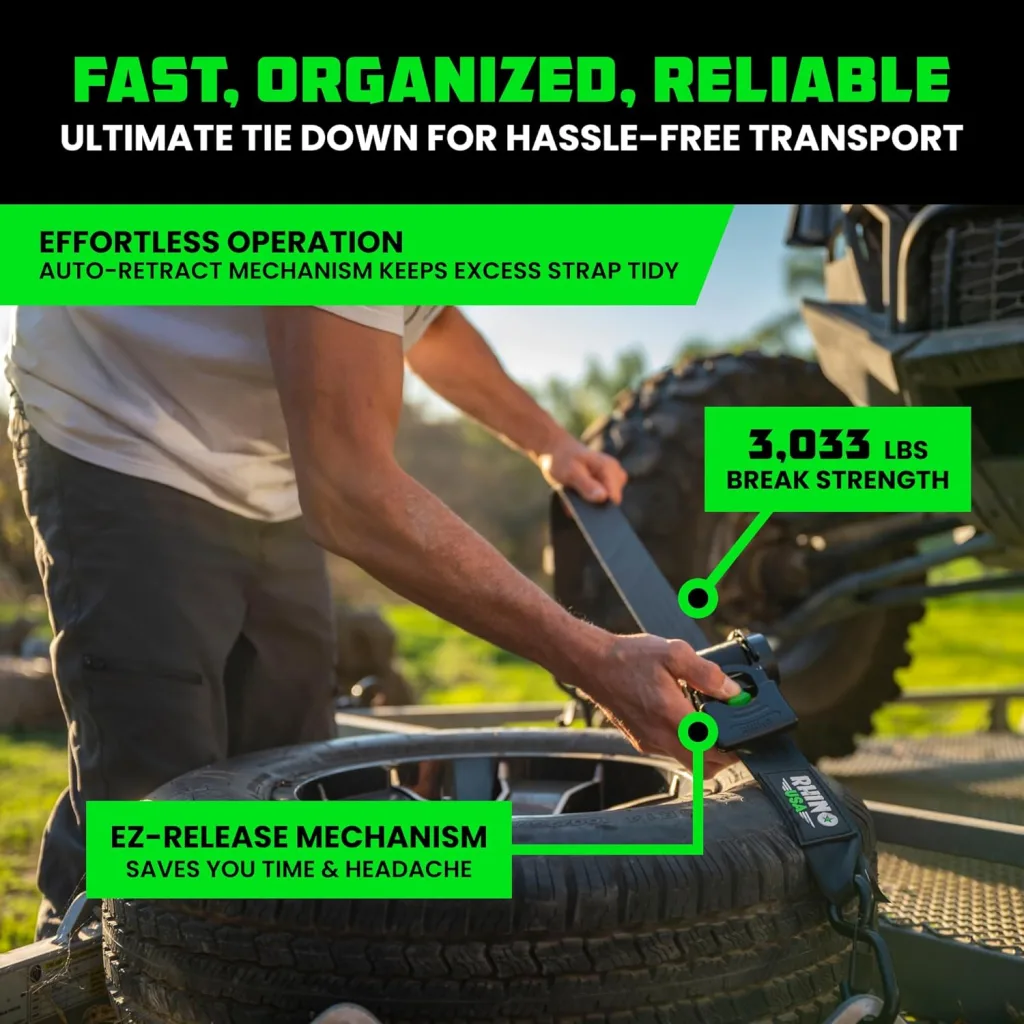
A lot of buyers get trapped by marketing here. They see a number like 1,209 pounds or 3,033 pounds and assume that is the safe working capacity. Often, it is not. Many product pages emphasize maximum break strength, which is the force at which the assembly may fail under test conditions. Actual safe-use capacity is typically governed by working load limit, which is lower.
FMCSA’s cargo securement framework is built around working load limit, not just raw break numbers. The system must have sufficient aggregate WLL for the cargo. That is why you should never buy solely off “max break strength” headlines. (FMCSA)
For example, Rhino USA’s product pages list:
- 1″ x 10′ retractable ratchet straps at 1,209 lbs max break strength
- 2″ x 10′ retractable ratchet straps at 3,033 lbs max break strength (Rhino USA)
Those numbers help compare products, but the real buying decision should still start with intended load type, tiedown points, strap count, and working load requirements.
1-inch vs 2-inch retractable ratchet straps
This is one of the most important buying decisions in the category.
1-inch retractable ratchet straps
These are usually best for:
- Motorcycles
- ATVs
- Lawn equipment
- Coolers
- Light furniture
- General cargo in truck beds
- Recreational gear
Rhino USA’s 1″ x 10′ model and US Cargo Control’s 1″ retractable options show how common this size is for lighter-duty and powersports-type use. US Cargo Control specifically notes its 1″ retractable strap as suitable for boats, motorcycles, ATVs, and similar recreational cargo. (US Cargo Control)
2-inch retractable ratchet straps
These are usually better for:
- Heavier equipment
- Larger side-by-sides
- Utility trailers
- Heavier truck-bed cargo
- More demanding hauling situations
- Some commercial-style applications
Rhino USA’s 2″ x 10′ retractable strap is positioned as a heavier-duty option and carries a much higher published break strength than the 1-inch version. (Rhino USA)
If you are hauling something heavier, wider, more valuable, or more likely to shift, the 2-inch category is usually where you should start.
What makes the best retractable ratchet straps?
The best retractable ratchet straps are not simply the most popular ones on Amazon or the ones with the strongest branding. The best ones do four things well:
1. Smooth retraction
A retractable strap should actually retract cleanly and consistently. If the mechanism binds, jams, or only partially stores the webbing, the entire convenience advantage falls apart.
2. Strong webbing and hardware
High-quality polyester webbing, durable hooks, and a solid ratchet assembly matter more than flashy packaging. Rhino USA emphasizes lab-tested strength and a lifetime warranty across its tie-down lineup, which is exactly the kind of positioning buyers should look for in this category.
3. Correct fit for the application
A boat transom, an ATV, a truck bed, an E-track trailer wall, and a palletized cargo load do not all want the same strap style. Good product lines offer multiple versions for a reason. Rhino USA, for example, sells standard retractables, transom tie-downs, E-track retractables, and bed-mounted retractable options. (Rhino USA)
4. Real-world usability
A good retractable strap should be easy to operate with gloves, simple to hook up, and compact enough to store without becoming another bulky tool.
Rhino retractable ratchet straps: why they dominate search
The reason rhino retractable ratchet straps, rhino usa retractable ratchet straps, and rhino ratchet straps retractable show up so often is that Rhino USA has built a strong brand around user-friendly, enthusiast-oriented cargo gear. Their retractable strap line covers several common use cases, including 1-inch, 2-inch, E-track, transom, and even bed-mounted versions for Ford trucks. That variety matters because it makes the brand visible across multiple buyer intents. (Rhino USA)
Rhino also does a good job positioning these products emotionally as much as functionally. The message is not just “here is a strap.” It is “here is a cleaner, more confidence-inspiring way to secure your cargo.” That plays well with buyers who want gear that feels easier and more premium than bargain-bin tiedowns.
Rhino retractable ratchet straps review: are they worth it?
If you are effectively looking for a rhino retractable ratchet straps review, the balanced answer is that they look attractive because they check the main category boxes:
- Wide selection
- Recognizable brand
- Clear product segmentation
- Published strength figures
- Focus on anti-tangle convenience
- Options for trucks, trailers, powersports, and E-track systems (Rhino USA)
That does not mean Rhino is the only valid brand in the space. Erickson, US Cargo Control, Strapinno, and other brands also compete in the retractable segment. But Rhino is one of the clearest examples of what buyers want from this category: convenience without looking flimsy.
Whether they are “worth it” comes down to how often you haul and how much you value speed and organization. If you only strap something down twice a year, standard straps may be enough. If you haul often, the convenience difference becomes much easier to justify.
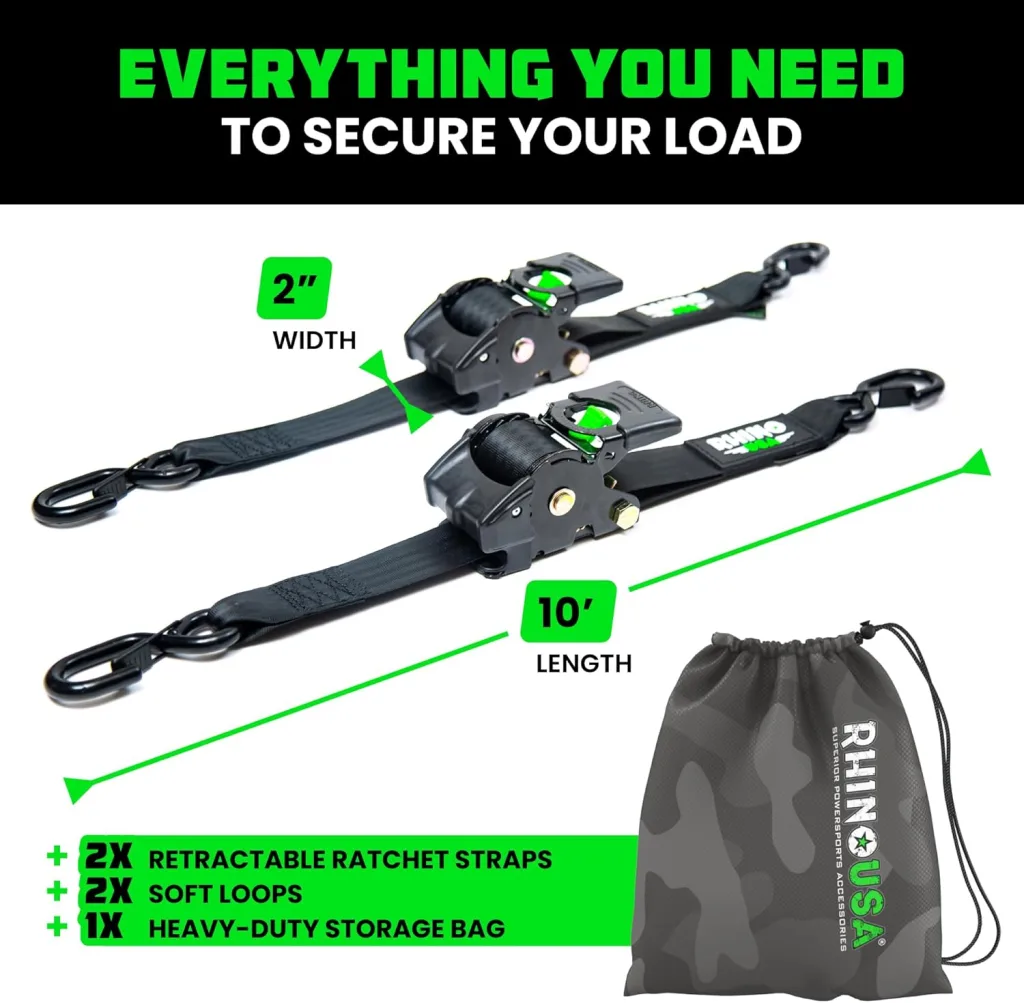
Heavy duty retractable ratchet straps: what “heavy duty” really means
The phrase heavy duty retractable ratchet straps is one of those keywords that sounds straightforward but can mislead buyers. “Heavy duty” should never be treated as a vibe. It should mean:
- Wider webbing, usually 2-inch
- Higher rated hardware
- Stronger hooks or anchors
- Better ratchet body construction
- Appropriate WLL and break strength for the cargo
- Intended use on heavier loads, not just light cargo with aggressive branding
If you are hauling a side-by-side, dense tool chests, appliances, heavier machinery, or bigger loads in a trailer, the 2-inch segment is where you should look first. Rhino’s published 2-inch retractable specs clearly position that version above the 1-inch model for more demanding use. (Rhino USA)
Retractable ratchet straps for truck bed use
Searches like retractable ratchet straps for truck bed and mountable retractable ratchet straps point to a specific user need: permanent or semi-permanent convenience. People do not just want straps they can toss in the bed. They want a cleaner integrated solution.
This is why bed-mounted and bolt-on retractable ratchet systems are gaining attention. Rhino USA’s Ford truck bed-mounted retractable straps are a good example of this trend. The appeal is obvious: the straps stay with the truck, are easier to access, and do not clutter the bed like loose tiedowns do. (Rhino USA)
For frequent truck-bed hauling, that style can be a smart upgrade. For occasional use, standard portable retractables may make more sense.
E-track and specialty retractable systems
If you haul cargo in enclosed trailers, E-track systems are a separate world. Rhino USA offers 2″ x 10′ retractable E-track ratchet straps, and US Cargo Control’s E-track guidance explains why that matters: E-track systems are built around configurable anchor points along trailer walls or floors, making them ideal for modular cargo securement. (Rhino USA)
This is important because not all retractable ratchet straps are universal. Hook style matters. S-hooks, flat hooks, transom hooks, and E-track fittings all serve different applications. If you buy the wrong end fitting, even a great strap becomes the wrong tool.
Are retractable ratchet straps better than standard ratchet straps?
For many people, yes. But not always.
Retractable straps are better when:
- You hate loose strap ends
- You want faster setup
- You value neat storage
- You use straps regularly
- You want less tangling and less mess
- You are securing common recreational or truck-bed cargo
Standard ratchet straps may still be better when:
- You need very long lengths
- You need the widest range of commercial hardware options
- You want maximum low-cost availability
- You do not care about convenience features
- You are working in applications where traditional long-tail systems are still more flexible
So the answer is not that retractable straps replaced regular ones. It is that they are often the better ownership experience for non-commercial users and many enthusiast use cases.
How many straps do you actually need?
This is where buyers often under-secure loads. FMCSA guidance makes clear that cargo length and weight affect the number of required tiedowns. A commonly cited rule is that longer cargo needs more straps, and the aggregate WLL has to be sufficient for the load. US Cargo Control also notes that for many loads up to 5,000 pounds, at least two tiedowns are generally required, with additional straps needed as cargo gets longer or heavier. (FMCSA)
Practical takeaway:
- Small, stable cargo may still need at least two good tiedowns
- Long items need more than one strap even if not very heavy
- Heavier items require stronger straps and usually more tiedowns
- Do not let convenience make you lazy with securement planning
What to look for before buying
If you are shopping retractable ratchet straps amazon, retractable ratchet straps nearby, or retractable ratchet straps near me, use this checklist:
- Strap width: 1-inch or 2-inch
- Length: enough for your real cargo
- Hook type: S-hook, flat hook, E-track, transom, bed-mount
- Published rating: especially WLL if available
- Retraction quality
- Weather resistance
- Ease of release
- Intended use: truck bed, trailer, ATV, boat, motorcycle, general cargo
- Brand support or warranty
That matters far more than choosing based on color or ad copy.
Final verdict
Retractable ratchet straps are one of those products that make immediate sense the first time you use a good set. The core appeal is real: less tangling, less wasted strap, cleaner storage, faster setup, and a better day-to-day cargo securement experience. Brands like Rhino USA have leaned hard into that convenience factor, offering multiple retractable formats including 1-inch, 2-inch, E-track, transom, and bed-mounted options, which helps explain why search terms like rhino retractable ratchet straps and rhino usa retractable ratchet straps are so strong. (Rhino USA)
The right choice comes down to application. For lighter recreational cargo, 1-inch retractables often make sense. For heavier-duty hauling, 2-inch models are usually the smarter move. But the biggest rule never changes: buy for real securement needs, not just convenience. FMCSA cargo securement principles still apply, and the aggregate working load limit of your tiedown system still matters. (FMCSA)
So if you want a cleaner, faster, more user-friendly tiedown setup, retractable ratchet straps are not a gimmick. They are a genuinely better format for a lot of real-world hauling.
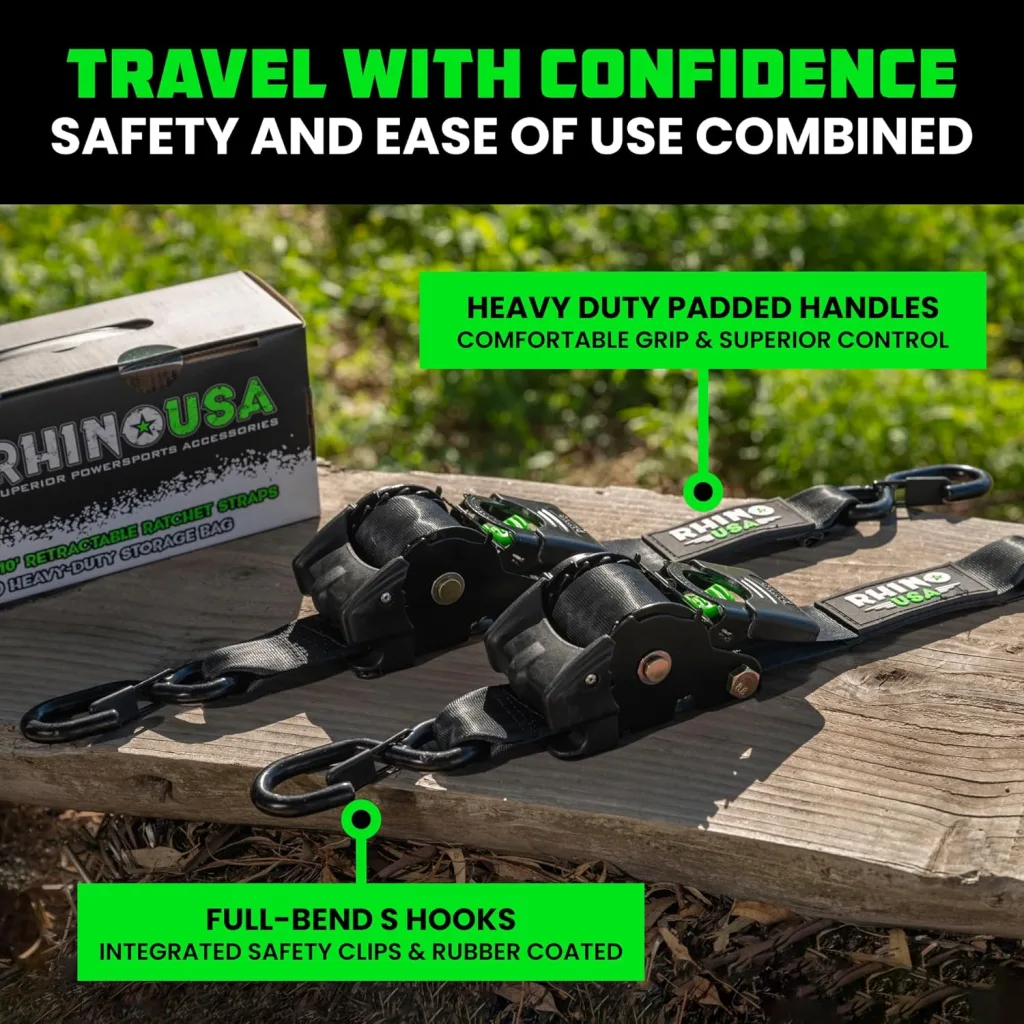
Connect with us


