


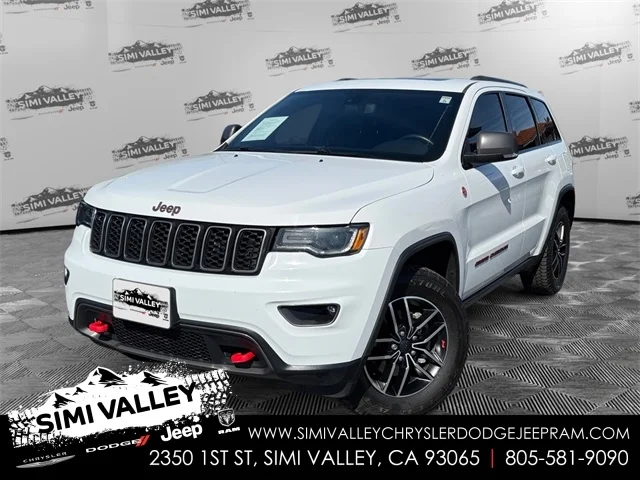
2019 Jeep Grand Cherokee Trailhawk For Sale
If you’re searching for a used SUV that’s as comfortable in a shopping plaza as it is on a rock-strewn mountain pass, the 2019 Trailhawk is a compelling, proven choice.
Engineered for the Trail
At its core, the 2019 Grand Cherokee Trailhawk was built for serious off-road performance. Jeep offers it standard with the 3.6L Pentastar V6, a dependable engine producing 295 horsepower and 260 lb-ft of torque. However, many buyers opted for the available 5.7L HEMI V8, which pushes out 360 horsepower and 390 lb-ft of torque.
Powertrain Options:
| Engine | Horsepower | Torque | Drivetrain | Fuel Economy (City/Hwy) |
|---|---|---|---|---|
| 3.6L Pentastar V6 | 295 hp | 260 lb-ft | Quadra-Drive II 4WD | 18 / 25 MPG |
| 5.7L HEMI V8 (Optional) | 360 hp | 390 lb-ft | Quadra-Drive II 4WD | 14 / 22 MPG |
The standard Quadra-Drive II 4×4 system is what sets the Trailhawk apart from its rivals. Paired with an electronic limited-slip rear differential, it actively monitors traction and delivers torque to the wheel with the most grip. Whether crawling through mud or descending steep slopes, this SUV handles terrain with composure and control.
Jeep’s Selec-Terrain® System also comes standard, offering driver-selectable modes for snow, sand, mud, rock, and automatic terrain response. When combined with skid plates, hill descent control, and all-terrain tires, the 2019 Trailhawk earns its Trail Rated® badge.
Suspension and Ride Comfort
What makes the Trailhawk truly versatile is its Quadra-Lift® Air Suspension system. This feature allows drivers to raise or lower the vehicle’s ride height with the touch of a button.
Ride Height Modes:
| Mode | Ground Clearance | Purpose |
|---|---|---|
| Park Mode | 6.6 inches | Easy entry/exit |
| Aero Mode | 7.7 inches | Optimized highway aerodynamics |
| Normal Ride | 8.6 inches | Everyday driving |
| Off-Road 1 | 9.9 inches | Light trail use |
| Off-Road 2 | 10.8 inches | Maximum clearance |
Few midsize SUVs offer this level of adaptability, giving the Trailhawk an edge over competitors like the Toyota 4Runner and Ford Edge ST.
Interior: Practical Meets Premium
Step into the 2019 Trailhawk, and you’re greeted by a cabin that’s as premium as it is functional. Jeep spared no effort in equipping it with both rugged flair and upscale finishes.
Interior Features:
| Feature | Description |
|---|---|
| Seats | Heated front and rear leather/suede seats |
| Steering Wheel | Heated, leather-wrapped, red stitching |
| Infotainment | Uconnect 4C NAV with 8.4-inch touchscreen |
| Audio | 9-speaker Alpine premium audio system |
| Cargo Space | 36.3 cu-ft behind 2nd row / 68.3 cu-ft max |
| Climate Control | Dual-zone automatic |
Trailhawk logos are stitched into the seatbacks, while red tow hooks and black interior accents complete the theme. The flat-folding rear seats and power liftgate also make it family and pet friendly for daily life.
Technology and Safety
While engineered for the trail, the 2019 Trailhawk doesn’t skimp on tech. Jeep included a suite of standard and optional safety and convenience features.
Technology & Driver Assistance:
| Feature | Function |
|---|---|
| Adaptive Cruise Control | Maintains set distance on highways |
| Blind Spot Monitoring | Alerts during lane changes |
| Forward Collision Warning | Warns and brakes in emergency |
| Rear Cross Path Detection | Monitors traffic when reversing |
| Parallel/Perpendicular Assist | Helps park in tight spots |
| Apple CarPlay / Android Auto | Seamless smartphone connectivity |
These features make the Trailhawk not just a weekend warrior but also a confident daily commuter.
2019 Grand Cherokee Trailhawk vs. Competitors
Compared to rivals in the midsize SUV segment, the Trailhawk offers a uniquely capable, luxurious, and well-rounded package.
Segment Comparison:
| Model | Horsepower | Towing Capacity | Max Ground Clearance | Off-Road System |
|---|---|---|---|---|
| Jeep GC Trailhawk | 360 hp | 7,200 lbs | 10.8 inches | Quadra-Drive II + Air |
| Toyota 4Runner TRD Pro | 270 hp | 5,000 lbs | 9.6 inches | Part-Time 4WD |
| Ford Edge ST | 335 hp | 3,500 lbs | 8.0 inches | AWD only |
| Subaru Outback Onyx XT | 260 hp | 3,500 lbs | 8.7 inches | X-Mode AWD |
The Trailhawk simply outclasses its competition in off-road capability, power, and comfort when compared side-by-side.
Pricing and Value
In 2019, the Grand Cherokee Trailhawk started at around $45,500 USD, depending on the powertrain and packages selected. Today, used models can be found between $32,000 and $38,000 USD, depending on mileage, condition, and optional features.
Buyers can find strong value in a used Trailhawk, as it retains high resale value due to Jeep’s off-road reputation, premium materials, and longevity.
Final Verdict
The 2019 Jeep Grand Cherokee Trailhawk is not your average midsize SUV. It offers a unique balance of rugged 4×4 utility and plush interior refinement—an ideal solution for those who want adventure-ready hardware without sacrificing daily drivability.
Whether you’re tackling a steep trail or just need a winter-capable commuter with flair, the 2019 Trailhawk checks every box. For buyers exploring the used market, it remains one of the most well-rounded and underrated SUVs of its era.
If you want capability without compromise, refinement without fluff, and design with function—this is your SUV.
2025 Jeep Wagoneer for Sale

In an SUV market saturated with options, the 2025 Jeep Wagoneer emerges as a beacon of full-size luxury and utility. Fusing high-end interior finishes with rugged off-road prowess and impressive towing capabilities, the latest Wagoneer is engineered for both families and adventurers. Now available at Simi Valley Chrysler Dodge Jeep Ram, this premium SUV demands attention.
Engineered Excellence: Power and Performance
The heartbeat of the 2025 Wagoneer is its Hurricane Twin-Turbo I6 engine. Displacing 3.0L and twin-turbocharged, it produces a compelling 420 hp and 468 lb-ft of torque, far surpassing previous V8 benchmarks.
Performance Specifications:
| Specification | Value |
|---|---|
| Engine Type | 3.0L Hurricane Twin-Turbo I6 |
| Horsepower | 420 hp |
| Torque | 468 lb-ft |
| Transmission | 8-speed automatic |
| Towing Capacity | Up to 10,000 lbs |
Engineered to handle everything from urban commuting to serious trail duty, the Wagoneer features advanced 4×4 options: Quadra-Trac I, Quadra-Trac II, and the off-road-ready Quadra-Drive II system. The Selec-Terrain® traction management system offers drive modes for snow, sand, rock, mud, and auto.
Adding to the experience is the available Quadra-Lift® Air Suspension, which automatically adjusts the ride height to improve aerodynamics, ride comfort, or off-road clearance.
Cabin Craftsmanship: Interior Features
Inside, the Wagoneer exceeds expectations. The cabin layout reflects symmetry, space, and sophistication. Premium Nappa leather seating, real wood trim, and soft ambient lighting greet drivers and passengers alike.
Interior and Technology Highlights:
| Feature | Description |
| Seating Capacity | Up to 8 passengers |
| Infotainment | Uconnect® 5 with 10.1-inch display |
| Connectivity | Wireless Apple CarPlay®, Android Auto™, Alexa Built-In |
| Passenger Display (Optional) | 10.25-inch front passenger interactive screen |
| Audio System (Optional) | McIntosh® 19-speaker premium sound |
| Rear Entertainment | Amazon Fire TV for second and third row |
Third-row passengers enjoy genuine legroom, and rear doors open nearly 90 degrees, simplifying entry and exit. The large panoramic sunroof (available on higher trims) further enhances openness and natural light throughout the cabin.
Intelligent Safety Suite
With over 130 available safety and driver-assist features, the 2025 Wagoneer ensures confidence on every road. These features work behind the scenes to actively protect passengers.
Key Safety Features:
| Safety Feature | Functionality |
| Adaptive Cruise Control | Maintains safe following distance and full-stop capability |
| Blind Spot Monitoring | Alerts drivers of vehicles in adjacent lanes |
| Forward Collision Warning | Alerts and automatically brakes to avoid collisions |
| Lane Keep Assist | Gently corrects steering to maintain lane position |
| 360° Surround View Camera | Provides overhead view for better parking and navigation |
Combined with Jeep’s robust frame structure and proven reliability, these features place the Wagoneer among the safest SUVs in its segment.
Trims, Pricing, and Competitive Value
Jeep offers the Wagoneer in three carefully curated trims. Each one adds layers of luxury, tech, and off-road prowess:
| Trim | Starting Price (USD) | Highlights |
| Wagoneer Series I | $77,000 | Leather, 10.1-inch touchscreen, LED headlights |
| Wagoneer Series II | $85,000 | Air suspension, McIntosh audio, remote start |
| Wagoneer Series III | $93,000 | Quadra-Drive II, premium wood accents, ventilated 2nd row |
Compared to rivals like the Chevy Tahoe and Ford Expedition, the Wagoneer delivers more standard horsepower, better towing, and class-leading interior refinement.
Segment Comparison:
| Feature | Jeep Wagoneer | Chevy Tahoe | Ford Expedition |
| Horsepower | 420 hp | 355 hp | 400 hp |
| Towing Capacity | 10,000 lbs | 8,400 lbs | 9,300 lbs |
| Interior Material Quality | Premium | Functional | Comfortable |
| 3rd-Row Comfort | Best-in-Class | Moderate | Good |
| Off-Road Capability | Exceptional | Limited | Moderate |
Ownership Experience: Why Buy from Simi Valley CDJR?
Buying a Wagoneer is more than a transaction; it’s a partnership. At Simi Valley Chrysler Dodge Jeep Ram, we specialize in premium Jeep experiences. We offer:
- Competitive lease and finance options
- Transparent pricing with no hidden fees
- Generous trade-in appraisals
- Factory-trained Jeep service experts
- Convenient location at 2350 First St, Simi Valley, CA
With a large selection of 2025 Wagoneers in stock, our team is ready to help you customize your build or schedule a test drive. Every customer benefits from our dedication to premium service, expert product knowledge, and flexible financing solutions tailored to your needs.
Final Verdict
The 2025 Jeep Wagoneer is more than an SUV—it’s a mobile sanctuary built for explorers, large families, and style-driven individuals alike. Whether you’re hauling gear to a trailhead, attending a black-tie event, or simply taking the kids to school, the Wagoneer delivers in comfort, power, and prestige.
As one of the most capable and refined full-size SUVs available in the U.S. market, the 2025 Wagoneer is ideal for those who want versatility and luxury in one bold package. Come experience it for yourself. Visit Simi Valley Chrysler Dodge Jeep Ram and discover why this premium SUV continues to raise the bar.
Is the Jeep Compass Good? Experts Answer
The Jeep Compass is a compact SUV that sits comfortably between the smaller Renegade and the larger Cherokee. With its refined styling, off-road chops, and a refreshed turbocharged powertrain, the Compass has become a serious contender in the compact SUV space.
But let’s get down to the big question:
Is the Jeep Compass actually good?
Let’s break down its performance, reliability, features, pricing, and how it compares to competitors to help you decide if it’s the right SUV for you.
🚗 Overview: What Is the Jeep Compass?
The Jeep Compass is a five-passenger compact crossover SUV first introduced in 2007. It received a complete redesign in 2017 and a significant refresh in 2022, including a major powertrain upgrade in 2023.
The 2025 Compass features updated styling, an intuitive tech interface, and a standard 2.0L turbocharged engine delivering 200 horsepower. With its available Trail Rated 4×4 system, the Compass also remains one of the most capable compact SUVs off the pavement.
✅ What Makes the Jeep Compass Good?
1. Distinctive Design and Build
The Compass stands out from the cookie-cutter SUV crowd with classic Jeep styling, a bold seven-slot grille, and rugged design elements that echo the larger Grand Cherokee. Inside, the cabin is well-appointed with soft-touch materials, a modern layout, and available upscale trims like the High Altitude.
2. Standard Turbocharged Power
Starting in 2023, all Compass trims now come with a 2.0L turbocharged inline-4 engine paired to an 8-speed automatic transmission. This setup:
- Produces 200 horsepower and 221 lb-ft of torque
- Offers smoother acceleration than older models
- Delivers solid performance for both city and highway driving
Front-wheel drive is standard on base trims, while Jeep Active Drive 4×4 is available — and standard on higher trims and all Trailhawk models.
3. Off-Road Capability
This is where the Compass separates itself from most compact SUVs. The Compass Trailhawk trim is Trail Rated, which means it passes Jeep’s rigorous off-road standards for:
- Traction
- Water fording
- Maneuverability
- Articulation
- Ground clearance
Features like skid plates, hill descent control, and a low-range 4×4 system make the Compass Trailhawk a rare find among small crossovers when it comes to trail use.
4. Technology and Infotainment
Every 2025 Compass comes with:
- A 10.1-inch Uconnect touchscreen
- Wireless Apple CarPlay and Android Auto
- Available wireless charging and navigation
- Digital instrument cluster on upper trims
Uconnect is frequently rated among the easiest-to-use infotainment systems on the market, and the new setup feels intuitive and fast.
5. Advanced Safety Features
The Compass comes standard with:
- Forward collision warning with automatic emergency braking
- Lane departure warning and lane keep assist
- Blind-spot monitoring and rear cross-traffic alert
- Adaptive cruise control (on higher trims)
These safety features give the Compass a competitive edge, especially for families and commuters.
⚖️ Where the Jeep Compass Falls Short
1. Interior Space
Compared to competitors like the Honda CR-V or Toyota RAV4, the Compass offers less cargo space and tighter rear-seat legroom. It’s ideal for couples or small families but may feel cramped for larger households or road-tripping groups.
| Model | Cargo Capacity (Rear Seats Up) |
|---|---|
| Jeep Compass | 27.2 cu ft |
| Honda CR-V | 39.3 cu ft |
| Toyota RAV4 | 37.6 cu ft |
| Subaru Crosstrek | 20.8 cu ft |
2. Fuel Economy
While not inefficient, the Compass isn’t best-in-class for gas mileage.
- FWD models average around 27 mpg combined
- 4×4 models average 24–25 mpg combined
If fuel efficiency is your top priority, hybrids like the RAV4 Hybrid or CR-V Hybrid offer better long-term savings.
3. Resale Value
Jeep vehicles tend to depreciate faster than Toyota or Honda. The Compass holds its value better than the Renegade but may not match the residual strength of a RAV4 or Subaru.
🧾 Pricing and Trim Options (2025)
The Compass offers a variety of trims, all with the same powertrain:
| Trim | Starting MSRP |
|---|---|
| Sport | ~$27,495 |
| Latitude | ~$31,395 |
| Altitude | ~$33,990 |
| Trailhawk (4×4) | ~$35,490 |
| Limited | ~$36,495 |
| High Altitude | ~$39,495 |
Prices do not include destination charges or optional equipment.
🔄 How It Compares to the Competition
| SUV | Pros | Cons |
|---|---|---|
| Jeep Compass | Trail Rated capability, turbo power, tech | Less cargo space, average resale |
| Toyota RAV4 | Excellent resale, hybrid option | Less off-road focused |
| Honda CR-V | Spacious interior, high reliability | Not trail capable, dull styling |
| Subaru Crosstrek | AWD standard, rugged feel, high value | Lower horsepower, less towing ability |
| Ford Escape | Multiple powertrains, sporty feel | Complex infotainment, resale lags |
The Compass is a great option for drivers who want personality, performance, and off-road potential in a compact SUV — even if it gives up a bit of practicality.
🏁 Final Verdict: Is the Jeep Compass a Good SUV?
Yes — the Jeep Compass is a good SUV, especially for buyers who value capability, style, and a strong tech package.
It stands out in a sea of lookalike crossovers thanks to:
- Rugged styling that resembles the Grand Cherokee
- A turbocharged engine that offers solid real-world performance
- Available Trail Rated 4×4 systems that beat most rivals off the pavement
- Modern infotainment and standard safety features
It may not be the biggest or most fuel-efficient SUV in its class, but for those who prioritize personality and performance, the Compass delivers where it counts.
If you’re a commuter who enjoys weekend adventures, or simply want a capable SUV with the Jeep name on the grille, the Jeep Compass is worth serious consideration.
Are Jeep Compass SUVs Reliable? Experts Answer

A Full Breakdown of Jeep Compass Reliability in 2025
If you’re shopping for a compact SUV, the Jeep Compass probably sits somewhere on your shortlist — especially if you like the idea of blending city driving with off-road capability. But while the Compass certainly looks the part, many buyers still pause to ask the all-important question:
Is the Jeep Compass reliable?
Let’s explore the Jeep Compass’ reliability based on real-world data, expert reviews, maintenance costs, and long-term ownership experiences. Whether you’re considering a new 2025 model or a used one from earlier years, this guide will help you make an informed decision.
🚘 What Is the Jeep Compass?
The Jeep Compass is a compact crossover SUV that sits between the smaller Jeep Renegade and the larger Jeep Cherokee. First introduced in 2007, the Compass was redesigned in 2017 and refreshed again in 2022. The latest 2025 Compass models come with modern tech, refined interiors, and Jeep’s legendary 4×4 systems (especially in Trailhawk trim).
📈 How Reliable Is the Jeep Compass Overall?
Reliability Rating (2025 Model Year)
According to industry sources, the 2025 Jeep Compass earns an average reliability rating. Here’s how it ranks:
| Source | Score (Out of 5 or 100) |
|---|---|
| J.D. Power (Predicted Reliability) | 77/100 (Average) |
| RepairPal | 3.5 out of 5 (Above Average) |
| Consumer Reports | Mixed reliability across model years |
In general, the Compass is considered mid-pack in reliability — better than some rivals, but not as bulletproof as others like the Honda CR-V or Toyota RAV4.
🔍 What Affects the Compass’ Reliability Score?
Let’s take a closer look at the key factors influencing how the Jeep Compass performs over time:
1. Engine and Transmission
- Since 2023, the Compass comes standard with a 2.0L turbocharged inline-4 producing 200 hp.
- The new 8-speed automatic transmission replaces older CVT models, which had mixed reviews.
- Early model years (2011–2016) had more complaints related to powertrain performance, but newer models show significant improvement.
2. Electronics and Infotainment
- The Uconnect system is generally praised for being intuitive, responsive, and durable.
- Occasional reports of touch screen freezing or Bluetooth pairing issues, but nothing widespread.
3. Build Quality
- Interior quality has improved significantly in recent years.
- Rattles and trim wear were common in pre-2017 models but are rare in the newest generations.
🔧 Common Jeep Compass Issues (Used Models)
If you’re looking at used Jeep Compass models, especially between 2012–2018, here are some known problem areas:
| Issue | Affected Years | Severity |
|---|---|---|
| CVT Transmission Slipping | 2014–2016 | Moderate |
| Electrical Gremlins (Radio/ECU) | 2012–2015 | Low to Moderate |
| Suspension Wear (Ball Joints) | 2011–2014 | Low |
| TIPM (Totally Integrated Power Module) failures | 2011–2013 | Moderate |
| Interior Wear (Cloth Seats, Dash) | 2012–2016 | Cosmetic only |
Newer models (2019–2025) benefit from FCA/Stellantis engineering improvements and tighter quality control.
💵 Jeep Compass Maintenance Costs
| Category | Estimated Cost (Annual) | Comparison |
|---|---|---|
| Oil Changes | $80–$120 | Average for class |
| Brakes (pads/rotors) | $300–$600 | Average |
| Tires (Full Set) | $600–$850 | Compact SUV standard |
| Transmission Fluid | $150–$250 | Every 60,000–100,000 mi |
| Total 5-Year Cost | ~$5,800–$7,200 | Slightly above average |
The Compass is more affordable to maintain than luxury crossovers but may cost slightly more over time compared to a Toyota or Honda — mostly due to minor repairs or part availability.
⚖️ How Does the Compass Compare to Competitors?
Here’s how the 2025 Jeep Compass stacks up in terms of reliability and ownership expectations:
| Model | Reliability Rating | Ownership Cost | Powertrain Warranty |
|---|---|---|---|
| Jeep Compass | Average (3.5/5) | Slightly Above Avg | 5 yrs / 60,000 mi |
| Toyota RAV4 | Excellent (4.5/5) | Below Avg | 5 yrs / 60,000 mi |
| Honda CR-V | Excellent (4.5/5) | Avg | 5 yrs / 60,000 mi |
| Subaru Crosstrek | Good (4.0/5) | Avg | 5 yrs / 60,000 mi |
| Ford Escape | Below Average (3.0/5) | Above Avg | 5 yrs / 60,000 mi |
While the Compass isn’t at the top, it holds its own — especially when factoring in off-road capability and standard features.
🚦 Should You Buy a Jeep Compass?
The Compass is a great fit if you want:
- A compact SUV with legitimate 4×4 ability (especially in Trailhawk trim)
- A stylish, affordable crossover with a strong brand identity
- One of the few small SUVs that can truly go off-road
- A newer model with upgraded turbocharged engine and 8-speed transmission
It may not be ideal if:
- You plan to keep your car for 10+ years with minimal repairs
- You prioritize bulletproof long-term reliability above all else
- You expect luxury interior materials or high resale value
🏁 Final Verdict: Is the Jeep Compass Reliable?
The answer: Yes — with conditions.
The Jeep Compass is a reliable SUV when purchased new or certified pre-owned, especially from model years 2019 onward. Its reputation has improved dramatically in recent years thanks to better engines, electronics, and build quality.
However, if you’re buying used — especially from early 2010s model years — it’s essential to check service history and have it inspected, as those models are more prone to issues.
For drivers who want a compact SUV that stands out with rugged styling, optional Trail Rated off-road capability, and a strong Jeep identity, the Compass offers a compelling package. Just be sure you understand the trade-offs — and that you’re not expecting Toyota-like long-term simplicity.
In short: The newer the Compass, the more reliable it becomes.
What Is a Rubicon?

The name “Rubicon” carries weight in the off-road world. For those familiar with Jeep culture, it’s synonymous with rugged capability, aggressive styling, and vehicles ready for the wildest adventures. But for new buyers or curious enthusiasts, a common question often arises:
– Buy a Rubicon For Sale Near You.
What Is a Rubicon Jeep?
The Off-Road Jeep Explained by Simi Valley Chrysler Dodge Jeep Ram
When people talk about the most capable off-road SUV on the planet, one name almost always comes up — the Jeep Wrangler Rubicon. But what exactly does “Rubicon” mean? Is it just a trim level, or something more?
At Simi Valley Chrysler Dodge Jeep Ram, we see “Rubicon” as more than just a badge — it’s a legacy of off-road dominance, capability, and adventure that defines what it means to own a true Jeep.
The Meaning of “Rubicon”
The name “Rubicon” comes from a real mountain trail — the Rubicon Trail, located in the Sierra Nevada mountains of California. Spanning about 22 miles from Georgetown to Lake Tahoe, the Rubicon Trail is considered one of the toughest off-road routes in the world.
In ancient history, the term “crossing the Rubicon” meant making an irreversible decision, stemming from Julius Caesar’s crossing of Italy’s Rubicon River in 49 BC — a bold act that changed history.
For Jeep, “Rubicon” symbolizes that same spirit: crossing limits, taking decisive action, and venturing where others can’t.
What Does Rubicon Mean for Jeep?
In Jeep’s lineup, “Rubicon” represents the highest level of off-road performance and equipment available for the Wrangler and Gladiator. It’s not just a styling package — it’s an engineering upgrade built to tackle terrain that would stop most vehicles cold.
When a Jeep carries the Rubicon name, it means it’s designed to dominate the trail right out of the factory, no modifications required.
A Brief History of the Rubicon
The Rubicon trim was introduced in 2003 as part of the TJ-generation Jeep Wrangler. It was the first production Wrangler to come equipped with:
- Heavy-duty Dana 44 front and rear axles
- Front and rear locking differentials
- Rock-Trac 4×4 system
- Enhanced off-road suspension
- 31-inch mud-terrain tires
Jeep named it “Rubicon” to honor the brand’s tradition of conquering the Rubicon Trail during testing — a proving ground used for decades to validate Jeep’s legendary capability.
Since then, the Rubicon has evolved through generations — from the TJ to the JK, JL, and now the latest 2025 Jeep Wrangler Rubicon, which continues to raise the bar in the off-road world.
What Makes the Jeep Rubicon Different?
Compared to the standard Wrangler or Gladiator, the Rubicon model comes with several exclusive upgrades designed for rugged performance. Here’s a breakdown:
| Feature | Description | Rubicon Advantage |
|---|---|---|
| 4×4 System | Rock-Trac® 4:1 Low-Range Transfer Case | Delivers superior crawl ratio and torque for steep climbs |
| Locking Differentials | Tru-Lok® Front & Rear Electronic Lockers | Ensures equal power to all wheels on uneven terrain |
| Axles | Dana 44 Heavy-Duty Front & Rear | Built for rock crawling and extreme durability |
| Tires | 33-inch (optional 35-inch) All-Terrain Tires | Greater ground clearance and traction |
| Suspension | High-Articulation, Off-Road Tuned | Better wheel travel and obstacle absorption |
| Skid Plates | Steel Undercarriage Protection | Guards key components from rocks and debris |
| Disconnecting Sway Bar | Electronic Front Disconnect | Improves articulation on uneven trails |
These features give the Rubicon unmatched trail performance while maintaining comfort and stability on highways — a rare combination in today’s SUV market.
Jeep Wrangler Rubicon vs. Other Trims
| Trim | Key Traits | Off-Road Capability |
|---|---|---|
| Sport | Affordable, basic 4×4 | Good for light trails |
| Sahara | Comfort and tech-focused | Moderate off-roading |
| Rubicon | Purpose-built off-roader | Extreme terrain and rock crawling |
| Rubicon 392 | Adds 6.4 L V8 Hemi engine | Ultimate power and performance |
The Rubicon 392 takes everything great about the Rubicon and adds sheer muscle — 470 hp, a deep V8 rumble, and the ability to go from 0 to 60 mph in just 4.5 seconds, making it the most powerful Wrangler ever built.
The Rubicon Trail Connection
Every Rubicon-trim Jeep is designed with the Rubicon Trail in mind. Jeep’s engineers test these vehicles on that exact path in Northern California before production approval.
Conquering the Rubicon Trail is considered the ultimate rite of passage for off-road enthusiasts — and Jeep ensures that any vehicle bearing the name can complete the trail right from the showroom.
Everyday Driving Comfort
While the Rubicon is built for adventure, it’s surprisingly practical for daily life. Modern Rubicons feature:
- Premium leather-trimmed interiors
- Advanced infotainment with Uconnect 5
- Apple CarPlay and Android Auto
- Adaptive cruise control and blind-spot monitoring
- Removable roof and doors for open-air fun
You can commute comfortably Monday through Friday and hit the trails on Saturday — all without compromise.
Should You Buy a Jeep Rubicon?
If you’re looking for the most capable factory 4×4 vehicle in the world, the Rubicon is it. It’s ideal for:
- Outdoor enthusiasts who regularly explore off-road
- Drivers seeking durability and resale strength
- Jeep fans who want the authentic off-road experience
At Simi Valley Chrysler Dodge Jeep Ram, the Rubicon remains one of our most popular trims, offering unbeatable versatility and trail-rated toughness backed by the Jeep legacy.
Explore our new Jeep inventory or used Wranglers and Gladiators to find your perfect match.
Frequently Asked Questions About the Jeep Rubicon
1. What does “Rubicon” mean in Jeep terms?
“Rubicon” refers to the top off-road trim of Jeep models like the Wrangler and Gladiator, equipped with specialized hardware — locking differentials, low-range gearing, and heavy-duty axles — designed for extreme off-road conditions. The name originates from California’s Rubicon Trail, a legendary Jeep testing ground.
2. Is the Jeep Rubicon worth the price?
Yes. The Rubicon’s advanced components would cost thousands more if added aftermarket. Buying the Rubicon ensures you get a factory-engineered off-roader with full warranty coverage and top resale value — especially important in Southern California’s Jeep-loving market.
3. Can the Jeep Rubicon be used as a daily driver?
Absolutely. Despite its off-road DNA, modern Rubicons include comfort and tech features like heated seats, touchscreen infotainment, and adaptive safety systems. It’s designed to perform equally well on highways and rugged trails.
4. What’s the difference between a Rubicon and a Sahara?
The Sahara focuses on on-road comfort and luxury, while the Rubicon emphasizes off-road strength. The Rubicon includes locking differentials, skid plates, and a 4:1 transfer case that the Sahara doesn’t offer.
5. Does the Jeep Rubicon come in automatic or manual?
Both. Most Rubicon models offer a 6-speed manual or an 8-speed automatic transmission. The automatic provides smoother torque delivery for rock crawling and towing.
6. How much can a Jeep Rubicon tow?
The Wrangler Rubicon can tow up to 3,500 lbs, while the Gladiator Rubicon — being a pickup — can tow as much as 7,000 lbs, depending on configuration.
7. Is the Rubicon Trail open to the public?
Yes, but it’s recommended only for experienced off-roaders. The Rubicon Trail is maintained by enthusiasts and county organizations, offering a challenging route for 4×4 vehicles. Many Jeep clubs organize annual trail rides to celebrate the brand’s heritage.
8. Does Rubicon mean “limited edition”?
No — “Rubicon” is a permanent trim level, not a limited release. However, Jeep occasionally releases special editions like the Rubicon X, Rubicon 392, or 20th Anniversary Rubicon, featuring exclusive styling and performance upgrades.
9. What engines are available in the Rubicon?
Depending on the year and model, Rubicons are offered with:
- 2.0-L Turbo I-4
- 3.6-L Pentastar V6
- 3.0-L EcoDiesel V6 (in select years)
- 6.4-L V8 Hemi (392 model)
Each engine balances power, torque, and efficiency for different driving styles.
10. How much does a Jeep Rubicon cost?
As of 2025, a Wrangler Rubicon typically starts around $54,000 USD, while the Rubicon 392 begins near $88,000 USD. Prices vary with engine choice, packages, and accessories. To view the latest deals and inventory, visit Simi Valley Chrysler Dodge Jeep Ram.
Final Thoughts
The Jeep Rubicon isn’t just another SUV trim — it’s a declaration of capability. Born from one of the most demanding trails in the world, it stands as Jeep’s ultimate symbol of adventure. Whether you’re climbing rocks in the desert or cruising through Ventura County, the Rubicon delivers unmatched confidence and excitement.
Simi Valley Chrysler Dodge Jeep Ram proudly offers a full range of Rubicon-equipped Wranglers and Gladiators — each one ready to help you “cross the Rubicon” and embrace adventure on your own terms.
How Much Is a Jeep Wrangler ? Experts Answer
The Jeep Wrangler isn’t just an SUV — it’s an icon. For decades, it’s stood as a symbol of off-road capability, adventure, and American freedom on four wheels. But in 2025, with more configurations, engines, and tech than ever before, one key question arises: How much is a Jeep Wrangler?
The answer depends on several factors: body style, trim level, engine choice, and whether you opt for the increasingly popular plug-in hybrid Wrangler 4xe. This guide breaks down everything you need to know — from base models to the most luxurious and powerful variants — to help you understand what a Wrangler costs and what you get for your money.
💰 2025 Jeep Wrangler Pricing Overview
Jeep offers the Wrangler in two body styles: the classic 2-door and the more family-friendly 4-door Unlimited. Pricing varies significantly between trims and configurations.
2-Door Models Starting MSRP
| Trim | Starting Price (USD) |
|---|---|
| Sport | $32,095 |
| Sport S | $35,695 |
| Willys | $39,595 |
| Rubicon | $46,955 |
4-Door Models Starting MSRP
| Trim | Starting Price (USD) |
|---|---|
| Sport | $36,695 |
| Sport S | $40,295 |
| Willys | $44,195 |
| Sahara | $49,370 |
| Rubicon | $51,455 |
| Rubicon X | $61,405 |
| Rubicon 392 | $99,995 |
Note: All prices are base MSRP and do not include destination charges, taxes, or optional packages.
🚙 Jeep Wrangler Trim Breakdown: What You Get at Each Level
Sport
The entry-level Wrangler doesn’t cut corners on capability. With a robust 4×4 system, skid plates, tow hooks, and a removable top and doors, it’s designed for raw off-road fun. It comes standard with a 3.6L V6 engine and 6-speed manual transmission.
Sport S
This trim builds on the Sport with added comfort and tech — including power windows, power locks, keyless entry, and available upgrades like alloy wheels and the 8.4-inch touchscreen.
Willys
The Willys edition throws in more off-road equipment, like 32-inch mud-terrain tires, Rubicon shocks, limited-slip rear differential, and black exterior accents. It’s a perfect balance between rugged capability and aggressive styling.
Sahara (4-door only)
The Sahara trim leans into luxury and daily drivability. You get body-colored fenders, upgraded infotainment with navigation, dual-zone climate control, and a smoother suspension for on-road comfort.
Rubicon
The Rubicon is the go-to for hardcore trail enthusiasts. Equipped with front and rear locking differentials, electronic sway bar disconnect, 33-inch all-terrain tires, and the Rock-Trac 4×4 system, this model is built to tackle the most demanding terrain with ease.
Rubicon X
New in 2025, the Rubicon X enhances the standard Rubicon with more premium materials, integrated off-road camera, steel bumpers, and power front seats. It blends luxury with extreme off-road capability.
Rubicon 392 Final Edition
This is the top of the line — and the last of its kind. With a 6.4L HEMI V8 pushing 470 horsepower and 470 lb-ft of torque, this limited edition celebrates the end of V8 Wranglers. It’s priced just under $100,000 and offers top-tier performance and exclusivity.
⚡ Wrangler 4xe: The Plug-In Hybrid Wrangler
The Wrangler 4xe starts at approximately $52,690 and brings plug-in hybrid power to the iconic Jeep lineup. It combines a turbocharged 2.0L four-cylinder engine with two electric motors to produce 375 horsepower and 470 lb-ft of torque — the same torque rating as the Rubicon 392.
What makes the 4xe special is its 21 miles of electric-only range, making it a perfect fit for city commutes without sacrificing trail capability. It’s available in Sahara, Willys, Rubicon, and High Altitude trims.
Key advantages include:
- Federal and local EV incentives (depending on location)
- Instant torque for off-roading
- Great fuel economy compared to gas-only variants
🔧 Engine Options and Performance
The 2025 Jeep Wrangler offers a variety of engines depending on the trim:
| Engine | Horsepower | Torque (lb-ft) | Availability |
|---|---|---|---|
| 3.6L Pentastar V6 | 285 hp | 260 | Standard on most models |
| 2.0L Turbo I4 | 270 hp | 295 | Optional on most trims |
| 2.0L PHEV (4xe Hybrid) | 375 hp | 470 | Available on 4xe trims only |
| 6.4L HEMI V8 (Rubicon 392) | 470 hp | 470 | Only in Rubicon 392 Final Edition |
Most trims come with a choice between a 6-speed manual or 8-speed automatic transmission, depending on engine selection.
🧾 Optional Packages and Pricing Factors
Your Wrangler’s price can vary significantly depending on the options you choose:
| Option Package | Cost Range | Common Features Included |
|---|---|---|
| Advanced Safety Group | $995–$1,395 | Adaptive cruise control, forward collision warning |
| Cold Weather Group | $995 | Heated seats, heated steering wheel |
| LED Lighting Group | $1,395 | Premium headlamps and fog lights |
| Trailer Tow & HD Electrical | $795 | Class II hitch, auxiliary switches |
| Xtreme 35 Package (Rubicon) | $4,000–$5,000 | 35-inch tires, beadlock-capable wheels |
Expect pricing to increase by $5,000–$12,000 depending on which trim and how many add-ons you select.
📈 Jeep Wrangler Resale Value and Ownership Costs
The Wrangler continues to be one of the best vehicles in the U.S. for resale value. According to recent industry analysis, the Wrangler retains up to 70% of its value after 5 years — far above average.
Average 5-year ownership cost (excluding fuel):
- Maintenance: $3,000–$5,000
- Insurance: $1,400/year (varies by location and trim)
- Registration/fees: ~$300/year
Its solid resale performance makes the Wrangler not just a fun vehicle, but also a wise investment compared to many SUVs in its class.
🏁 Final Thoughts: Which Jeep Wrangler Is Right for You?
The Jeep Wrangler lineup in 2025 offers something for nearly every kind of driver — from outdoor adventurers and city commuters to plug-in hybrid pioneers and V8 performance lovers.
Whether you’re aiming for the budget-friendly Sport, the upscale Sahara, or the beastly Rubicon 392, there’s a Wrangler tailored to your lifestyle. And with excellent residual value, countless customization options, and trail-tested engineering, your Wrangler won’t just get you where you’re going — it’ll make the journey unforgettable.
For anyone wondering “How much is a Jeep Wrangler?”, the answer is as wide-ranging as the terrains it conquers. Starting in the low $30,000s and climbing to just under $100,000, the 2025 Wrangler offers a price point for every level of enthusiasm.
Can You Lease a Used Car? Experts Answer
What You Need to Know Before Signing the Dotted Line
When most people think of leasing, they picture a brand-new vehicle with zero miles, a shiny window sticker, and that new car smell. But what if you’re on a tighter budget, or want to avoid the sharp depreciation hit that comes with new cars?
You might be wondering:
Can you lease a used car?
Short answer: Yes. But it’s not as common — and not always offered at every dealership.
Let’s break down how used car leases work, when they make sense, and what you should watch out for.
🚗 What Is a Used Car Lease?
A used car lease — sometimes called a pre-owned lease — is an agreement that allows you to drive a used or certified pre-owned (CPO) vehicle for a fixed monthly payment over a set term (usually 24 to 48 months). At the end of the lease, you return the car or buy it at a predetermined residual value.
Used leases are typically available on:
- Certified Pre-Owned (CPO) vehicles (often 1–4 years old)
- Off-lease returns from previous lessees
- Select low-mileage, late-model vehicles
✅ Who Offers Used Car Leases?
Not every dealer does. Used leases are most commonly offered by:
| Provider Type | Availability |
|---|---|
| Franchise Dealerships | Yes — especially with CPO models (e.g., Toyota, BMW, Lexus, Kia, Jeep) |
| Luxury Brands | Common — BMW, Mercedes-Benz, Audi, Lexus often promote used leases |
| Independent Dealers | Rare — used leasing requires manufacturer backing and residual calculation |
| Third-Party Lenders | Sometimes — but may come with higher interest rates or stricter terms |
🔑 Pro Tip: Ask your dealership’s finance department if they offer leasing on certified used vehicles. Some models may be lease-eligible even if not advertised.
💰 Used vs. New Lease: What’s the Difference?
| Feature | New Car Lease | Used Car Lease |
|---|---|---|
| Monthly Payment | Higher | Lower (typically 10–30% less) |
| Depreciation Hit | Immediate (first 2–3 years) | Already absorbed by first owner |
| Warranty Coverage | Full manufacturer warranty | May require extended or CPO warranty |
| Maintenance Costs | Minimal | Slightly higher due to age/mileage |
| Vehicle Condition | Brand new | Light wear and tear may be present |
| Selection | Broad — all trims/models available | Limited to specific CPO units |
| Residual Value | More predictable | Harder to calculate, sometimes lower |
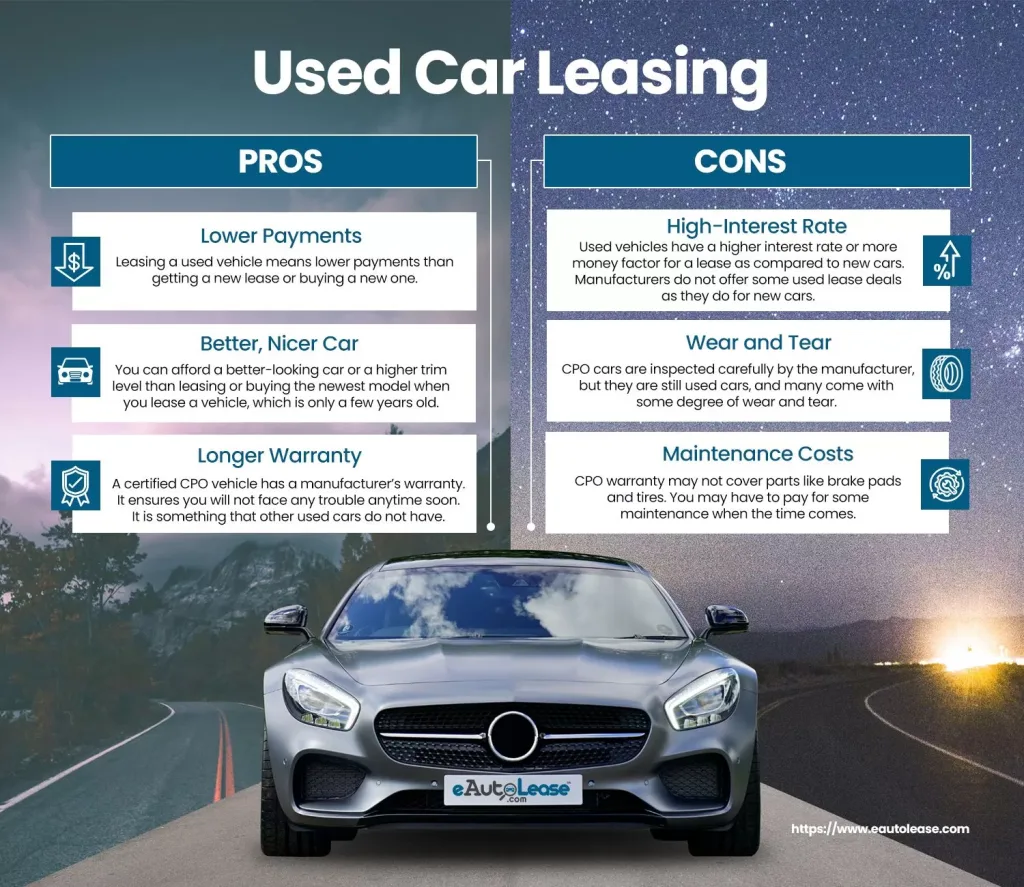
📉 Pros and Cons of Leasing a Used Vehicle
✅ Pros
- Lower Monthly Payments: Because the vehicle has already depreciated, you’re paying less for the same nameplate.
- Shorter Lease Terms: Some used leases are as short as 24 months.
- Option to Buy: You can often buy the car at the end of the lease for less than retail.
- Access to Luxury or Premium Brands: Leasing a used luxury car can be far cheaper than buying or leasing new.
❌ Cons
- Limited Availability: Not all makes/models qualify.
- Higher Interest Rates: Used leases often carry money factors (lease interest rates) that are higher than new cars.
- Less Incentives: New cars come with rebates and lease specials — used cars typically don’t.
- Older Tech/Warranty Limits: Fewer modern features and potential out-of-pocket repair costs if not under CPO coverage.
🔍 Used Lease Example
Let’s say you’re choosing between leasing a new 2025 Jeep Grand Cherokee vs. a CPO 2022 Grand Cherokee.
| Feature | 2025 Model (New Lease) | 2022 CPO Model (Used Lease) |
|---|---|---|
| MSRP | $42,000 | $32,000 |
| Lease Term | 36 months | 24–36 months |
| Monthly Payment | ~$540/month | ~$390/month |
| Total Lease Cost | ~$19,500 | ~$14,000 |
| Buyout Price (Residual) | ~$27,000 | ~$19,000 |
🚘 Result: You save around $130–$150/month with the used lease while still driving a well-equipped SUV.
🛠️ What to Look for in a Used Lease
Before signing a used car lease, check for:
- Certified Pre-Owned Status
This ensures the car has passed inspection and may carry extended warranty coverage. - Low Mileage
Under 35,000 miles is ideal — higher mileage vehicles may not qualify for leasing. - Clear Maintenance History
Request a Carfax or AutoCheck report. - Buyout Option
Make sure you know what it will cost to purchase the vehicle at lease-end. - Mileage Limit
Most used leases offer 10,000–12,000 miles/year — ask about overage penalties.
💬 FAQs: Leasing a Used Car
Q: Can I lease any used car?
A: No. Typically, only certified pre-owned or off-lease vehicles from major brands qualify. Most must be under 4 years old and 50,000 miles.
Q: Is it cheaper to lease or finance a used car?
A: Leasing usually results in lower monthly payments, but you don’t own the car unless you buy it out. Financing has higher payments but builds equity.
Q: Do used leases require good credit?
A: Yes. Just like new car leases, a credit score of 650+ is typically required, though options exist for lower scores.
Q: Can I get a warranty on a used lease?
A: Yes — most used leases are backed by CPO warranty coverage, and you can add extended protection if needed.
Q: Can I trade in my current car toward a used lease?
A: Absolutely. A trade-in can cover your down payment or reduce monthly payments.
🏁 Final Thoughts: Is a Used Car Lease Right for You?
If you’re shopping for value, flexibility, and lower monthly costs, leasing a used vehicle — especially a certified pre-owned model — can be a smart move. It’s an excellent way to access a higher-end vehicle with lower payments, while keeping your options open at lease-end.
That said, be sure to:
- Understand mileage limits and end-of-lease costs
- Compare used lease offers to traditional financing
- Prioritize CPO models from trusted dealerships
And if you’re exploring used leasing options in California, stop by Simi Valley Chrysler Dodge Jeep Ram — where you can find low-mileage Jeeps, RAMs, and Dodges with flexible lease plans and CPO coverage that give you confidence behind the wheel.
How Much Car Can I Afford ? Experts Advice

How Much Car Can I Afford? Expert Advice Before You Buy
The smartest answer is this: you can afford a car when the full monthly cost, not just the payment, fits comfortably inside your budget without hurting rent, mortgage, groceries, debt payments, emergency savings, or long-term goals.
A good expert rule is to keep your car payment around 10% to 15% of your monthly take-home pay, and keep your total vehicle cost including payment, insurance, fuel, maintenance, registration, and parking closer to 15% to 20% of take-home pay. NerdWallet recommends building the car payment into a broader 50/30/20 budget, where needs, wants, and savings are separated before deciding how much car payment makes sense.
The biggest mistake buyers make is asking, “Can I afford the monthly payment?” The better question is: Can I afford the car after insurance, fuel, maintenance, taxes, fees, interest, and depreciation?
Start With Your Monthly Budget
Before shopping for a vehicle, start with your real monthly take-home pay.
That means the money that actually lands in your bank account after taxes and deductions. Do not use your gross salary unless you are doing a rough estimate. A $70,000 income does not mean you have $70,000 available to spend.
From there, subtract your fixed costs. That includes rent or mortgage, utilities, phone bill, groceries, credit cards, student loans, insurance, childcare, subscriptions, savings, and any other monthly obligations.
The money left after those costs tells you how much room you actually have for a car. This is where many buyers get into trouble. A lender may approve you for a higher payment than your lifestyle can comfortably handle.
Approval does not always mean affordability.
The 20/4/10 Rule Still Works
One of the most useful car-buying rules is the 20/4/10 rule.
That means put 20% down, finance for no more than 4 years, and keep total monthly transportation costs under 10% of gross monthly income. This rule is strict, especially in today’s market, but it is useful because it protects buyers from becoming car poor.
The point is not that every buyer must follow it perfectly. The point is that it forces you to avoid three common traps: tiny down payments, very long loans, and payments that look affordable only because the loan term is stretched too far.
Longer loan terms can lower the monthly payment, but they often increase the total interest paid and make it easier to owe more than the car is worth.
Do Not Shop by Payment Alone
A low monthly payment does not always mean a good deal.
Dealers and lenders can lower the payment by extending the term, increasing the down payment, changing the rate, adding a balloon structure in some markets, or shifting numbers around inside the deal. That is why you should always look at the full price, interest rate, term, taxes, fees, and total cost of borrowing.
Experian reported that the average new car payment in Q3 2025 was $748, while the average used car payment was $532. Those numbers show how easy it is for a car payment to become one of the biggest monthly expenses in a household.
A $748 payment may be normal in the market, but that does not mean it is right for your budget.
New Car vs Used Car: Which Can You Afford?
A new car usually gives you warranty coverage, the latest features, lower repair risk, and sometimes better interest rates. But it also usually costs more up front and depreciates faster in the early years.
A used car usually costs less to buy, but it may come with higher interest rates, more maintenance risk, older tires, older brakes, and less warranty coverage. That does not make used cars bad. It simply means you need to budget for repairs and inspection.
For many buyers, a lightly used vehicle between three and five years old can be the sweet spot. It has already taken some depreciation, but it may still have modern safety features and a useful remaining lifespan.
When comparing options, check both used inventory and new inventory so you can compare payment, warranty, mileage, interest rate, and long-term value.
How Much Should Your Down Payment Be?
A bigger down payment gives you more breathing room.
Putting money down reduces the amount financed, lowers the monthly payment, reduces interest paid over time, and helps prevent negative equity. Negative equity happens when you owe more than the car is worth.
For new cars, 20% down is ideal. For used cars, 10% to 20% down is still a strong target. If that is not possible, try to put down enough to cover taxes, fees, and part of the vehicle price so you are not financing every dollar.
A small down payment is not always wrong, but it leaves less protection if the vehicle depreciates quickly or you need to trade out early.
Loan Term Matters More Than Buyers Think
A longer loan term can make a car look affordable when it really is not.
A 72-month or 84-month loan may lower the payment, but it also keeps you in debt longer. It can also increase total interest and raise the chance of being upside down on the loan.
Experian tracks auto finance trends and shows how many buyers stretch terms to manage higher vehicle prices. That may solve the monthly payment problem, but it can create a long-term ownership problem.
A simple rule: try to finance for 60 months or less when possible. If the only way to afford the vehicle is an 84-month loan, the vehicle may be too expensive for your budget.
Do Not Forget Insurance
Insurance can completely change affordability.
A truck, performance car, luxury SUV, or new vehicle may cost much more to insure than an older sedan or compact SUV. Your age, driving record, location, credit profile in some states, deductible, coverage level, and vehicle type all affect the quote.
Before buying, get an insurance quote using the exact year, make, model, and trim. Do this before signing, not after.
A car that fits your payment budget may not fit once insurance is added.
Maintenance and Repairs Are Part of Affordability
The payment is only one piece.
You also need to budget for oil changes, tires, brakes, batteries, fluids, filters, alignments, registration, inspections, and unexpected repairs. Trucks and SUVs may cost more for tires and brakes. Luxury brands may cost more for parts and labor. Older vehicles may need more frequent repairs.
A cheaper used car with poor maintenance history can become more expensive than a newer vehicle with warranty coverage.
This is why a pre-purchase inspection matters on used cars. A $150 inspection can save you from a $3,000 mistake.
A Simple Way to Calculate Your Car Budget
Start with your monthly take-home pay.
Take 10% of that number for a conservative car payment. Take 15% if your other expenses are low and you are financially comfortable. Then estimate insurance, fuel, maintenance, and registration.
For example, if your take-home pay is $4,500 per month, a smart payment range may be around $450 to $675. But if insurance is $200, fuel is $250, and maintenance savings are $100, the total vehicle cost could land between $1,000 and $1,225 per month. That may be too high depending on rent, debt, and savings.
This is why the total cost matters more than the payment.
What Credit Score Can Change
Your credit score affects the interest rate, and the interest rate affects how much car you can afford.
A buyer with strong credit may qualify for a lower rate and afford more vehicle for the same payment. A buyer with weaker credit may pay much more interest, which means less of the payment goes toward the actual car.
Before shopping, check your credit, correct errors, pay down revolving debt if possible, and avoid opening unnecessary new credit. Getting pre-approved can also help you understand your real budget before visiting the dealership.
You can start with a dealership finance application to understand available options before choosing a vehicle.
Should You Lease or Finance?
Leasing may offer a lower monthly payment and newer vehicle access, but it comes with mileage limits, condition rules, and no ownership at the end unless you buy it out.
Financing usually costs more monthly, but you build ownership and can keep the vehicle after it is paid off.
Lease if you like driving newer vehicles, stay within mileage limits, and want predictable warranty coverage.
Finance if you drive a lot, keep vehicles long term, or want to build equity.
Neither is automatically better. The right choice depends on your driving habits and long-term plan.
Expert Advice: Buy Less Than You Are Approved For
The best advice is to buy slightly less car than the bank says you can afford.
Leave room for life. Rates change. Insurance rises. Tires wear out. Jobs change. Families grow. Gas prices move. Repairs happen.
A car should make your life easier, not trap your budget.
The safest purchase is the one where you can make the payment comfortably, insure it properly, maintain it on time, and still save money every month.
FAQs About How Much Car You Can Afford
How much car can I afford based on salary?
A practical rule is to keep your car payment around 10% to 15% of monthly take-home pay and total vehicle costs around 15% to 20%. Lower is better if you have high rent, debt, or limited savings.
Is the 20/4/10 rule realistic?
It is strict, but useful. It recommends 20% down, a loan term of four years or less, and total transportation costs under 10% of gross income. Even if you cannot follow it perfectly, it helps prevent overspending.
What is a good monthly car payment?
A good monthly car payment is one you can afford while still paying bills, saving money, and handling emergencies. For many buyers, that means staying near 10% of take-home pay.
Should I buy new or used?
Buy new if you want warranty coverage, lower repair risk, and the latest features. Buy used if you want a lower purchase price and are comfortable checking condition, service history, and repair risk.
Is a 72-month car loan bad?
Not always, but it can be risky. A 72-month loan lowers the payment but keeps you in debt longer and may increase total interest. A shorter term is safer when the budget allows.
How much should I put down on a car?
A 20% down payment is ideal for a new car. For a used car, 10% to 20% is a strong target. More down usually means less interest, lower payment, and less risk of negative equity.
Final Thoughts: Afford the Car, Not Just the Payment
So, how much car can you afford?
The best answer is not the biggest payment a lender approves. It is the vehicle that fits your life after insurance, fuel, repairs, registration, taxes, interest, and savings.
Keep the payment reasonable, avoid overlong loans, get insurance quotes first, compare new and used options, and leave room in your budget. A smart car purchase should feel comfortable on day one and still make sense three years later.
Jeep Grand Cherokee LAltitude X For Sale Los Angeles

Commanding Form, Subtle Flash: Exterior Design That Belongs Anywhere
It doesn’t matter whether you’re rolling through gridlock in West Hollywood or winding up Angeles Crest Highway—the Altitude X looks composed, confident, and unmistakably upscale.
Interior That Feels Designed for the Los Angeles Lifestyle
Slip inside, and the Grand Cherokee L Altitude X reveals its true ambition: comfort without compromise. Jeep isn’t trying to mimic European minimalism here. Instead, it offers a modern, intuitive interior that balances utility and sophistication.
The seating is tailored in black premium cloth with detailed stitching—durable for family life, but far from basic. The dashboard is clean, digital, and uncluttered. An 8.4-inch Uconnect 5 touchscreen anchors the center stack, offering crisp visuals and fast response times. Wireless Apple CarPlay and Android Auto come standard, so your phone becomes your control center with zero cables cluttering up the console.
But perhaps more importantly—this is a true three-row SUV. The Grand Cherokee L isn’t cheating with a cramped back row. Adults can comfortably sit in the third row, making this a rare breed in the midsize SUV market. Whether you’re shuttling friends to Venice Beach or loading up the kids for a day at Universal Studios, this SUV’s layout actually works in real life.
Cargo space isn’t an afterthought, either. With all seats up, you get 487 litres of usable trunk space—enough for grocery hauls, stroller storage, or beach gear. Fold the third row flat, and that number jumps to 1,330 litres. With all rows down, the cavernous 2,400+ litres makes it suitable for home reno runs or even sleeping inside during an impromptu desert escape.
Engineered for the Freeway and the Forgotten Roads
The Grand Cherokee L Altitude X is powered by Jeep’s veteran 3.6-litre Pentastar V6 engine—arguably one of the most proven powerplants in the industry. With 293 horsepower and 260 lb-ft of torque on tap, it’s confident under acceleration and composed in traffic. The 8-speed automatic transmission feels fluid whether you’re cruising down the 405 or inching through evening rush on Sunset Blvd.
It’s not a race car, and it doesn’t pretend to be. What it offers instead is balanced, intelligent performance. Need to tow? The Altitude X can pull up to 6,200 pounds when properly equipped. That’s enough for jet skis, a modest camper, or even a small vintage Airstream—perfect for Angelenos with a weekend itch to get out of town.
Four-wheel drive is available for those who want extra grip in the mountains or plan to explore fire trails and hidden campsites. Jeep’s Selec-Terrain system gives you control over different driving modes—Auto, Snow, Sport, and Sand/Mud—so you can feel confident wherever you’re headed.
Technology Built for the Digital Age
Jeep didn’t skimp on tech, and that’s obvious from the moment you start the vehicle. The Uconnect 5 system is one of the best in the business—fast, reliable, and easy to navigate. Over-the-air updates ensure your infotainment stays current without dealership visits.
Multiple USB ports in all three rows, available wireless charging, and a digital instrument cluster make this feel more premium than the price suggests. There’s also an available rear-seat entertainment system if your passengers need distraction during LA’s notoriously long commutes.
And for the audiophiles? An optional premium Alpine sound system turns the cabin into a rolling sound studio—whether it’s early morning NPR or late-night Kendrick.
Safety in Every Lane
Los Angeles driving is unpredictable at best. Jeep equips the Altitude X with a standard suite of advanced driver-assistance systems to take the edge off. These include:
- Forward collision warning with active braking
- Blind spot monitoring and rear cross-path detection
- Adaptive cruise control with stop-and-go
- Lane departure warning with lane keep assist
- Rear park assist with automatic braking
In a city that thrives on motion and multitasking, having these tools as standard features helps the Grand Cherokee L Altitude X stand out as more than just a pretty face.
Priced Right, Packed Smart
Here’s the real kicker: despite looking and feeling like a luxury SUV, the 2025 Jeep Grand Cherokee L Altitude X is priced well below many of its rivals. With a starting MSRP in the low $50,000s and typical dealer incentives available across Los Angeles, you’re getting serious value. You don’t need to stretch to the Summit Reserve or Overland trims to enjoy high-end design and tech—this version delivers much of the same character without the heavy premium.
It’s the smart buyer’s trim—the one that understands the value of understatement.
Final Thoughts: This Is the LA SUV
The 2025 Jeep Grand Cherokee L Altitude X isn’t a gimmick. It’s not for influencers. It’s not trying to go viral. What it does offer is the kind of quiet excellence that fits naturally into Los Angeles life.
It’s stylish without being flashy. Spacious without being oversized. Capable without being complicated. Whether you’re navigating downtown, heading up Mulholland, or escaping for a weekend in the Mojave, this SUV is ready—without the drama.
If you’re in Los Angeles and you’ve been waiting for an SUV that respects your time, understands your lifestyle, and delivers real-world utility without forcing you into a $70,000 badge… the Altitude X is the one to test drive.
Jeep Gladiator GLADIATOR BIG BEAR 4X4 For Sale

The 2025 Jeep Gladiator Big Bear 4×4 is more than just a limited-edition truck — it’s a purpose-built off-road machine that captures the spirit of the California lifestyle. With bold styling, trail-rated capability, and exclusive features that set it apart from the pack, this trim is a must-see for anyone in the market for a rugged pickup. Available now at Simi Valley Chrysler Dodge Jeep Ram, the Gladiator Big Bear offers something truly special for adventure-ready drivers.
A Powertrain That Delivers on and off the Road
At the heart of the 2025 Jeep Gladiator Big Bear is a proven 3.6-litre Pentastar V6 engine. Producing 285 horsepower and 260 lb-ft of torque, this engine is matched to an 8-speed automatic transmission. Whether you’re merging onto the highway or crawling through rough terrain, the power delivery is smooth, responsive, and confident.
Jeep pairs the Big Bear with its Command-Trac 4×4 system — a part-time four-wheel drive setup that splits torque evenly between the front and rear axles when engaged. It’s a staple of Jeep engineering and well-suited to handling dirt trails, rocky paths, and challenging inclines. The addition of a 3.73 axle ratio, off-road plus mode, and Dana 44 axles helps deliver the kind of control and durability that serious off-roaders demand.
Towing capabilities are also strong. With a max towing capacity of up to 6,000 pounds when properly equipped, the Gladiator Big Bear is capable of pulling small trailers, boats, or even a couple of motorcycles with ease.
Unique Styling That Commands Attention
The Big Bear is a California-exclusive trim that distinguishes itself with exclusive badging and a number of aesthetic enhancements. Exterior elements include black 17-inch alloy wheels, rock rails, and all-terrain tires designed for superior grip. Fender flares are body-colored, giving the truck a seamless and aggressive look, while the signature Big Bear hood graphic makes it unmistakable on the road or the trail.
Available in a variety of classic Jeep colors including Bright White Clearcoat, the Big Bear manages to look refined while maintaining the rugged stance that Gladiator fans expect.
Inside, the cabin features black premium cloth upholstery with contrast stitching, and details like all-weather floor mats, a leather-wrapped steering wheel, and soft-touch surfaces balance utility with comfort. For buyers looking to blend daily driving comfort with weekend trail ability, this interior strikes the right tone.
Comfort and Convenience Where It Matters Most
The 2025 Gladiator Big Bear doesn’t skimp on tech or comfort. It’s equipped with the latest Uconnect 5 infotainment system, operated via a high-resolution 12.3-inch touchscreen. This system supports wireless Apple CarPlay and Android Auto, voice recognition, navigation, and customizable profiles.
Dual-zone automatic climate control, push-button start, remote vehicle start, and heated front seats are all included to make every ride — no matter how far off the beaten path — more enjoyable. For those cold early mornings or late-night camp setups, the heated steering wheel is a welcome touch.
The five-foot steel bed in the rear is practical and durable, offering integrated tie-downs and optional LED lighting. The three-position tailgate makes accessing gear easier than ever, while optional bed liners and tonneau covers are available for added protection and security.
Safety and Driver Confidence
While off-road capability may be the star of the show, safety in the Gladiator Big Bear is equally impressive. Jeep has included a wide array of active and passive safety systems to ensure that both driver and passengers are protected.
Key safety features include:
- Forward Collision Warning with Active Braking
- Blind Spot Monitoring and Rear Cross-Path Detection
- Adaptive Cruise Control
- ParkSense Rear Park Assist
- Rear backup camera
- Electronic Stability Control and Hill Start Assist
The Big Bear also benefits from high-strength steel construction, advanced airbag systems, and optional trail cameras that provide added visibility when navigating tough terrain.
Trim-Specific Features That Set It Apart
The Quick Order Package 24L Big Bear brings several exclusive upgrades that elevate the experience beyond that of the base Sport or Willys trims. Among the most notable features:
- Big Bear hood and tailgate decals
- All-terrain tires and unique black wheels
- Premium off-road suspension
- Rock protection rails
- Remote start system
- All-weather floor mats with Jeep logo
It’s clear that the Big Bear trim was developed for the driver who wants more than just a utilitarian truck. This is a Jeep built for those who live for the journey.
Price and Availability at Simi Valley CDJR
As of this writing, multiple units of the 2025 Gladiator Big Bear 4×4 are available for sale at Simi Valley Chrysler Dodge Jeep Ram. Pricing starts around the low $40,000 range, though dealership discounts have brought some models down as low as the upper $30,000s. This represents a significant value when you consider the package of capability, technology, and limited availability.
Buyers interested in reserving a unit or scheduling a test drive are encouraged to act quickly. Given the Big Bear’s unique California-only designation, availability will be limited and demand is expected to remain high throughout the year.
Final Word
The 2025 Jeep Gladiator Big Bear 4×4 is a bold expression of everything the Jeep brand stands for — capability, durability, and individuality. It’s purpose-built for those who refuse to compromise between work and play, between weekend adventure and weekday utility.
With an impressive suite of features, distinctive design cues, and serious off-road chops, the Big Bear is more than just another truck — it’s an invitation to take the road less traveled. And in Simi Valley, it’s available right now.
For those looking to make a statement and take command of every trail, the 2025 Gladiator Big Bear 4×4 is the truck to beat.
Connect with us


