




Simi Valley Chrysler Dodge Jeep Ram

Blog

Tire Repair Kit Explained - Mechanic Advice

Tire Repair Kit Explained

What a Tire Repair Kit Is, How to Use One, and When It’s Actually Safe

A flat tire can happen without warning, and many modern vehicles no longer come with a full-size spare. Instead, manufacturers often include a tire repair kit designed to temporarily restore mobility. While these kits can be useful in emergencies, they are often misunderstood.

This in-depth guide explains what a tire repair kit is, how different types work, how to use a tire repair kit properly, and when a tire repair kit should not be relied on as a permanent solution. The guidance aligns with tire and safety recommendations discussed across Simi Valley Chrysler Dodge Jeep Ram service resources.

For proper tire inspection and long-term repair, professional service at Simi Valley Chrysler Dodge Jeep Ram Service Center is always recommended.
https://www.simivalleychryslerdodgejeepram.com/service.aspx


What Is a Tire Repair Kit?

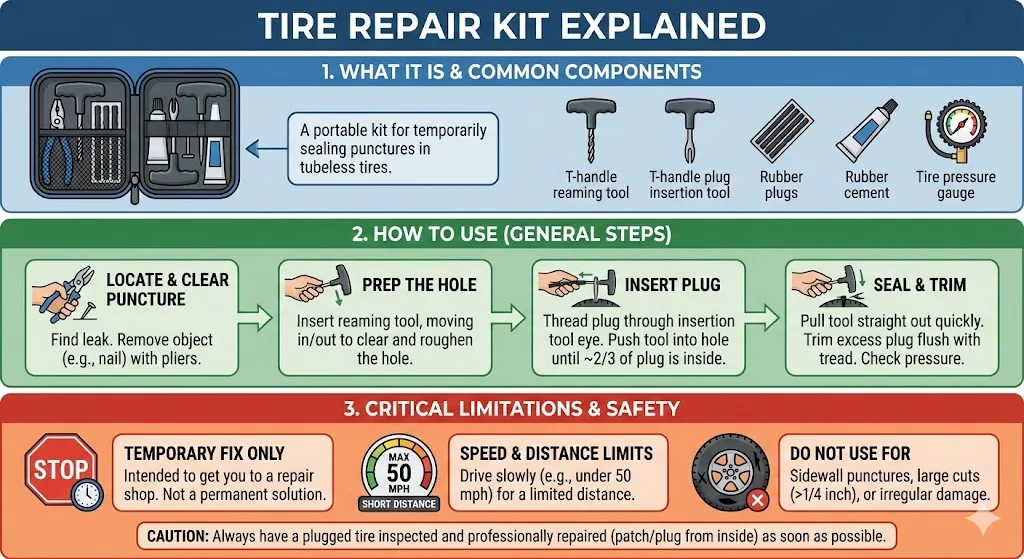
A tire repair kit is an emergency solution designed to temporarily seal a puncture and restore air pressure so you can safely drive to a repair facility. Tire repair kits vary by vehicle and purpose, but they generally fall into two categories:

  1. Plug-style tire repair kits
  2. Sealant-based flat tire repair kits

Some kits are designed specifically for tubeless tires, while others are compact sealant systems paired with a small air compressor.


Common Types of Tire Repair Kits

Flat Tire Repair Kit (Sealant + Compressor)

A flat tire repair kit typically includes:

  • Liquid sealant
  • Small electric air compressor
  • Inflation hose and power cable

These kits inject sealant into the tire and inflate it simultaneously. They are commonly supplied with newer vehicles in place of a spare tire.

Simi CDJR service articles often address the limitations of sealant-based systems and why professional inspection is required afterward.
https://www.simivalleychryslerdodgejeepram.com/blogs/5737


Tubeless Tire Repair Kit

A tubeless tire repair kit usually contains:

  • T-handle reaming tool
  • Plug insertion tool
  • Rubber plugs
  • Adhesive or rubber cement

These kits are used to physically plug a puncture in a tubeless tire’s tread area.


Bike Tire Repair Kit / Bicycle Tire Repair Kit

A bike tire repair kit or bicycle tire repair kit is specifically designed for:

  • Thinner tire casings
  • Lower air pressures
  • Inner tube or tubeless bicycle systems

These kits should never be used on automotive tires, as they are not designed for vehicle weight, speed, or load.


How to Use a Tire Repair Kit

One of the most common searches is how to use a tire repair kit, and the answer depends on the type of kit you have.


How to Use a Sealant-Based Flat Tire Repair Kit

This process applies to most factory-supplied flat tire repair kits.

Step 1: Park Safely

  • Pull over to a safe, flat location
  • Turn off the engine
  • Engage the parking brake

Step 2: Connect the Sealant

  • Attach the sealant hose to the tire valve
  • Plug the compressor into the vehicle’s power outlet

Step 3: Inflate the Tire

  • Turn on the compressor
  • Allow sealant and air to enter the tire
  • Inflate to the recommended pressure

Step 4: Drive Immediately

  • Drive for 5–10 minutes
  • This spreads the sealant inside the tire

After use, the tire must be professionally inspected, even if it appears to hold air.

Simi CDJR service technicians routinely clean and inspect tires after sealant use to ensure no internal damage exists.
https://www.simivalleychryslerdodgejeepram.com/service.aspx


How to Use a Tubeless Tire Repair Kit

Drivers also frequently search how to use tubeless tire repair kit. This applies to plug-style kits.

  1. Locate the puncture
  2. Remove the object
  3. Ream the hole
  4. Insert the plug
  5. Trim excess rubber
  6. Inflate tire
  7. Check for leaks

This method is typically considered a temporary repair, not a permanent fix.


Are Tire Repair Kits Permanent?

This is one of the most misunderstood aspects of tire repair kits.

Most tire repair kits are NOT permanent solutions.

Sealant kits:

  • Do not inspect internal tire structure
  • Can mask internal damage
  • Often void tire warranties

Plug kits:

  • Do not reinforce internal layers
  • Cannot detect belt separation

Professional tire repair standards require:

  • Tire removal
  • Internal inspection
  • Patch or patch-plug repair

Simi CDJR recommends professional evaluation after any tire repair kit use.
https://www.simivalleychryslerdodgejeepram.com/service.aspx


Does Tesla Come With a Tire Repair Kit?

Many drivers ask does Tesla come with a tire repair kit, especially Tesla Model 3 owners. Some Tesla vehicles include a sealant-based repair kit, while others do not.

Regardless of brand, the limitations of tire repair kits remain the same:

  • Temporary mobility only
  • Speed and distance restrictions
  • Mandatory professional inspection afterward

The same principles apply to Chrysler, Dodge, Jeep, and Ram vehicles equipped with repair kits instead of spare tires.


How to Use Tesla Tire Repair Kit Model 3 (General Principles)

Searches like how to use Tesla tire repair kit Model 3 reflect confusion around electric vehicles and tire repair. While procedures vary slightly by manufacturer, the fundamentals are the same:

  • Sealant + compressor
  • Temporary use only
  • Speed limitations
  • Immediate service required

Simi CDJR service guidance applies similar caution to all sealant-based systems.
https://www.simivalleychryslerdodgejeepram.com/service.aspx


When NOT to Use a Tire Repair Kit

Do not use a tire repair kit if:

  • Damage is on the sidewall
  • Tire has a blowout
  • Tire has multiple punctures
  • Wheel is damaged
  • Tire pressure dropped to zero at speed

In these cases, towing or tire replacement is the safest option.


Tire Repair Kit vs Spare Tire

Tire repair kit advantages:

  • Lightweight
  • Saves trunk space
  • Quick roadside use

Disadvantages:

  • Temporary repair
  • Limited effectiveness
  • Cannot repair large damage

Spare tire advantages:

  • True replacement
  • No sealant residue
  • No speed restrictions

Simi CDJR service teams can help drivers evaluate whether a spare tire conversion is appropriate.
https://www.simivalleychryslerdodgejeepram.com/service.aspx


How Long Can You Drive on a Tire Repaired With a Kit?

Most manufacturers recommend:

  • Driving no more than 50–100 miles
  • Staying below highway speeds
  • Visiting a service center immediately

Driving longer than recommended increases the risk of tire failure.


Are Tire Repair Kits Safe?

Tire repair kits are safe only when used correctly and temporarily.

They are unsafe when:

  • Used as permanent repairs
  • Used on sidewall damage
  • Ignored without follow-up inspection

Safety systems like ABS and traction control depend on tire integrity.


Professional Tire Repair at Simi CDJR

At Simi Valley Chrysler Dodge Jeep Ram, tire service includes:

  • Internal tire inspection
  • Proper patch installation
  • Sealant cleanup
  • TPMS sensor inspection
  • Tire replacement if necessary

This ensures your vehicle remains safe at highway speeds and under load.
https://www.simivalleychryslerdodgejeepram.com/service.aspx


Final Thoughts

A tire repair kit is an emergency mobility solution — not a permanent fix. While it can help you get back on the road temporarily, it does not replace professional tire repair or replacement.

If you’ve used a tire repair kit, or your vehicle came equipped with one instead of a spare, schedule a tire inspection at Simi Valley Chrysler Dodge Jeep Ram Service Center to ensure long-term safety and reliability.
https://www.simivalleychryslerdodgejeepram.com/service.aspx

Recommended Posts

Turbocharger Wastegate Problems: How Small Mechanical Faults Can Affect Boost Control

Turbocharger Wastegate Problems: How Small Mechanical Faults Can Affect Boost Control

Turbocharger problems are often associated with failure of the entire unit. Loss of power, unstable boost, or unusual noise under acceleration may suggest that the turbocharger itself is worn out. Yet boost control depends on more than the compressor wheel, turbine, and bearings. The wastegate regulates exhaust energy reaching the turbine, keeping turbocharger speed and boost pressure within the intended range. When its flap, shaft, linkage, or related hardware wears, the symptoms can resemble a larger failure. This is why a Wastegate Repair Kit may be relevant when the turbocharger core remains serviceable but its boost-control mechanism has localized wear. What Happens When the Wastegate Mechanism Wears Wastegate wear usually appears as changes in boost behaviour rather than one clear symptom. Excessive clearance around the flap or shaft can cause a metallic rattle, while poor sealing may let exhaust gas bypass the turbine too early. This can result in underboost, weaker acceleration, or inconsistent response across the RPM range. If the mechanism fails to open correctly, excessive boost may develop and trigger engine-management intervention. Typical symptoms include: Boost pressure differing from the expected target. Underboost during acceleration or sustained load. Overboost or boost-control warnings. Intermittent power delivery. Rattling near the turbocharger. Reduced response at certain RPM ranges. These symptoms do not confirm a wastegate fault. Leaks, actuators, sensors, control valves, hoses, software issues, or internal turbocharger damage can behave similarly. Diagnosis should compare commanded and actual boost while checking the wastegate's mechanical operation. Why Replacing the Entire Turbo May Be Excessive A turbocharger can develop localized mechanical wear without its complete assembly failing. Compressor and turbine wheels, bearings, shaft, housings, and lubrication systems may remain serviceable while the wastegate deteriorates. A precise repair separates the failed component from parts that are still usable, avoiding unnecessary replacement of the entire unit. The decision should follow a complete inspection. A technician should determine whether there is: Significant rotating-assembly damage. Excessive shaft movement or bearing wear. Damaged compressor or turbine wheels. Housing damage affecting safe operation. A fault limited to the wastegate mechanism. If the core remains sound and the fault is clearly localized, targeted repair may be appropriate. Complete replacement can still be justified by secondary damage, thermal distortion, severe corrosion, or extensive wear. The key is to establish the condition of the whole turbocharger first. When a Targeted Repair Is the Better Approach When diagnostics confirm localized wastegate wear and the rest of the turbocharger remains serviceable, targeted repair can be more logical than replacing the complete assembly. A Wastegate Repair Kit may allow worn components to be replaced while retaining sound original parts. Compatibility must be confirmed for the specific turbocharger design and application. Repair should begin with inspection rather than simple parts selection. The technician needs to identify why the mechanism stopped working correctly and which components have deteriorated. Particular attention should be given to: Flap and shaft condition. Mechanical play and seating surfaces. Linkage and actuator movement. Heat damage, corrosion, or distortion. Condition of the rotating assembly. A component that fits physically but does not reproduce the original geometry can create another boost-control problem. Part quality is also critical. A wastegate operates under high temperatures, vibration, repeated movement, and strong exhaust-gas forces, so correct dimensions and materials directly affect the function of the flap, shaft, and related components.

/What is the Most Common Problem with the Jeep Grand Cherokee

What is the Most Common Problem with the Jeep Grand Cherokee

The Most Common Problem with the Jeep Grand Cherokee: What Every Owner Should Know The Jeep Grand Cherokee has a reputation that’s equal parts rugged capability and frustrating reliability. It can tow, crawl over rocks, and haul the family in comfort. But if you talk to enough owners—or spend time digging through complaint databases—you’ll notice a pattern. One issue comes up again and again. The most common problem with the Jeep Grand Cherokee is electrical system failure. That’s not just a minor annoyance. Electrical gremlins can leave you stranded, drain your battery overnight, or cause a chain reaction of warning lights that makes you wonder if the whole SUV is falling apart. Here’s a closer look at what goes wrong, which models are most affected, and what you can do about it. WHY ELECTRICAL ISSUES TOP THE LIST Across multiple model years, electrical complaints dominate owner reports and NHTSA data. For the 2024 Grand Cherokee, owners frequently report engines losing power, batteries dying, exterior lighting malfunctioning, and infotainment systems freezing. But the problem isn’t new. Older generations have their own electrical headaches, especially the infamous TIPM. The TIPM Problem The Totally Integrated Power Module (TIPM) is a fuse box on steroids. It controls fuel pump operation, lighting, wipers, and more. When it fails—and it often does—you might experience: - A fuel pump that won’t prime or stops working - Wipers that run nonstop or won’t turn on - Random warning lights - Battery drain that kills the battery overnight Replacing a TIPM isn’t cheap, and diagnosing the issue can be a nightmare because the symptoms mimic other problems. Battery Drain and Infotainment Glitches Modern Grand Cherokees are rolling computers. That means parasitic battery drains, unresponsive touchscreens, and software bugs are common. Some owners have replaced batteries multiple times only to find the real culprit is a faulty module that never sleeps. OTHER COMMON PROBLEMS WORTH KNOWING While electrical faults are the most frequent, they aren’t the only issues. If you’re shopping for a Grand Cherokee, keep these in mind too. Transmission Trouble Rough shifting, delayed engagement, and occasional slipping into neutral are common complaints, especially in model years from 2005 through 2015. Some owners describe a “clunk” when shifting from park to drive. Engine and Cooling Issues The 2024 model has seen reports of stalling, overheating, and excessive oil consumption. Older models (2011–2014) have fuel-related stalling complaints, often at higher mileage. Suspension Recall Jeep recently recalled over 328,000 Grand Cherokees from 2021–2023 because rear coil springs could detach while driving. It’s the third recall for the same problem, which tells you something about persistence. MODEL YEARS TO WATCH Based on complaint data, these model years are often flagged as ones to approach with caution: - 2011 - 2012 - 2014 - 2015 - 2018 - 2021–2024 That doesn’t mean every single one is a lemon. But electrical failure rates on some of these years are up to 3.2 times the model’s median. If you’re buying used, a pre-purchase inspection by a mechanic who knows Jeeps is worth every penny. WHAT YOU CAN DO If you own a Grand Cherokee or plan to buy one: 1. Check for recalls using your VIN on the NHTSA website. 2. Scan for stored codes before buying. Electrical issues often leave ghost codes. 3. Test the battery and charging system—a weak battery can trigger dozens of false warnings. 4. Consider an extended warranty if you’re buying an older model with known electrical quirks. 5. Join owner forums to learn the specific workarounds for your model year. THE BOTTOM LINE The Jeep Grand Cherokee is still a capable, comfortable, and iconic SUV. But its Achilles’ heel is the electrical system. From TIPM failures to battery drains and infotainment glitches, these problems are the most common complaints among owners. If you can look past them—or budget for repairs—you’ll enjoy everything else the Grand Cherokee does well. Just don’t ignore the warning signs. Have you dealt with electrical issues in your Grand Cherokee? Share your story in the comments—it might help another owner avoid the same headache.

Freightliner Bumpers and Cascadia Fairing Panels for a Stronger, Sleeker Truck

Shop durable Freightliner truck bumpers and Cascadia fairing panels for sale. Precise-fit exterior components for 2008-2017 and 2018+ trucks with fast shipping and expert support. Keeping a Freightliner Cascadia in top condition is about more than the engine under the hood — the exterior body components play a huge role in how the truck performs, looks, and holds its value. Side fairings, step skirts, and front-end pieces all work together to cut drag, protect vulnerable systems, and give the rig a clean, professional presence on the road. Operators searching for quality freightliner bumpers for sale often find that upgrading the entire front and side profile delivers the biggest return. When you pair durable freightliner truck bumpers with well-fitted aerodynamic panels, your Cascadia gains both protection and efficiency in one smart upgrade. The Value of a Complete Exterior Upgrade A truck's exterior is its first line of defense and its calling card all at once. Aerodynamic fairing panels smooth the airflow around the fuel tanks and drive area, lowering wind resistance and helping every gallon of diesel go further. A solid front end absorbs impacts and shields the radiator and cooling system from road debris. Together these components reduce long-term repair costs while keeping the truck looking sharp mile after mile. Over time, that combination of efficiency and protection adds up to real savings, since a truck that burns less fuel and stays out of the repair bay simply earns more for its owner on every route. At tacoma-truckparts.com, the Cascadia selection covers front, middle, and rear fairing panels, step skirts, extensions, and complete sets for both driver and passenger sides. Whether you run a 2008-2017 model or a 2018-and-newer truck, there are pieces engineered to match your exact frame and factory mounting points. Precision Fit for Every Model Year Fitment is everything with exterior body components. Panels and front-end pieces built for your specific model year line up cleanly with existing hardware, so installation is straightforward and the finished surface sits flush and secure. Durable materials stand up to road spray, gravel, and constant vibration, keeping the truck looking its best season after season. Reinforced panels and aluminum step skirts add both function and a polished, professional finish that owner-operators take pride in. Choosing correctly-sized components also protects everything around them. Well-fitted fairings shield tanks, steps, and wiring from flying debris, while a strong front end guards the systems behind it. That kind of protection keeps your Cascadia earning out on the highway instead of sitting in the shop. Efficiency, Protection, and Uptime Downtime is expensive, which is why fast order processing and dependable availability matter as much as the parts themselves. Orders ship quickly, backed by knowledgeable support that understands the daily demands facing fleet managers and independent drivers alike. Being able to find the exact panel, skirt, or front-end piece you need without guesswork keeps maintenance simple and predictable. Investing in your Cascadia's exterior is a smart move for fuel economy, curb appeal, and long-term resale value. With aerodynamic fairings and dependable front-end components working together, your truck cuts cleanly through the wind, looks its best, and stays ready for the next long haul. A well-maintained, polished rig also builds trust with customers and makes a strong impression during inspections. Browse the full selection today and give your Freightliner Cascadia the efficient, protected, road-ready finish it truly deserves.