


Simi Valley Chrysler Dodge Jeep Ram

Blog

Does Your Transmission Need to Warm Up Before a Fluid Change? The Definitive Guide

does transmission need to warm up before a fluid change

Yes, in most cases, it is better to warm up the transmission before changing the fluid, but you do not need to make it dangerously hot.

The simple answer is this: warm transmission fluid drains faster and carries more suspended contaminants out with it, but the final fluid level must be checked exactly the way the manufacturer specifies. That last part matters most. Some transmissions need the fluid checked hot, some warm, some at a specific scan-tool temperature, and some with the engine running.

Mobil says transmission fluid drains better at operating temperature and recommends letting the vehicle idle for a few minutes before draining. For some Ram transmissions, Mopar says the fluid level is best checked at normal operating temperature, around 158 to 176°F, or 70 to 80°C.

Why Warm Transmission Fluid Drains Better

Transmission fluid gets thinner when it warms up.

That means it flows out faster when you remove the drain plug or transmission pan. Warm fluid can also carry more suspended clutch material, metal particles, and old fluid residue out of the transmission.

Cold fluid is thicker. It drains slower and may leave more old fluid behind in the pan, valve body area, and passages.

That is why many mechanics prefer a warm transmission fluid change instead of a cold one.

Warm Does Not Mean Burning Hot

You do not need to drive for an hour or make the transmission extremely hot.

For most DIY drain-and-fill jobs, a short drive or a few minutes of idling is enough to warm the fluid slightly. The goal is to make the fluid flow better, not to create a burn hazard.

Hot ATF can burn skin. Exhaust parts, transmission pans, catalytic converters, and nearby components can also be dangerously hot.

A safe DIY approach is usually:

Drive gently for 5 to 10 minutes.

Park on a level surface.

Let the vehicle sit briefly if it is too hot to work around safely.

Use gloves and eye protection.

Drain carefully.

If the pan or exhaust is too hot to touch safely, wait.

The Fluid Level Check Is the Real Key

Warming the transmission before draining is helpful, but checking the final level correctly is critical.

Automatic transmission fluid expands as it heats up. That means the fluid level reading changes with temperature. If you fill it cold when the procedure requires hot, you may underfill or overfill it. If you check it with the engine off when the procedure requires engine running, the reading may be wrong.

That is where many DIY mistakes happen.

Car Talk explains that transmission fluid checking procedures vary by vehicle. Some are checked warm with the engine running, some are checked with the engine off, and some require a specific fluid temperature.

So the best answer is not “always hot” or “always cold.” The best answer is: follow the exact service procedure for your vehicle.

Dipstick Transmissions vs Sealed Transmissions

Older transmissions often have a dipstick.

These are usually easier for DIYers because you can check fluid level from the engine bay. Many dipstick transmissions have hot and cold marks, but the correct reading still depends on the manufacturer’s instructions.

Newer transmissions often do not have a traditional dipstick. These are sometimes called sealed transmissions, even though they still have fluid and may still be serviceable. They often require a fill plug, level plug, scan tool, or instrument-cluster temperature reading.

CarCareKiosk notes that vehicles without a transmission dipstick often use a check valve or plug underneath, and the vehicle must be level when the fluid is checked.

That is why sealed transmissions are more difficult for DIY fluid changes.

Should You Warm Up a Manual Transmission?

Manual transmissions are different.

A manual gearbox does not usually have the same fluid-level temperature sensitivity as many automatic transmissions. Warming the fluid can still help it drain faster, but the level is often checked by the fill plug height rather than a hot/cold dipstick mark.

Still, use the correct gear oil or manual transmission fluid. Do not assume automatic transmission fluid and manual transmission fluid are interchangeable.

Drain-and-Fill vs Flush

A drain-and-fill removes only part of the transmission fluid.

A lot of old fluid can remain in the torque converter, cooler lines, valve body, and internal passages. That is normal. Some owners repeat drain-and-fill service after driving for a short period to gradually refresh more of the fluid.

A flush replaces more fluid, but it should be done carefully and with the correct fluid. On a neglected high-mileage transmission, an aggressive flush can sometimes expose existing problems. The fluid change did not always “cause” the failure, but it may reveal a transmission that was already worn.

For many DIYers, a simple drain-and-fill with the correct fluid is the safer approach.

Should You Change the Filter Too?

If your transmission has a serviceable filter, replacing it during a pan-drop service is often smart.

Some filters are inside the pan and easy to access once the pan is removed. Others are internal and require deeper disassembly. Some modern transmissions use integrated pan/filter assemblies.

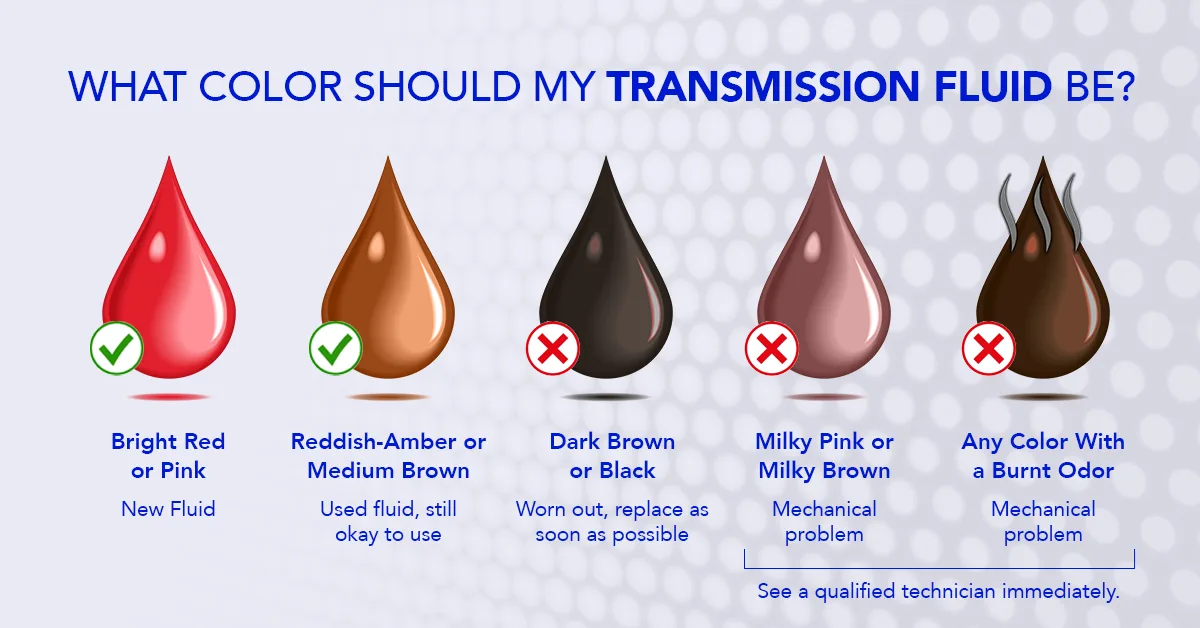
If the transmission pan is coming off, inspect the magnet, pan debris, gasket, and filter. A light film of gray material on the magnet can be normal. Large metal chunks, heavy debris, burnt smell, or black fluid are warning signs.

What Happens If You Check the Fluid at the Wrong Temperature?

You can end up with the wrong fluid level.

An underfilled transmission may slip, shift harshly, hesitate, overheat, or damage clutch packs.

An overfilled transmission can foam the fluid, cause erratic shifting, leaks, overheating, and pressure problems.

This is why many modern service procedures specify a narrow fluid temperature range. The fluid level is only accurate when the transmission is in that range.

For example, the Mopar Ram procedure says level checking is best at normal operating temperature and that the engine should remain running during the procedure.

Can You Change Transmission Fluid Cold?

Yes, you can drain transmission fluid cold, but it may not be ideal.

Cold fluid drains slower. It may leave more old fluid behind. It may also make it harder to estimate refill amount if the service procedure depends on operating temperature.

However, some DIYers prefer cold drain-and-fill work because it reduces burn risk and allows a measured “same amount out, same amount in” approach. That can work only if the transmission was already at the correct level before draining and the vehicle’s service procedure allows a proper final level check afterward.

The safest plan is still to perform the final level check by the book.

How Warm Should the Transmission Be?

For a basic DIY service, warm enough to flow well is usually enough.

For the final level check, the correct temperature depends on the vehicle. Some procedures specify a range around normal operating temperature. Others require a scan tool reading, dashboard transmission temperature display, or fluid temperature chart.

Do not guess if the vehicle has no dipstick. Look up the official procedure first.

How to Warm the Transmission Properly

To warm the transmission before a fluid change, drive gently for a short time.

A normal 5 to 10 minute drive is usually enough for a drain-and-fill. Shift through all gears, drive normally, and avoid hard acceleration. The goal is not to overheat the fluid.

If the procedure requires the final level to be checked hot, you may need to bring the transmission to the exact target range after refilling. That may require idling, shifting through gear positions, using a scan tool, or driving until the temperature is correct.

Use the Exact Transmission Fluid Spec

Do not guess on fluid type.

Transmissions are extremely sensitive to fluid chemistry, friction modifiers, viscosity, and manufacturer specifications. The wrong fluid can cause harsh shifts, slipping, shudder, overheating, and long-term damage.

For Ram, Dodge, Jeep, Chrysler, Toyota, Honda, Ford, GM, Nissan, Hyundai, Kia, BMW, Mercedes-Benz, and other brands, use the fluid spec listed in the owner’s manual or service information.

“Universal” fluid should only be used if it clearly lists your required specification.

Do Not Change Fluid If the Transmission Is Already Failing Without Diagnosis

If the transmission is slipping, banging into gear, flaring shifts, overheating, or full of burnt fluid, do not assume a fluid change will fix it.

A fluid change can help if the issue is low, old, or wrong fluid. But if clutches are worn, solenoids are failing, or the torque converter is damaged, fluid alone may not solve the problem.

A fluid service on a failing transmission should be done with realistic expectations.

DIY Transmission Fluid Change Checklist

Use the correct fluid.

Use the correct filter and gasket if applicable.

Warm the fluid slightly before draining.

Keep the vehicle level.

Measure what comes out.

Inspect the old fluid.

Inspect the pan and magnet.

Replace the filter if serviceable.

Torque pan bolts correctly.

Refill slowly.

Check level using the manufacturer procedure.

Do not overfill.

Test drive gently.

Recheck for leaks.

FAQs About Warming Up Transmission Fluid

Does transmission fluid need to be warm before changing it?

It is usually better if it is warm because warm fluid drains faster and carries more contaminants out. But it does not need to be dangerously hot.

Can you change transmission fluid cold?

Yes, but cold fluid drains more slowly and may leave more old fluid behind. The final level still needs to be checked according to the vehicle’s service procedure.

Should the engine be running when checking transmission fluid?

It depends on the vehicle. Many automatic transmissions are checked with the engine running, but some are not. Always follow the owner’s manual or service procedure.

Why does transmission fluid level change when hot?

Transmission fluid expands as it warms up. That is why hot and cold readings can differ and why many transmissions require a specific temperature range for accurate level checking.

Is a transmission flush better than a drain-and-fill?

Not always. A drain-and-fill is often safer and simpler for DIYers. A flush replaces more fluid but should be done correctly and may not be ideal for neglected high-mileage transmissions.

Can changing transmission fluid cause problems?

Changing fluid does not usually damage a healthy transmission. But if the transmission is already worn or failing, fresh fluid may reveal existing issues. Wrong fluid or wrong level can definitely cause problems.

Final Thoughts: Warm It Up, But Check It Correctly

A transmission does not have to be fully hot before a fluid change, but warming it up is usually helpful.

Warm fluid drains better, flows faster, and can carry more old material out of the transmission. But the most important step is not the drain temperature. It is the final fluid-level check.

Use the correct fluid, keep the vehicle level, avoid burns, and follow the exact service procedure for your transmission. That is what separates a proper fluid change from an expensive mistake.

Recommended Posts

Turbocharger Wastegate Problems: How Small Mechanical Faults Can Affect Boost Control

Turbocharger Wastegate Problems: How Small Mechanical Faults Can Affect Boost Control

Turbocharger problems are often associated with failure of the entire unit. Loss of power, unstable boost, or unusual noise under acceleration may suggest that the turbocharger itself is worn out. Yet boost control depends on more than the compressor wheel, turbine, and bearings. The wastegate regulates exhaust energy reaching the turbine, keeping turbocharger speed and boost pressure within the intended range. When its flap, shaft, linkage, or related hardware wears, the symptoms can resemble a larger failure. This is why a Wastegate Repair Kit may be relevant when the turbocharger core remains serviceable but its boost-control mechanism has localized wear. What Happens When the Wastegate Mechanism Wears Wastegate wear usually appears as changes in boost behaviour rather than one clear symptom. Excessive clearance around the flap or shaft can cause a metallic rattle, while poor sealing may let exhaust gas bypass the turbine too early. This can result in underboost, weaker acceleration, or inconsistent response across the RPM range. If the mechanism fails to open correctly, excessive boost may develop and trigger engine-management intervention. Typical symptoms include: Boost pressure differing from the expected target. Underboost during acceleration or sustained load. Overboost or boost-control warnings. Intermittent power delivery. Rattling near the turbocharger. Reduced response at certain RPM ranges. These symptoms do not confirm a wastegate fault. Leaks, actuators, sensors, control valves, hoses, software issues, or internal turbocharger damage can behave similarly. Diagnosis should compare commanded and actual boost while checking the wastegate's mechanical operation. Why Replacing the Entire Turbo May Be Excessive A turbocharger can develop localized mechanical wear without its complete assembly failing. Compressor and turbine wheels, bearings, shaft, housings, and lubrication systems may remain serviceable while the wastegate deteriorates. A precise repair separates the failed component from parts that are still usable, avoiding unnecessary replacement of the entire unit. The decision should follow a complete inspection. A technician should determine whether there is: Significant rotating-assembly damage. Excessive shaft movement or bearing wear. Damaged compressor or turbine wheels. Housing damage affecting safe operation. A fault limited to the wastegate mechanism. If the core remains sound and the fault is clearly localized, targeted repair may be appropriate. Complete replacement can still be justified by secondary damage, thermal distortion, severe corrosion, or extensive wear. The key is to establish the condition of the whole turbocharger first. When a Targeted Repair Is the Better Approach When diagnostics confirm localized wastegate wear and the rest of the turbocharger remains serviceable, targeted repair can be more logical than replacing the complete assembly. A Wastegate Repair Kit may allow worn components to be replaced while retaining sound original parts. Compatibility must be confirmed for the specific turbocharger design and application. Repair should begin with inspection rather than simple parts selection. The technician needs to identify why the mechanism stopped working correctly and which components have deteriorated. Particular attention should be given to: Flap and shaft condition. Mechanical play and seating surfaces. Linkage and actuator movement. Heat damage, corrosion, or distortion. Condition of the rotating assembly. A component that fits physically but does not reproduce the original geometry can create another boost-control problem. Part quality is also critical. A wastegate operates under high temperatures, vibration, repeated movement, and strong exhaust-gas forces, so correct dimensions and materials directly affect the function of the flap, shaft, and related components.

/What is the Most Common Problem with the Jeep Grand Cherokee

What is the Most Common Problem with the Jeep Grand Cherokee

The Most Common Problem with the Jeep Grand Cherokee: What Every Owner Should Know The Jeep Grand Cherokee has a reputation that’s equal parts rugged capability and frustrating reliability. It can tow, crawl over rocks, and haul the family in comfort. But if you talk to enough owners—or spend time digging through complaint databases—you’ll notice a pattern. One issue comes up again and again. The most common problem with the Jeep Grand Cherokee is electrical system failure. That’s not just a minor annoyance. Electrical gremlins can leave you stranded, drain your battery overnight, or cause a chain reaction of warning lights that makes you wonder if the whole SUV is falling apart. Here’s a closer look at what goes wrong, which models are most affected, and what you can do about it. WHY ELECTRICAL ISSUES TOP THE LIST Across multiple model years, electrical complaints dominate owner reports and NHTSA data. For the 2024 Grand Cherokee, owners frequently report engines losing power, batteries dying, exterior lighting malfunctioning, and infotainment systems freezing. But the problem isn’t new. Older generations have their own electrical headaches, especially the infamous TIPM. The TIPM Problem The Totally Integrated Power Module (TIPM) is a fuse box on steroids. It controls fuel pump operation, lighting, wipers, and more. When it fails—and it often does—you might experience: - A fuel pump that won’t prime or stops working - Wipers that run nonstop or won’t turn on - Random warning lights - Battery drain that kills the battery overnight Replacing a TIPM isn’t cheap, and diagnosing the issue can be a nightmare because the symptoms mimic other problems. Battery Drain and Infotainment Glitches Modern Grand Cherokees are rolling computers. That means parasitic battery drains, unresponsive touchscreens, and software bugs are common. Some owners have replaced batteries multiple times only to find the real culprit is a faulty module that never sleeps. OTHER COMMON PROBLEMS WORTH KNOWING While electrical faults are the most frequent, they aren’t the only issues. If you’re shopping for a Grand Cherokee, keep these in mind too. Transmission Trouble Rough shifting, delayed engagement, and occasional slipping into neutral are common complaints, especially in model years from 2005 through 2015. Some owners describe a “clunk” when shifting from park to drive. Engine and Cooling Issues The 2024 model has seen reports of stalling, overheating, and excessive oil consumption. Older models (2011–2014) have fuel-related stalling complaints, often at higher mileage. Suspension Recall Jeep recently recalled over 328,000 Grand Cherokees from 2021–2023 because rear coil springs could detach while driving. It’s the third recall for the same problem, which tells you something about persistence. MODEL YEARS TO WATCH Based on complaint data, these model years are often flagged as ones to approach with caution: - 2011 - 2012 - 2014 - 2015 - 2018 - 2021–2024 That doesn’t mean every single one is a lemon. But electrical failure rates on some of these years are up to 3.2 times the model’s median. If you’re buying used, a pre-purchase inspection by a mechanic who knows Jeeps is worth every penny. WHAT YOU CAN DO If you own a Grand Cherokee or plan to buy one: 1. Check for recalls using your VIN on the NHTSA website. 2. Scan for stored codes before buying. Electrical issues often leave ghost codes. 3. Test the battery and charging system—a weak battery can trigger dozens of false warnings. 4. Consider an extended warranty if you’re buying an older model with known electrical quirks. 5. Join owner forums to learn the specific workarounds for your model year. THE BOTTOM LINE The Jeep Grand Cherokee is still a capable, comfortable, and iconic SUV. But its Achilles’ heel is the electrical system. From TIPM failures to battery drains and infotainment glitches, these problems are the most common complaints among owners. If you can look past them—or budget for repairs—you’ll enjoy everything else the Grand Cherokee does well. Just don’t ignore the warning signs. Have you dealt with electrical issues in your Grand Cherokee? Share your story in the comments—it might help another owner avoid the same headache.

Freightliner Bumpers and Cascadia Fairing Panels for a Stronger, Sleeker Truck

Shop durable Freightliner truck bumpers and Cascadia fairing panels for sale. Precise-fit exterior components for 2008-2017 and 2018+ trucks with fast shipping and expert support. Keeping a Freightliner Cascadia in top condition is about more than the engine under the hood — the exterior body components play a huge role in how the truck performs, looks, and holds its value. Side fairings, step skirts, and front-end pieces all work together to cut drag, protect vulnerable systems, and give the rig a clean, professional presence on the road. Operators searching for quality freightliner bumpers for sale often find that upgrading the entire front and side profile delivers the biggest return. When you pair durable freightliner truck bumpers with well-fitted aerodynamic panels, your Cascadia gains both protection and efficiency in one smart upgrade. The Value of a Complete Exterior Upgrade A truck's exterior is its first line of defense and its calling card all at once. Aerodynamic fairing panels smooth the airflow around the fuel tanks and drive area, lowering wind resistance and helping every gallon of diesel go further. A solid front end absorbs impacts and shields the radiator and cooling system from road debris. Together these components reduce long-term repair costs while keeping the truck looking sharp mile after mile. Over time, that combination of efficiency and protection adds up to real savings, since a truck that burns less fuel and stays out of the repair bay simply earns more for its owner on every route. At tacoma-truckparts.com, the Cascadia selection covers front, middle, and rear fairing panels, step skirts, extensions, and complete sets for both driver and passenger sides. Whether you run a 2008-2017 model or a 2018-and-newer truck, there are pieces engineered to match your exact frame and factory mounting points. Precision Fit for Every Model Year Fitment is everything with exterior body components. Panels and front-end pieces built for your specific model year line up cleanly with existing hardware, so installation is straightforward and the finished surface sits flush and secure. Durable materials stand up to road spray, gravel, and constant vibration, keeping the truck looking its best season after season. Reinforced panels and aluminum step skirts add both function and a polished, professional finish that owner-operators take pride in. Choosing correctly-sized components also protects everything around them. Well-fitted fairings shield tanks, steps, and wiring from flying debris, while a strong front end guards the systems behind it. That kind of protection keeps your Cascadia earning out on the highway instead of sitting in the shop. Efficiency, Protection, and Uptime Downtime is expensive, which is why fast order processing and dependable availability matter as much as the parts themselves. Orders ship quickly, backed by knowledgeable support that understands the daily demands facing fleet managers and independent drivers alike. Being able to find the exact panel, skirt, or front-end piece you need without guesswork keeps maintenance simple and predictable. Investing in your Cascadia's exterior is a smart move for fuel economy, curb appeal, and long-term resale value. With aerodynamic fairings and dependable front-end components working together, your truck cuts cleanly through the wind, looks its best, and stays ready for the next long haul. A well-maintained, polished rig also builds trust with customers and makes a strong impression during inspections. Browse the full selection today and give your Freightliner Cascadia the efficient, protected, road-ready finish it truly deserves.